
Looking For A New Hobby? 40 Original DIY Designs With Beads Every Beginner (And Experienced) Artisan Will Love
Craft ideas using beads are convenient and less time-consuming. Beads come in many shapes, sizes, and colors, so you can find the perfect ones to create the look you want. In addition, beading is a very versatile craft that can be used for various projects, including jewelry-making, embroidery, and even furniture decoration.
Another great thing about bead crafting is that it’s a relatively affordable hobby. You may buy all sorts of materials and tools online or at your local craft store, and you won’t break the bank. Bead crafts are perfect if you wish to spruce up your home or need a last-minute gift idea.
If you want something to spend your free time, and you’re looking for something that doesn’t require a lot of money or equipment, keep reading!
1. Sun-catcher using reflective beads
Adults and kids will enjoy making a sun catcher for the windows. All you need are some reflective beads and a sunny window. The best method to do this is to string the beads onto a piece of fishing line or some other type of sturdy thread.
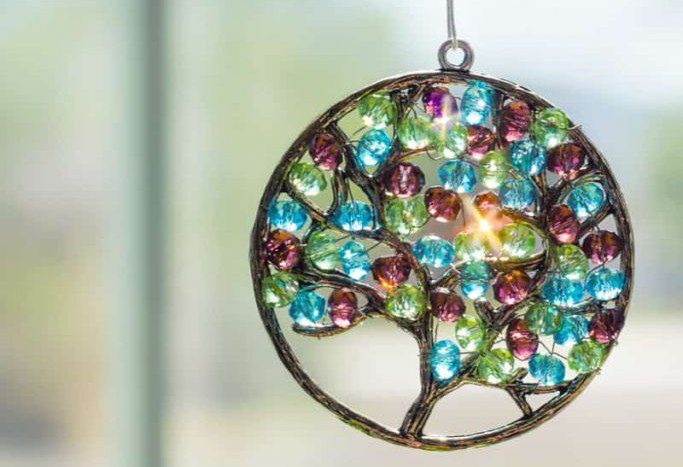
Then, hang the line in a spot where it will get direct sunlight. You may also weave these beads inside a circular frame and hang in on a window. You’ll witness the beads sparkling and shining in just a few minutes. It’s pretty beautiful to watch as the sunshine falls over it.
2. Wooden beads trivet
This is a great DIY for those who wish to add a little bit of rural charm to the kitchen. It would add some extra personality to your kitchen decor. Use up those different wooden beads lying around the house. Get some same-size wooden beads, wire, and a hot glue gun to make the trivet.
Attach the wooden beads in any pattern you like, or do a basic circular shape for the trivet. You may weave these in the wire and then glue them in a circular or rectangular shape with some hot glue. It’ll be ready to place on the dining table once the glue is dry.
3. Drink covers
These drink covers are genius because they leave space for the straw to go through. This way, you’ll avoid the straw getting wet or the drink cover falling off. Plus, they’re made from plastic beads, so they’re safe to use in the dishwasher.
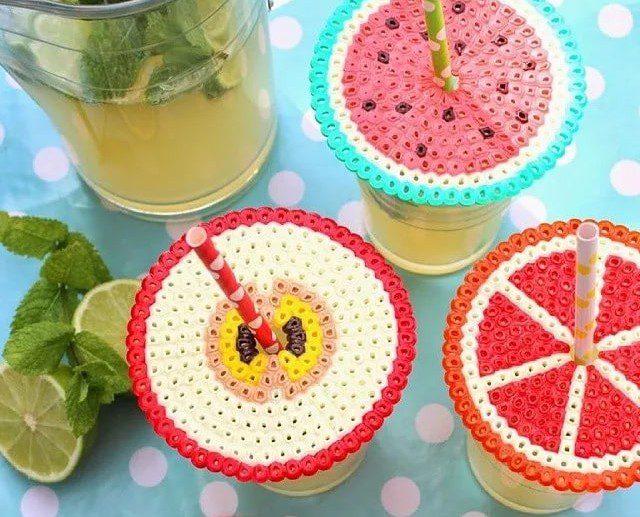
You can make your drink cover using beads in any color you like. Choose any fun shapes and designs to cover the glass circumference. Lay the beads in a circular shape and cover them with fabric before using a hot iron. The last step is melting the beads to connect them.
4. Beaded planter covers
You may need a few items to make your beaded planter cover. First, you’ll need a good quality beading needle with a large eye that can easily fit through the holes in your beads. You’ll also need some strong thread or string and a tapestry needle.
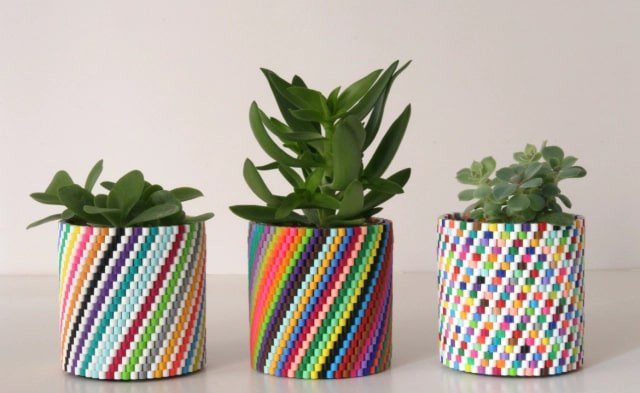
Begin by threading your beading needle with about 30 inches of thread. Knot the ends together, then secure a loop in the center of the cord. Make the holder a little bigger to accommodate the planter. You can use different patterns for each planter.
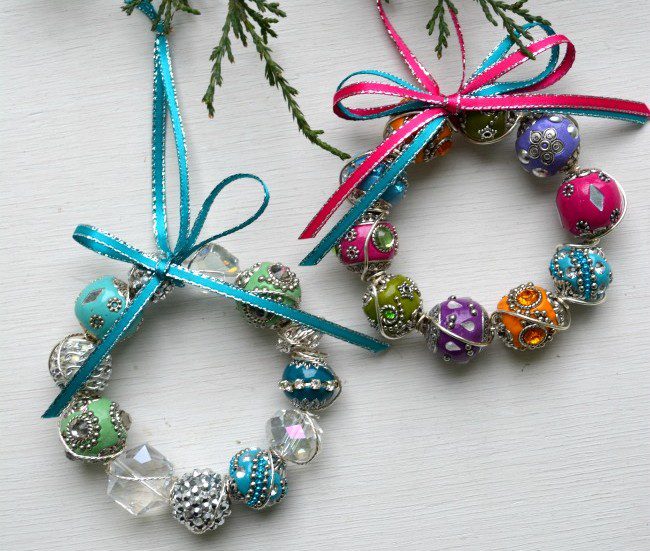
5. Glass bead ornaments
You could make glass bead ornaments for Christmas. Grab craft supplies, a hot glue gun, and some imagination. Get different-colored glass beads, wire, a hot glue gun, and pliers. You might also want to use a metal ornament hanger or a piece of ribbon to hang your ornaments.
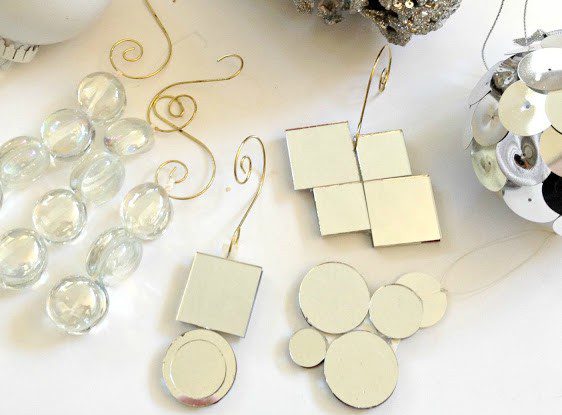
Use the pliers to twist the wires into a loop at one end. This part is going to be the adornment’s hanger. Then, start hot-gluing the beads onto the wire in any design you like. Make a note to use plenty of glue so they won’t fall off later. Let them dry before hanging.
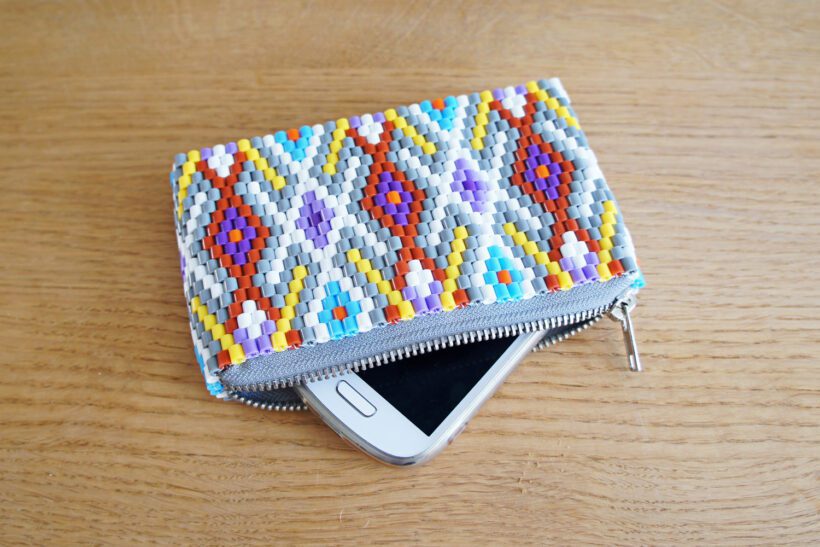
6. Patterned amulet bag
You can choose a bunch of random colors for a more interesting and eye-catching bag. You may also experiment with patterns, such as stripes or zig-zags. It’s an awesome project for those who’d like to learn how to make patterns with beads. It’s easy and exciting, and the results are stunning.
On top of that, you can choose the tones you appreciate, so it’s perfect for customizing your look. Pick the pattern you want to create. You can use any type of pattern or just freestyle it. Apart from beads, you may also use crystals, gemstones, wood beads, or other natural materials rather than artificial ones.
7. Wooden beaded keychain
Some people might think that making a keychain out of wooden beads takes a long time. But for those who appreciate the artistry and craftsmanship that goes into making something beautiful, it’s worth taking the time to do it. Moreover, you may gift it to loved ones.
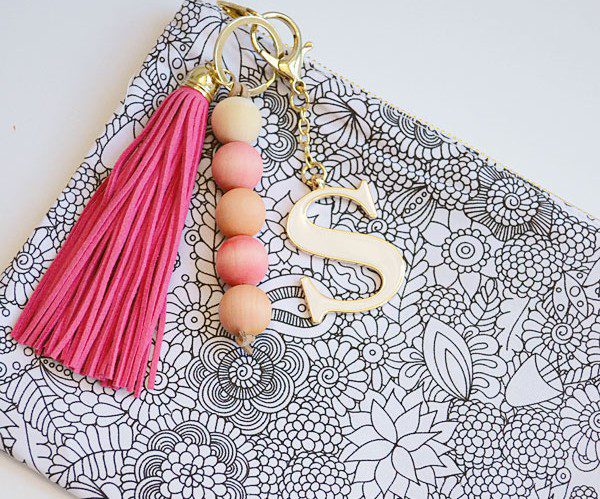
You’ll need to find some wood beads in your favorite colors. Then, you can use a simple beading needle and thread to string them together. It’s that easy. Once you’ve finished, you’ll have a beautiful keychain that will add personality to any set of keys. You may add your name’s initials to the keychain.
8. Garden balls
Garden balls are excellent for adding color, light, and elegance to your garden. You can create these items with any type of bead, but colorful glass beads work best. To make a garden ball, you’ll need beads in various colors, thread or wire, a sharp needle, and a sturdy stick or skewer.
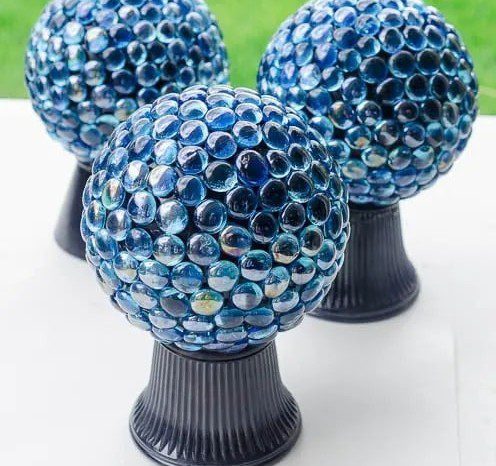
Start by threading your beads onto the thread or wire. Once you have the desired size, tie off the end of the thread or wire, so the beads don’t fall off. You may place the garden ball over a plastic or wooden platform.
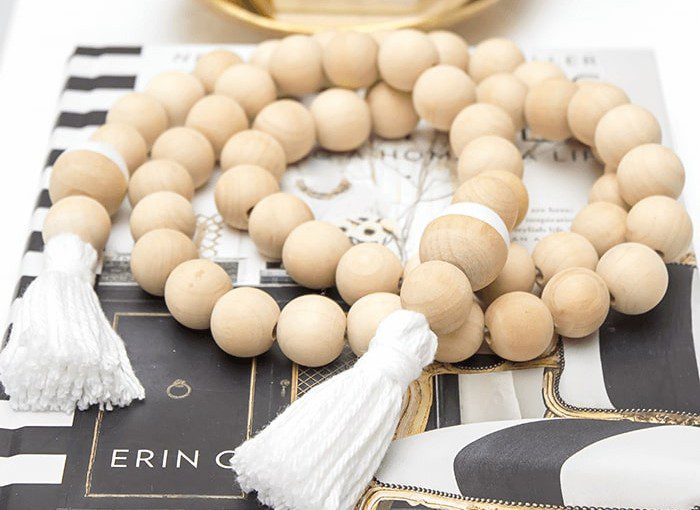
9. Farmhouse bead garland
Making a farmhouse bead garland using wooden beads is pretty easy. Cut a piece of thread or string that’s about 12 feet long. String one end of the twine onto a large wooden bead, and tie a knot to secure it in place.
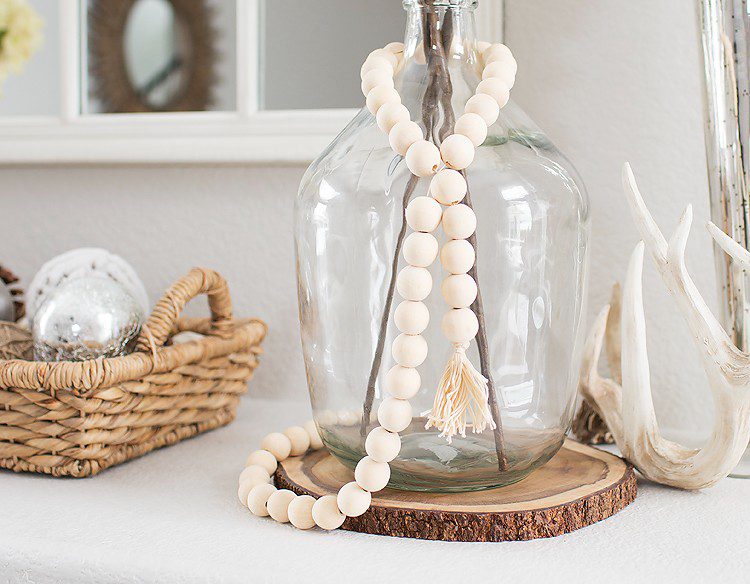
Add beads to the string in any order you like, spacing them about two inches apart. When you reach the end of the string, add another sizeable wooden bead and tie a knot so it’ll stay in its place. Trim off any excess twine or string and hang your farmhouse bead garland up and enjoy.
10. Fruit keychains
Making fruit keychains is a fun way to show your love of all things fruity. Not only will they add some quirky personality to your keys, but they’ll also keep you company as you wander through your day. Best of all, it’s a project that you can finish really quickly.
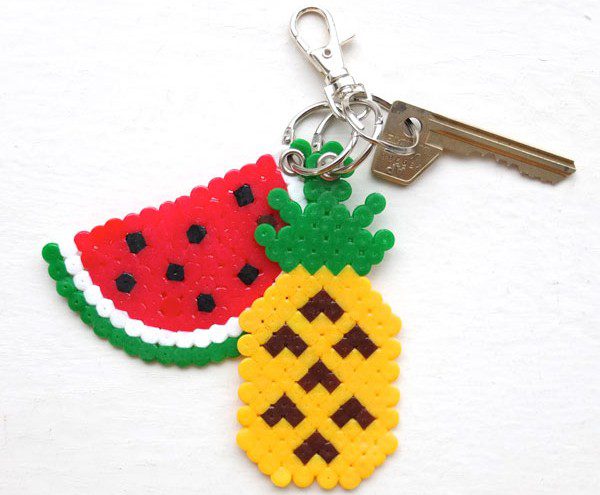
To get started, you’ll need to gather the following supplies: beads in assorted fruit colors, a key ring, and needle-nose pliers. First, thread the beads onto the key ring in the desired pattern. Weave individual beads in and out of each other until you’ve created the desired shape.
11. Vibrant beaded candle holder
This vibrant beaded candle holder is a great way to bring more color to your home. The simple design is straightforward to make, and the results are stunning. To make these items, you will need a glass container to place the candle and some colorful beads.
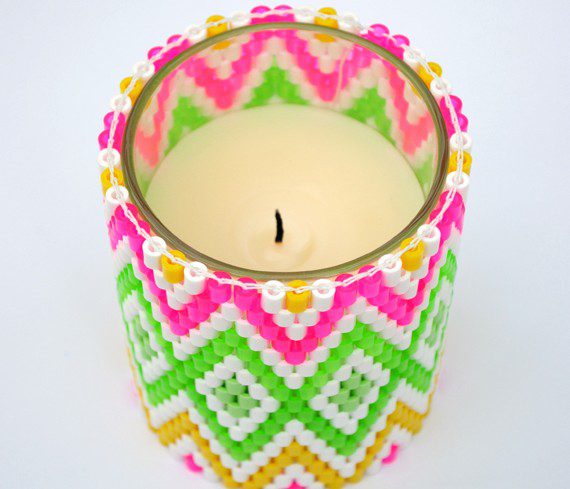
Decide on the placement of your beads. Start by adding a row of white, yellow, and green beads. You may add red and pink ones for some brightness. There are a couple of ways to attach the beads. You may string them together or use a glue gun to connect them.
12. Beaded grapevine for decor
You can complete this decor piece in just a few simple steps. Initially, you’ll have to collect a few materials. You’ll need purple beads for the grapes and green beads for the leaves. Also, grab thread, a glue gun, and scissors. Once you have everything, you can kick off by making the faux grapevine.
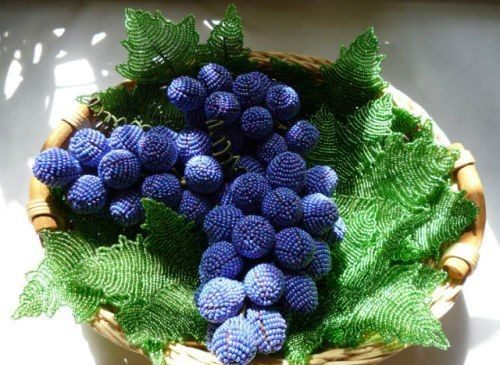
Attach purple beads to make grapes that look like they’re hanging from the vine. You may make them as long or short as you want – it’s up to you. Use glue to attach the vines. Then, you just hold them for a while until the glue dries.
13. Keys holder
With all the different colors of plastic beads available, the possibilities for creating a unique key holder are endless. You may choose blue and green beads to give the key holder a cool ocean-like vibe. Pick orange, red, and brown for some fall vibes.
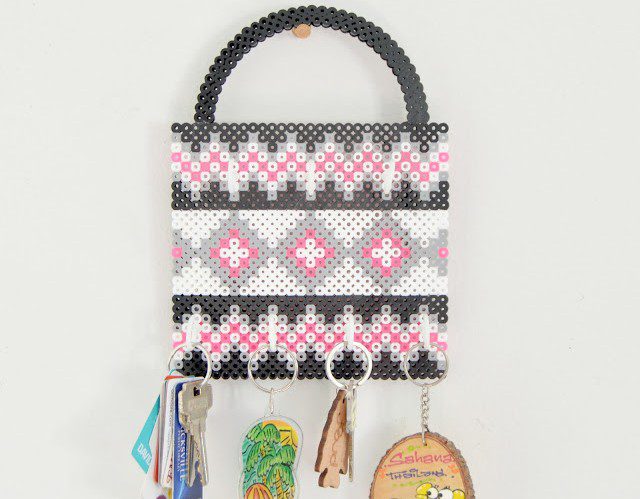
To create your design, start by stringing the beads onto a piece of sturdy wire. You can hot glue the wire onto a small wooden plaque or even directly onto the wall. Leave enough wire at the end to make a loop so you can easily hang up the keys on it.
14. Mismatch garland
Make a mismatched garland using different-sized wooden beads for your fireplace this winter. String a few large wooden beads onto a piece of twine or ribbon. Tie a knot at the twine or ribbon’s bottom to maintain the beads in place.
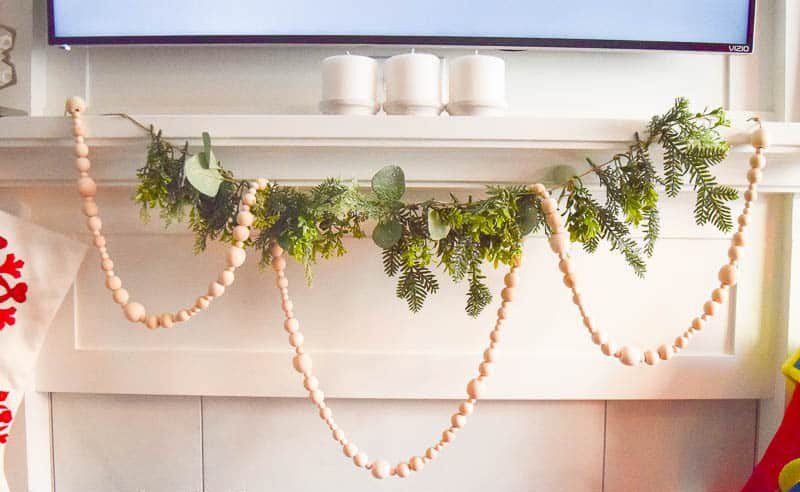
Repeat the process, stringing smaller wooden beads on top of the larger ones. Tie an additional knot at the twine’s end or ribbon to secure the beads in place. Make a few more such garlands for the fireplace. Hang your mismatched garland up and enjoy.
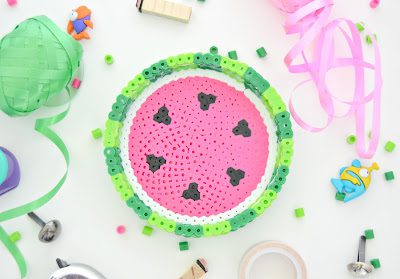
15. Square coasters
Square coasters are excellent to sprinkle some personality into your home. They’re stylish and also functional. Best of all, they’re easy to make. All you need is a few supplies: beads in your favorite colors, a hot glue gun, and a coaster template.
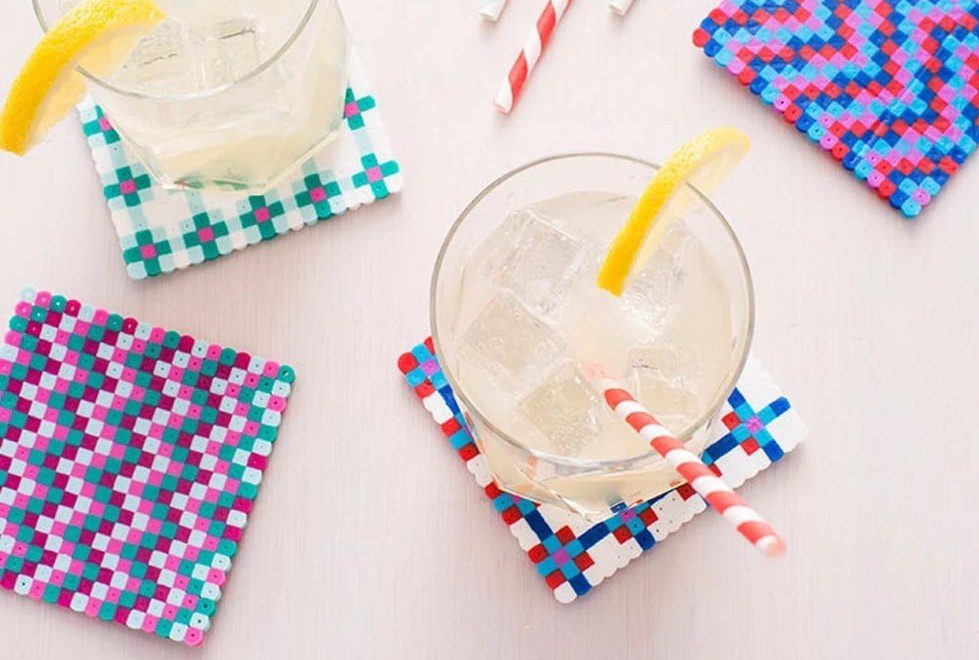
First, arrange the beads on the coaster template according to your liking. Don’t forget to save enough room near the edges for the hot glue. Use glue to connect the beads to the coaster. Keep each bead in place for a while until the glue dries.
16. Pearl flower tray
You’ll need some basic supplies like beads, an iron, and a tray to use as a template. You may include any type of beads you want, as long as they are small enough to fit through the holes in the tray. Begin by arranging your beads on the tray in a design.
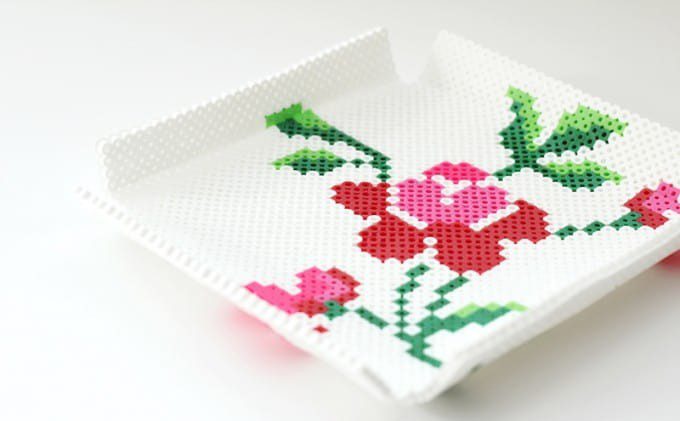
Ensure that the beads are close together so that they will fuse adequately. Once your design is finalized, place the tray inside a cloth bag and seal it shut. This will keep it protected from the heat of the iron. Now it’s time to start fusing those beads!
17. Colorful beaded wind chime
Making a beaded wind chime is a fun and easy way to add a touch of color to your home. Plus, the gentle tinkling of the bells will make you feel calm and relaxed whenever you hear it. Get a copper wire that’s about 30 inches long. Use assorted colorful beads in different sizes.
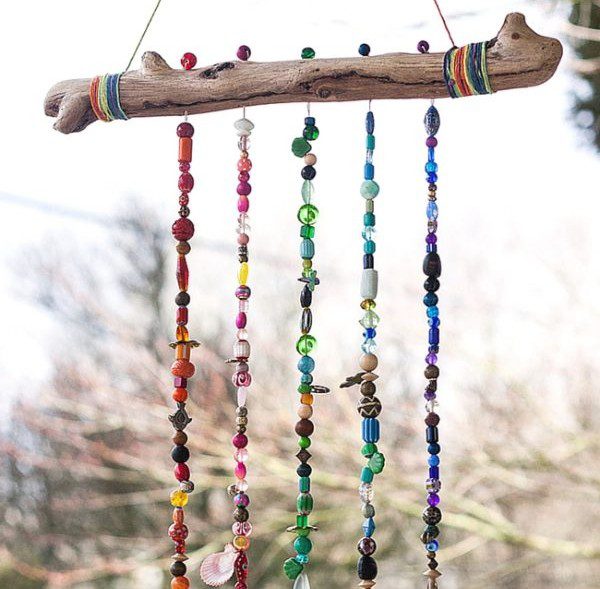
You may find these at any craft store, and then you’ll just need a wooden stick to hang the beaded wires from. Start weaving the beads into the wire and finish it by hanging bells to all the wires. Tie these to the wooden stick, and the wind chime is ready.
18. Decorate a mirror
It’s surprisingly easy to decorate a mirror using glass beads. This DIY will use a mirror, glass beads in various colors, and superglue or epoxy. First, pick the location on the mirror where you wish to set the beads. It’s recommended to work from the top to the bottom.
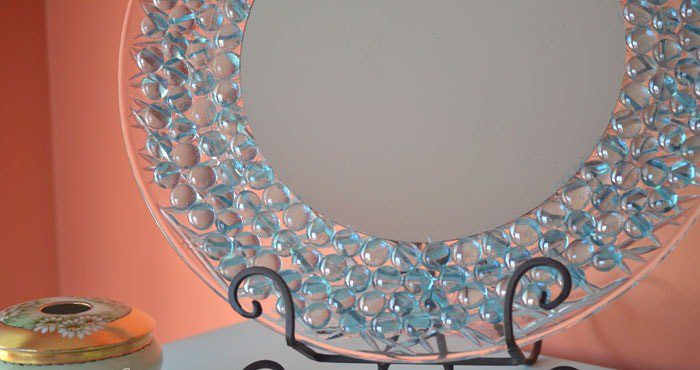
Next, use a small amount of superglue or epoxy on the back of a bead and press it firmly against the mirror. Repeat this procedure till the entire surface is covered with beads. If desired, you can use a paintbrush to help spread out any large clumps of beads.
19. Large beaded wreaths
There are various ways to use large beads to make wreaths. One method is to first create a wireframe using floral wire. You can then attach the beads to the wireframe by threading them on one at a time or by using wire to wrap around the beads and then attaching them.
Another option is to use a styrofoam wreath form as your base and then glue the beads directly onto the form. Besides, string the beads using a thick wire in a circular shape to work as a wreath. You’ll need to have plenty of patience to attach all those beads.
20. Glass bead vase
Glass beads may be used to make beautiful, decorative vases. They’re available in various colors and shapes, so you can come up with any design your brain wants. You can even work with different colors to form an exciting pattern to go with your decor.
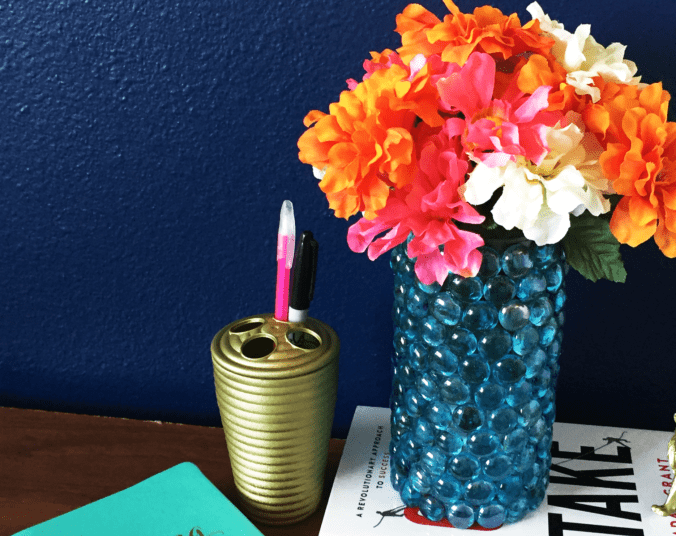
To make a glass bead vase, start by cleaning the glass beads thoroughly. Next, hot glue the beads together in the desired shape. Allow the glue to bind and dry completely before adding water. Don’t add a lot of water, or the vase may break. Enjoy your beautiful new vase!
21. Fridge magnets
You may try your hands at this simple project that’s also possible to do with your kids. You’ll need some beads in different colors, a hot glue gun, and a refrigerator magnet. Start by sorting your beads into piles of similar colors. Use hot glue to attach the beads to the magnet.
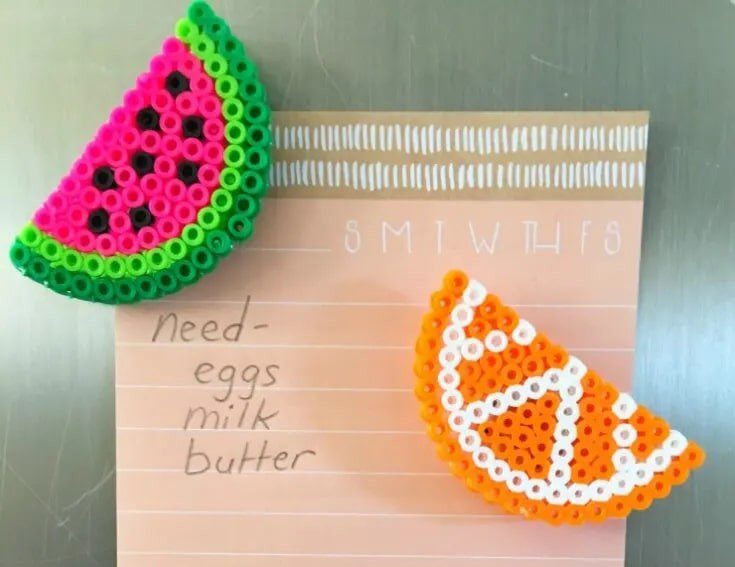
We’d work on the biggest beads and then move to the smallest ones. Be sure to have space at the top or back of the magnet so it can stick to the fridge. Let the glue dry before using your new fridge magnets!
22. Spruce up old sunglasses
Sticking some beads onto your old sunglasses is a great way to spruce them up and make them look new again. Also, it’s a delightful project you can do with your friends or family, and it doesn’t require special skills or tools.
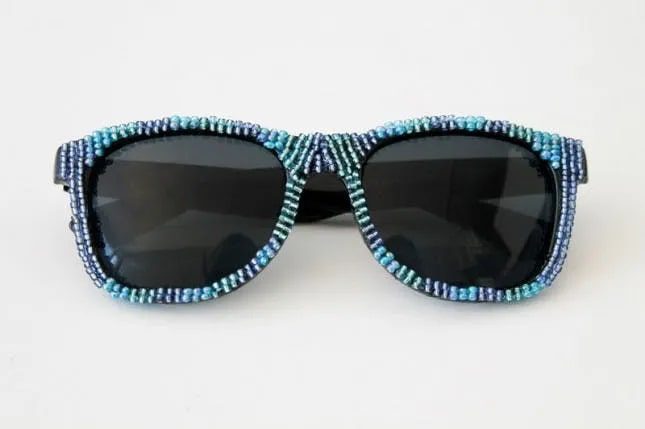
Select the beads you want to use, and then use a hot glue gun to attach them to the frames of your sunglasses. Be sure to press the beads firmly against the frames to stay in place, and then let the glue harden before wearing your sunglasses.
23. Decorate your notebooks
Dress up your notebooks and show off your personality by adding some beads. It’s a fabulous manner to add color and style, and it’s straightforward to do. Pick the pattern or drawing you want on the cover. You may use any colors you want or mix and match different colors.
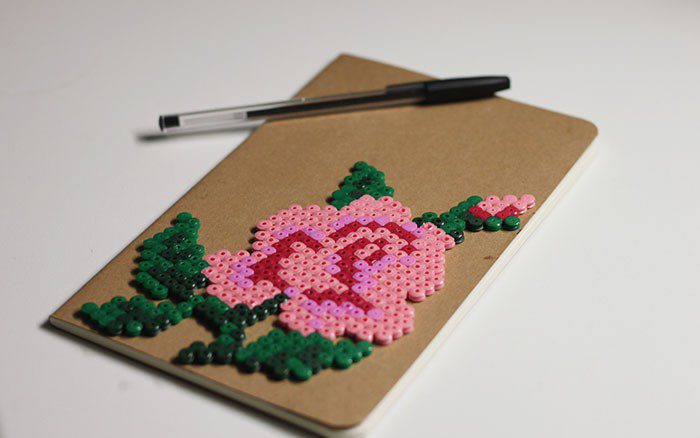
Make a piece of cardboard the same size as your notebook cover. If you’re using a spiral-bound notebook, cut the cardboard so that it’s slightly larger than the cover so that the edges of the cardboard will extend beyond the edges. Glue the beads on the notebook cover.
24. Fused beads bowl
There are many ways to fuse tiny beads into a bowl shape. One well-known way is to use a blowtorch. Create a mold for your bowl by wrapping a piece of wire around the desired circumference of the finished product. Begin melting your beads one at a time and carefully place them onto the mold.
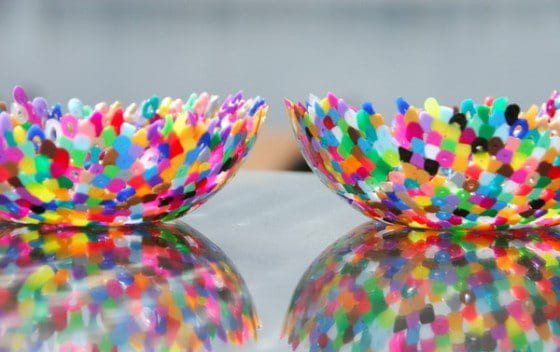
Be sure to overlap the beads slightly so that they will stick together when cooled. Keep adding layers of beads until you reach the desired thickness. Finally, use a blowtorch to heat the entire surface of the bowl evenly until it’s completely solidified.
25. Retro keychain
Learn to upcycle old or unused plastic beads. First, choose the shape you wish your keychain to be. For this project, you may make a retro camper out of plastic beads. You may find free patterns online or just use your imagination.
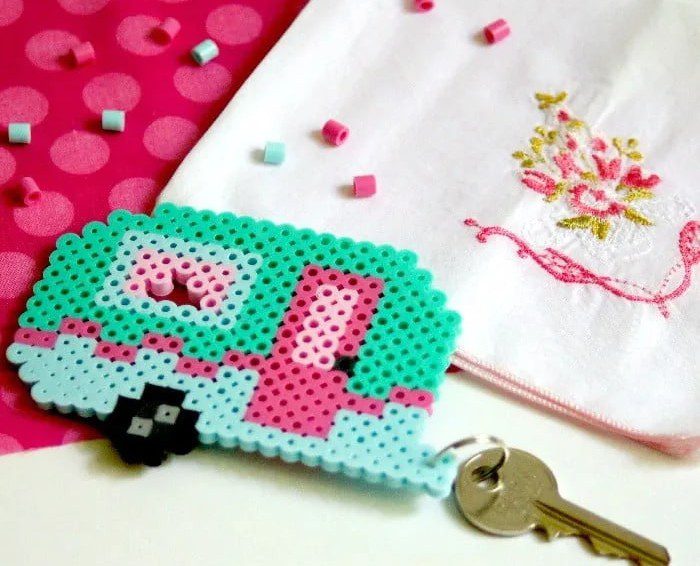
Once you’ve decided on the shape, start stringing the beads together. Use a needle and thread if you wish it to be sturdy, or use strong glue if you’re in a hurry. Keep hold of them until they’ve cooled down and solidified into one piece—there you have it, a retro camper keychain.
26. DIY chandelier
Here’s an ideal project for those who want to add some rustic vibes to their home. You’ll need wooden beads, a hot glue gun, and some wire. Start by wiring the beads together in the desired pattern. Ensure enough wire at the end of each strand to attach to the next one.
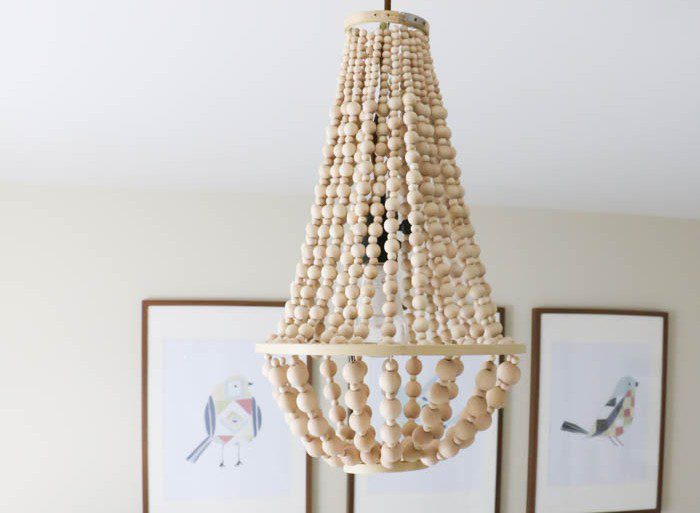
Add a few different layers to make the chandelier come alive. When you have finished wiring the beads together, use the hot glue gun to attach them to a metal ring or other support structure. Finally, put your new chandelier to work and appreciate the beautiful thing you created!
27. Candleholder
You may use some colored glass beads to upgrade old boring glass candle holders. You may use as many or as few beads as per your decor needs. Stick the beads on the top of the holder and leave the rest of the holder as it is.
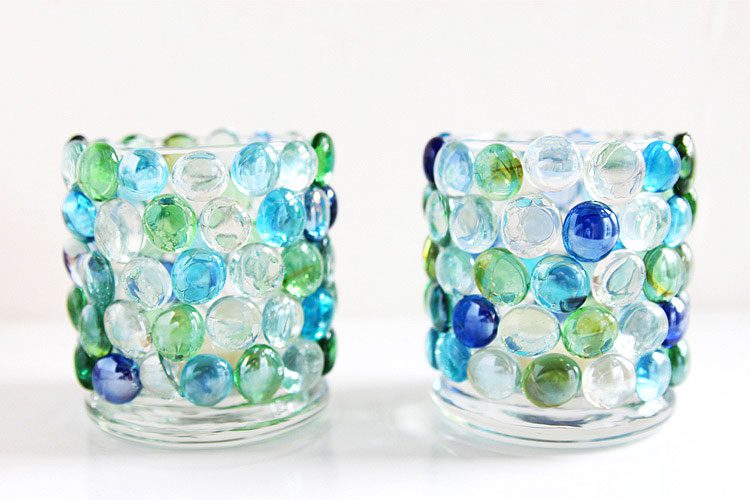
You may use different colors to spruce up the simple votive jars for candles. Moreover, experiment with various bead sizes while decorating the candleholders. These will give a festive appearance, and you won’t have to get new ones for a fancy occasion.
28. Adorable garden marker
This is an enjoyable and easy project that you can do with your kids. First, string some beads onto a piece of yarn or twine in the shape of a strawberry. Using red, pink, silver, and white will look especially pretty together.
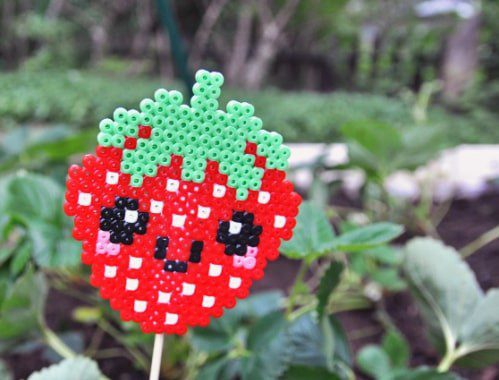
Once you have your bead “strawberry” all strung up, use a hot glue gun to attach it to a wooden garden marker. Now your strawberries will be easy to spot in the garden, and they’ll add a touch of cuteness too. You may do this for other fruits and vegetables too.
29. Cute fruit bowl
Make a fruit bowl that’ll last forever! It’s also a great way to repurpose some waste plastic beads. Get a bowl of plastic beads in assorted colors, a hot glue gun, and glue sticks. Glue the beads together in whatever design you like.
Be sure to use plenty of glue, as the beads will need to be structurally sound in order to hold the weight of the fruit. Let the glue dry completely. You may also fuse the beads with heat. Arrange your fresh fruit on top of your newly created fruit bowl.
30. DIY fabric beads
Learn how to make fabric beads for your next DIY project. Choose from methods such as melted fabric beads or just weaving the fabric into the beads. Cut a piece of fabric into a thin strip and then tie one part into a knot. Twist the strip around itself, forming a bead shape.
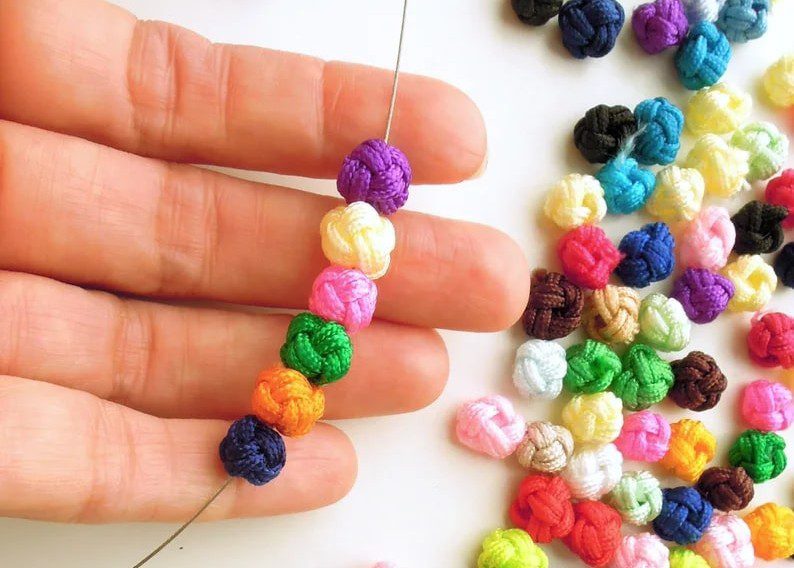
Knot the other end to keep the bead in shape. Repeat until you have enough beads. For melted fabric beads, take a toothpick and wrap the fabric around it, and then melt it over the flame. Remove the wooden stick when dry and cut them into beads. Use these colorful beads for jewelry or decor.
31. DIY bookmarks
These cute beaded bookmarks will be a delight for all book lovers. Moreover, bookmarks made from beads will be long-lasting in comparison to paper bookmarks. Use beads in your choice of colors. Cut a piece of thread about 36″ long. Thread the needle, and tie a knot to close the loop.
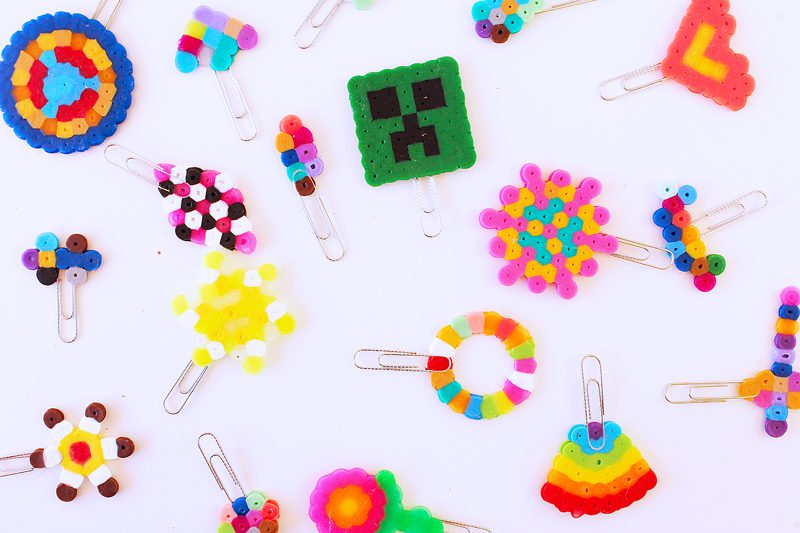
Decide on the pattern you may want to use for your bookmark. You may find lots of different patterns online or come up with your design. Begin beading according to your chosen pattern. When you reach the twine’s end, tie another knot to secure it. Cut off any excess thread.
32. Decorative tree
With a wee bit of creativity, you can use glass beads to make some gorgeous and unique decorative trees. Use different colors and sizes of glass beads to create a tree with a colorful mosaic effect. Make a tree out of clear glass beads to create a stunning visual impact against a dark background.
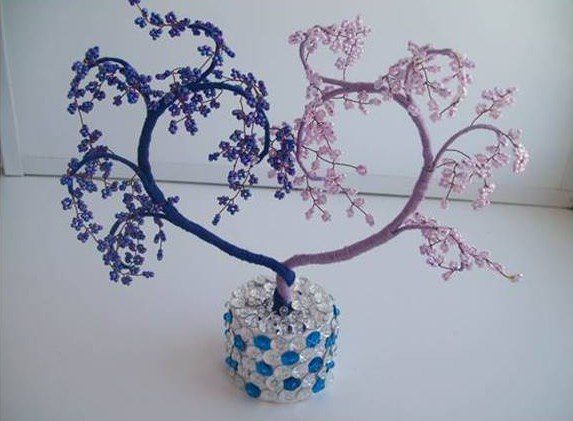
Use metallic glass beads to make a sparkling tree that will light up any room. Create an intricate bead design that looks like leaves on a tree for an extra-special touch. If you wish to add a country touch to the decor, use wooden beads for the trees.
33. Trendy pouch
This trendy pouch is perfect for carrying all your small essentials! It’s easy to make, and you can use any type of plastic bead you like. Start by stringing a few beads onto some sturdy thread or fishing line. Ensure the thread is long enough to fit your desired pouch size.
Leave a tail at the end to be used for stitching later on. Tie a loop at one end of the thread and make a knot around the other set of beads so that they are securely fastened in place. Continue adding more beads, alternating between different ones until you have created a pattern.
34. Hanging candle holder
This is a versatile DIY that you may use to hang planters or candles. Get some basic supplies like beads, wire, pliers, and candles. To make the holders, create a loop with the wire. Next, thread on some beads and make another loop. Keep adding beads and loops until you reach the desired length.

Finally, cut off the excess wire and use pliers to twist the loops closed. To hang the holders, tie a piece of ribbon or string around the top loop and hang them up! They’ll look beautiful lit up with candles in any room of your home.
35. Fancy curtains
There are all sorts of ways to add a touch of luxury to your home décor, and using beaded curtains is one easy way to do it. Beaded curtains can dress up a room and make it feel more elegant. You just string them up like you would any other curtain!
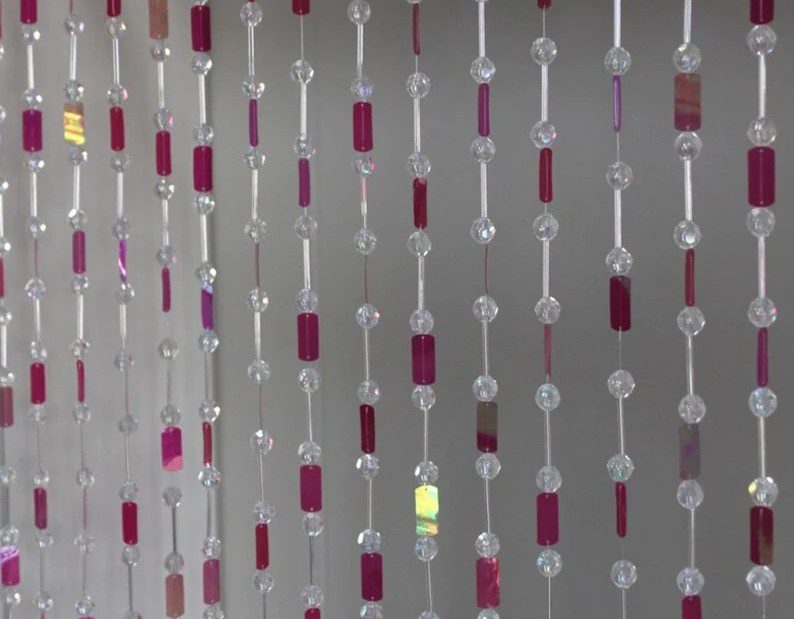
Beaded curtains can be made using a variety of materials and colors, so you may choose the perfect ones for your home. Be sure to measure the needed width and height of your window before making the beaded curtains, so you know that they’ll fit properly.
36. Upcycle old pens
There are many trendy ways to decorate old pens as decor items or to make writing less boring! Beads are among the simplest and best ways to spruce up old pens. It’s a great way to add personality and style to an otherwise plain pen.
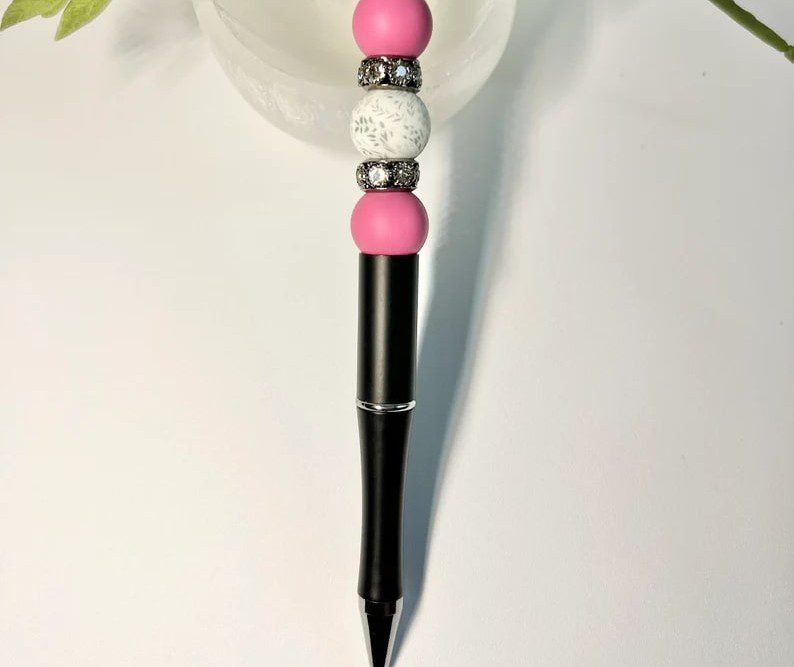
Decide where you want to place the beads on the pen. Some people prefer to have them all in one spot, while others like to spread them out evenly. Glue the beads in place using a strong adhesive. Make sure they’re glued on securely, so they don’t fall off over time.
37. Elegant brooch
Decide what type of flowers you may want to make. You can choose any type of flower, such as roses, lilies, orchids, etc. Cut a piece of wire about 18-20″ long. String on several different colors of beads, leaving about 1″ at the end without any beads.
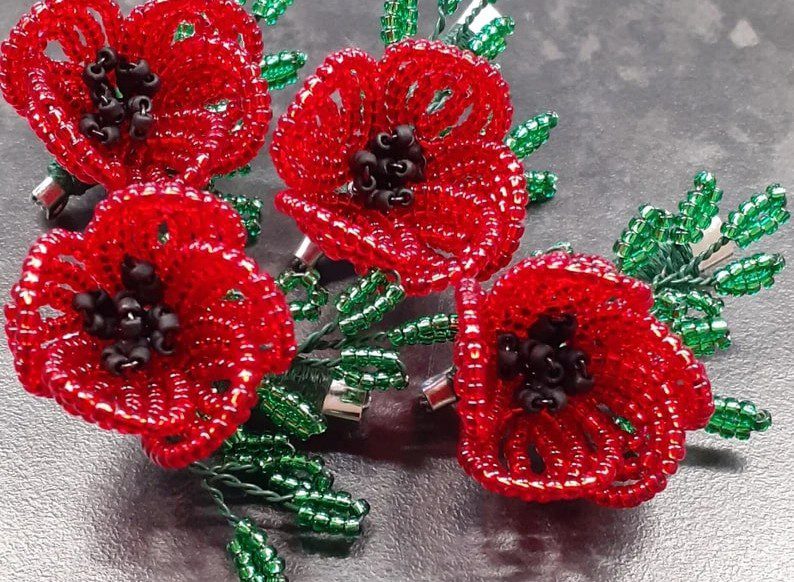
Twist the wire around itself to create a loop, and then use pliers to pinch it shut. String on more beads, making sure to leave enough space at the end to twist into a loop as well. Twist the wire around itself to make the loop, and then use pliers to pinch it shut.
38. Christmas placemat
Designing a Christmas placemat with a snowflake design is easy with this simple tutorial! You’ll need a white placemat, beads, and a hot glue gun. Begin by drawing a snowflake design on the placemat with a pencil. Try to make the snowflakes as symmetrical as possible.
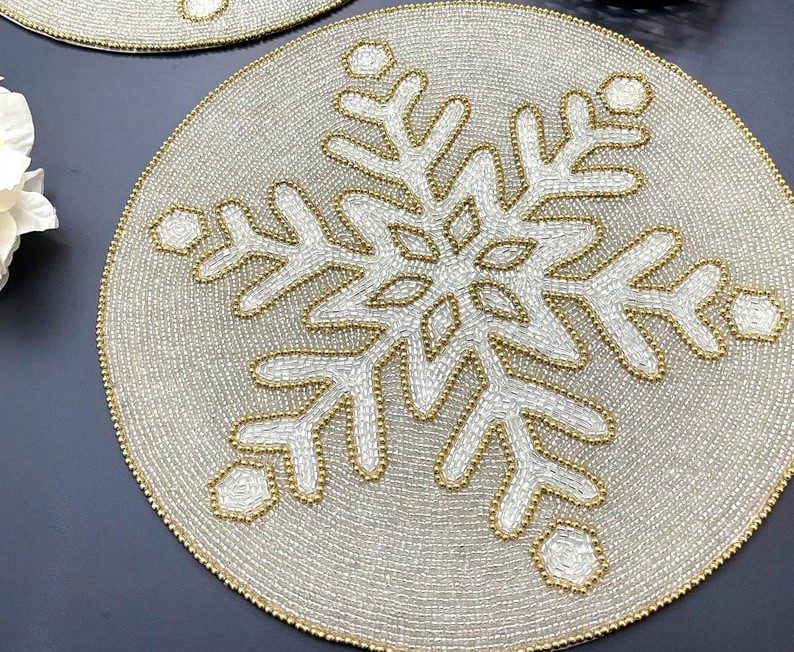
Once you have drawn your design, start gluing on the blue, white, and grey beads. Make sure that each bead is glued securely in place. Allow the glue to dry entirely before your placemat. Enjoy your beautiful new Christmas placemat during the holiday meals.
39. Valentine’s decor
This may come in handy for next year’s Valentine’s Day celebrations. What could be more romantic than a beautiful, hand-crafted heart made of colorful beads? Here’s how to make your own. Get some assorted beads in red, pink, and white, thread or thin wire, a needle, and scissors.
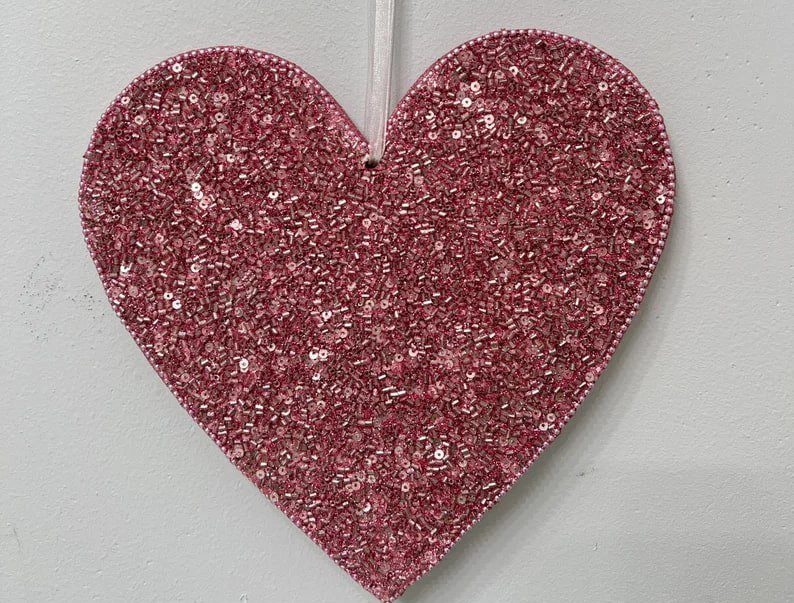
Cut a piece of thread or wire about 18 inches long. String on a few beads in each color, then tie a knot at the end to secure them. Make sure the knots are tight so they don’t come undone. Now begin weaving the beads around each other to form the heart shape.
40. Minimal jewelry
A minimal necklace is a great way to add a touch of glamour to any outfit. Gather the following supplies: beads, thread, scissors, and a needle. If you wish to make a longer necklace, you’ll also need a clasp. Cut a piece of thread that’s twice the length you want your necklace to be.
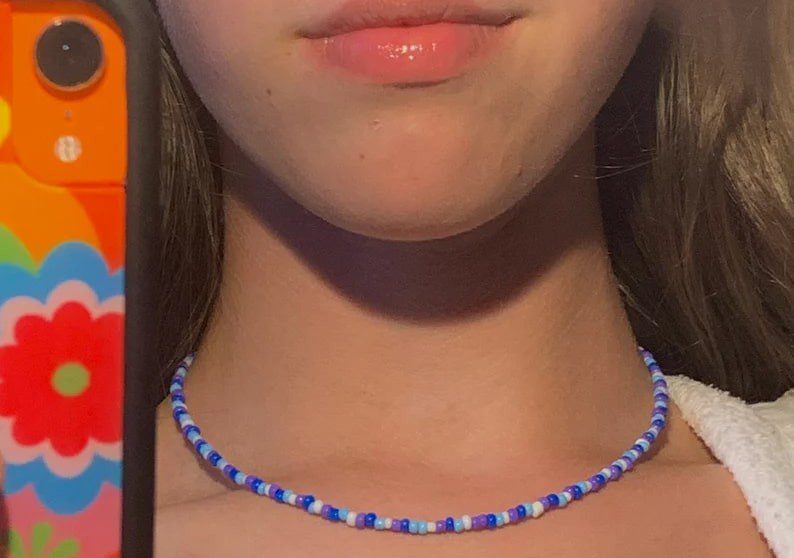
Thread the needle and knot its one end. String on your beads in any order you like. For a minimalist look, keep it simple with just one or two colors or shapes of beads. Sew the beads together by passing the needle through them from front to back.