
String Lights, Starry Nights: 30+ DIY Enhancements For Any Living Space
A long time ago, no one would have expected Christmas lights to become as popular as they have in the last few years. We went from neighbors complaining that the Jones’s haven’t put their Christmas lights away by January 1st to the Jones’s never putting those decorations away! The trend started as a cute way to decorate a college dorm room, and these string lights can now be spotted anywhere from cute restaurants to your best friend’s backyard. The glittering soft glow they give off while being ultimately minimalistic and relatively cheap makes us want to utilize them in every way possible. They can be simply hung across the ceiling, but there have been so many creative projects that really up the decor in your space. There are a lot of ideas in this article to try, and you won’t be disappointed. Make a brilliant bedside table lamp, a shining backdrop for your room, or a unique decoration display with string lights. Here are some interesting ways that you can DIY string lights in your home all year round and impress anyone that sees them
Shine Bright Like A Diamond
Home decor is very personal. There are endless possibilities of artwork to put around your house to make it a home. This is another beautiful idea that can be personalized precisely to your style and preference. The artist here, JoAnn, chose to use gold glitter on her canvas.
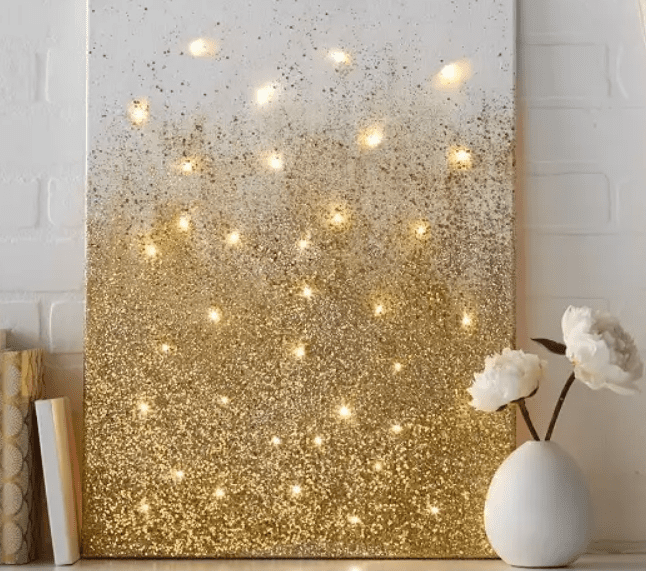
On the backside of the canvas, make a little slit with a craft knife. JoAnn barely pushed the lights through the hole, but you can feel inspired to have the lights displayed differently. Secure the lights around the canvas with duct tape. The glitter and lights are seamless and something we plan to put up in our home soon.
Mirror, Mirror, On The Wall
Have you ever been stuck trying to check yourself out in the mirror, but there simply was not enough light? It has happened to us one too many times. This mirror is perfect for highlighting your entire outfit. Even better, it creates the ideal lighting for you to apply your makeup.

With lighting all around the mirror, you are sure to get an even skin tone and beautiful highlights every time you do your makeup. Another idea is that taking a selfie with this mirror in the background would give off a soft natural glow without the need for a filter.
Firefly Light
Tulle is a perfect material for decor, especially when designing with string lights. Get a bundle of white tulle fabric from the store and cut them into small pieces. Keep in mind that they should be long enough to tie around the string.
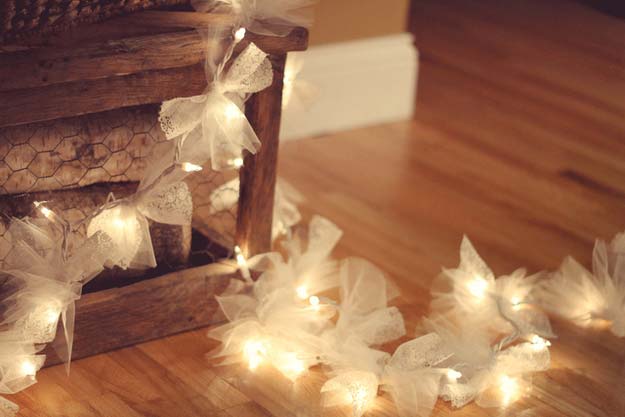
Tie each piece of fabric around the string lights until its entire length is covered in delicate fabric. The result looks like a swarm of fireflies showing off their light. Hang it on the wall or along a staircase to beautify any part of your house.
Flamingo Marquee
First, to produce this flamingo marquee, you will need foam care, bristol boards, and spray paint. On scrap paper, start by drawing the flamingo. This creator suggests beginning by drawing the letter s for the body and then sketching from there, then tracing the flamingo body onto the foam core before cutting it out with an X-ACTO knife.
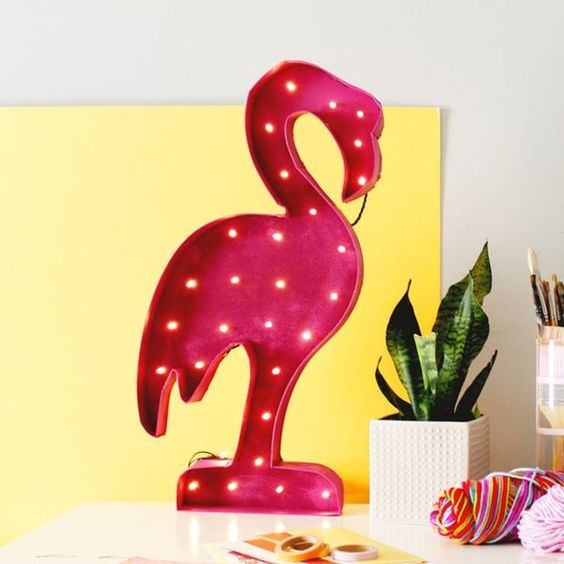
Mark the dots where you want your lights to be, and use a screwdriver to pierce the foam’s core. To make the marquee 3D design, add a 2-inch border from the bristol board around the entire bird. Spray your flamingo with hot pink paint (or any color of your choice) and poke your string light through the holes.
Rainbow Extravaganza
A rainbow is always beautiful. That’s why this next hack is top-notch. You will need a cheesecloth, fabric dye, a strand of cafe, Mod Podge, and style bulb lights. Start by pouring each dye into separate small glass bowls. Next, cut the cheesecloth into square shapes.
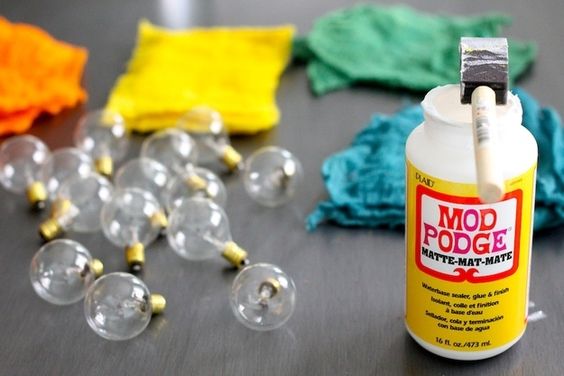
Soak each cheesecloth in a different colored dye. When the cheesecloths are dry, take the bulb (already detached from the string) and apply Mod Podge on it, then wrap a dyed cheesecloth around it. Attach the beautiful bulbs back on the string, and you’re done!
Divine Lighting
The guests have all been invited, the table is set, and the food is cooking. Everything for your perfect dinner for friends is ready there is just one problem; the table looks a little dim. There is no doubt a chandelier is expensive and not easy to install either.
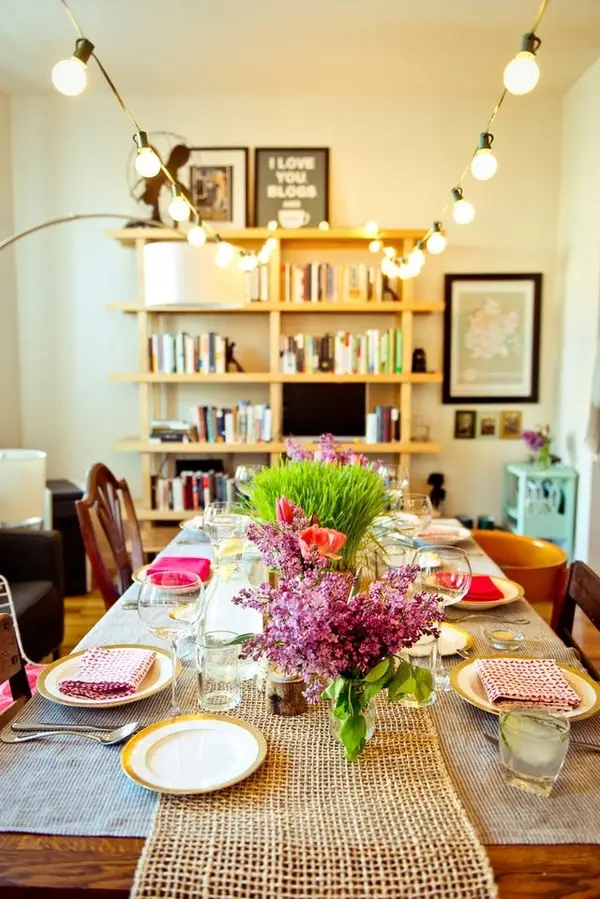
This look is effortless and just as elegant. Hanging two sets of lights rather than one balances the table nicely and lights up the room. This tablescape quickly went from dark and dismal to light and fabulous in a matter of seconds.
Light Wood Design
Using wood for indoor decor isn’t a bad idea after all. Gather some pieces of wood and nail them together to form a medium-sized frame. Write out words on the wooden frame and paint it; you can use a silhouette cameo for this.
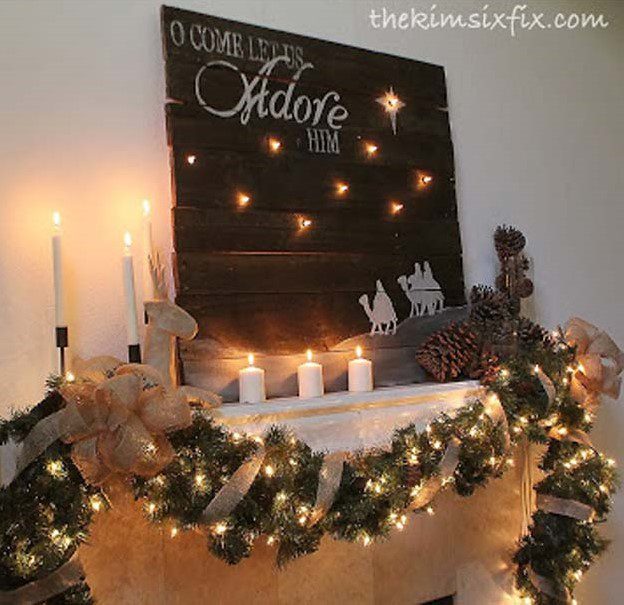
This DIY is exactly what you need, whether it’s something for the Christmas season, as highlighted above, or just everyday decor. Drill holes through the wood and fasten your string lights through them. Choose a meaningful quote, your family name, or perhaps a special occasion to write on the wood, so you have the perfect story to tell.
DIY Fox Lamp
String lights also work well in stuffed animals! Who knew? All you have to do is purchase a stuffed animal and cut the bottom part to remove some of its stuffing. Coat it with a fabric stiffener, such as Mod Podge, to make the surface stiff and easier to work with.

When the stuffed animal hardens, insert the string light from the bottom that you previously cut. It is preferable to use LED lights to ensure safety. This glowing fox lamp is an excellent idea to use as a night light or a gift to a young family member.
Paper Cube String Light
Using regular string lights at all times can become tedious; that’s why you should add paper cubes to your bulbs to create a different atmosphere. Paper cubes can make string lights look and appear impressive. Follow the description in the picture below to create the perfect paper cube.
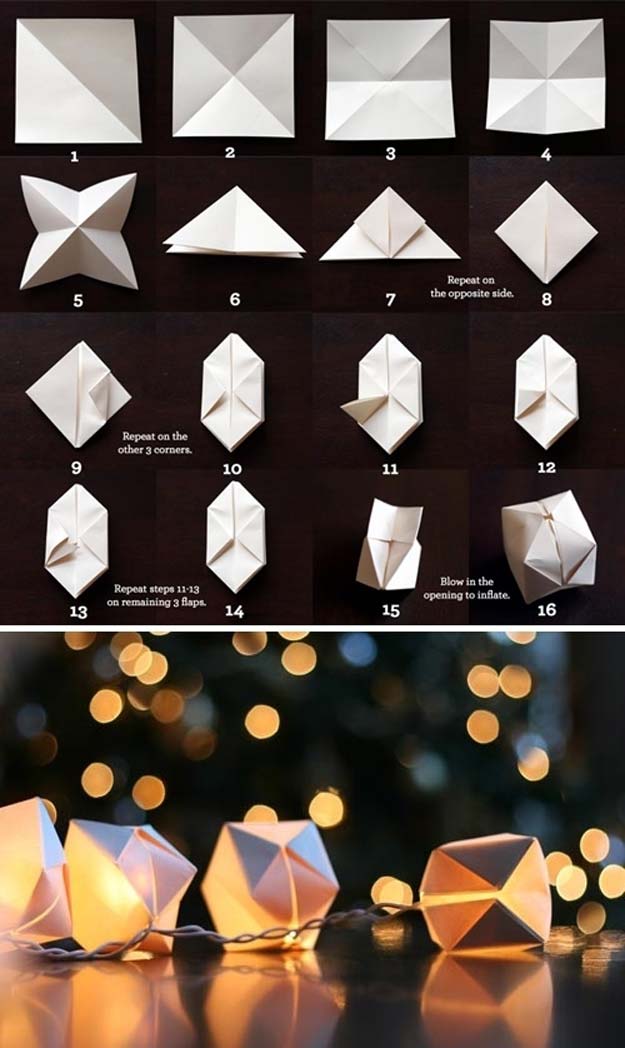
Blow air into the tiny opening to inflate it when you’re done. Make several of these paper cubes – literally, as many as you have light bulbs. Attach each light bulb into the paper cube through the opening. What a beautiful sight to see, especially at night.
Constellation Night Light
This next design is another incredible way to add lights to your home using canvas. Get some canvas from an art shop and paint it black to get the look below. It would look amazing if you chose to spray it with blue, purple, white, and neon pink paint to give it a galaxy effect.
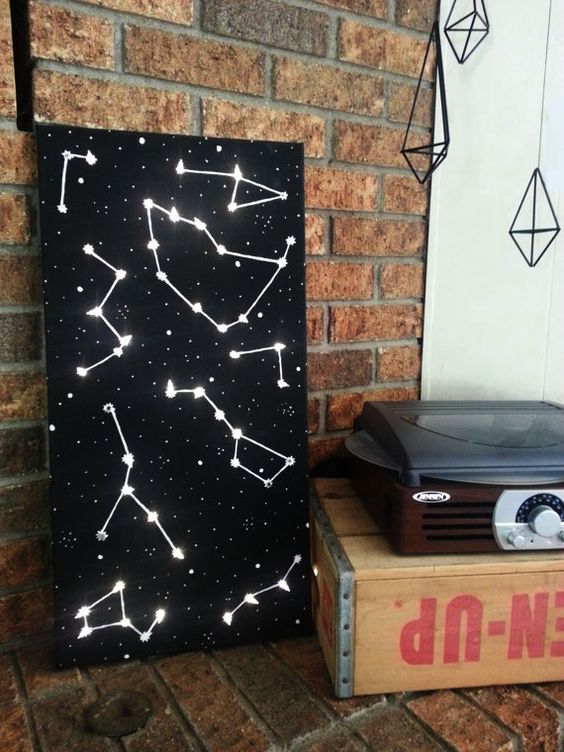
Project the black & white transparency of the Northern Hemisphere constellations through the canvas. To round it up, draw the stars/dots and connect them with a silver paint marker, then use your string lights to light the stars up by punching holes through the back and inserting them.
Your Name In Lights
A simple yet chic wall decor. To really get this design perfect, take a pencil with a good eraser and lightly sketch the design you wish to create or write on your wall. Then attach the string lights using nails, push pins, or small command hooks.
What is the best part about this wall art display? It does not have to be permanent. You can change up the word or design on your wall as frequently as you would like. Maybe ask a friend or family member that comes by to leave you a surprise in your room with your lights!
Plants And Lights
The combination of greenery and gold accents really does something for us! It can take either a fake or real plant to the next level. The thin gold fairy lights are practically weightless and won’t damage your plant while looking awesome.
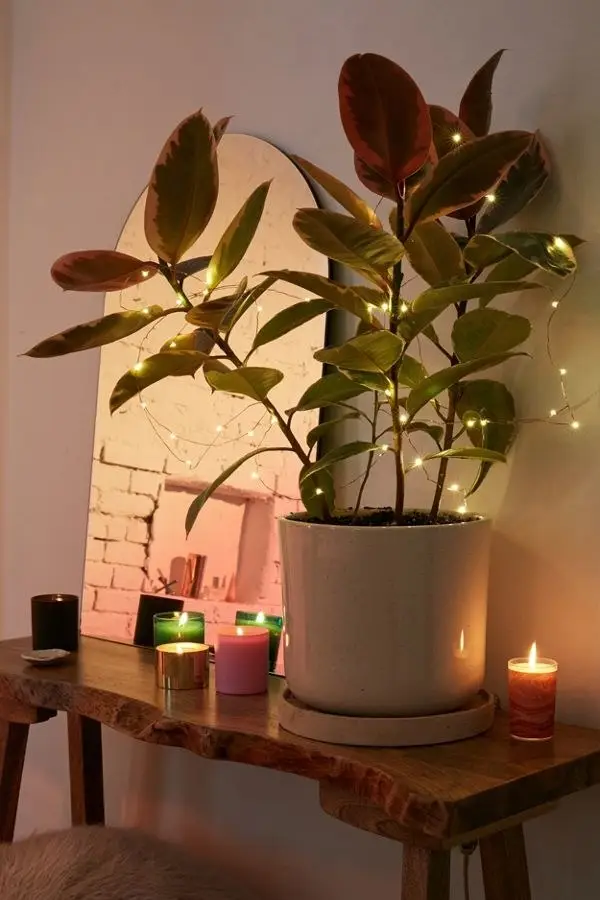
The plants and lights give us firefly energy, except they won’t ever fly away, and you can see them at all times! This is a very easy small thing that you can do in your home to take your decor to the next level.
Hula Hoop Chandelier
Not only are they used for exercise or playing during leisure time, but did you know hula hoops can be used as chandeliers? Here’s how to go about it. Wrap your hula hoop in a lace cloth, and then wrap your string light around the fabric.

Cut some lace pieces to hang the chandelier—the length and number of pieces of lace or ribbon depending on your taste. In the image above, the crafter used eight pieces of lace roughly 50 cm in length. Tie one end to the chandelier and the other ends of the lace together so that you can hang it in a suitable spot in your home.
Candy Lights
If you love candy, you’ll love this next hack! Materials Needed: corsage boxes, scissors, pipe cleaners, wire cutters, colorful cellophane rolls in different colors, and tape. Cut a large piece of cellophane and wrap some of the string lights inside, making sure to leave the wire hanging out of both ends. Then put the lights wrapped in cellophane into the corset box.
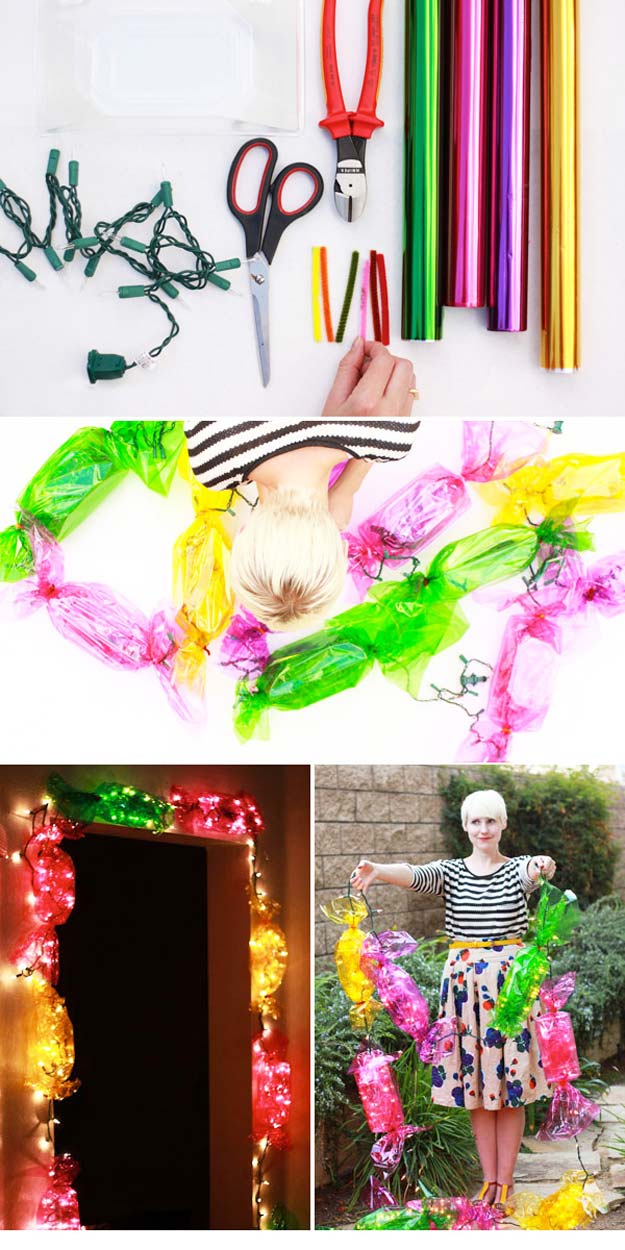
Wrap a larger piece of the same color cellophane outside the corset box, make sure there is enough wrapper leftover on each side, and close it on one side with tape. Use the pip cleaners to twist the sides of the candy together. You and your family will be amazed at your dedication and hard work.
Outdoor Wonder
This DIY project will need craft paper, string light, scissors, hole punch, glue, ruler, eraser, and pencil. Print the template for the pennant’s shape, and trace it on paper and cut it out. Then you can use a bone folder or letter opener to help make the creases; if not, you can use the ruler or your own hands.
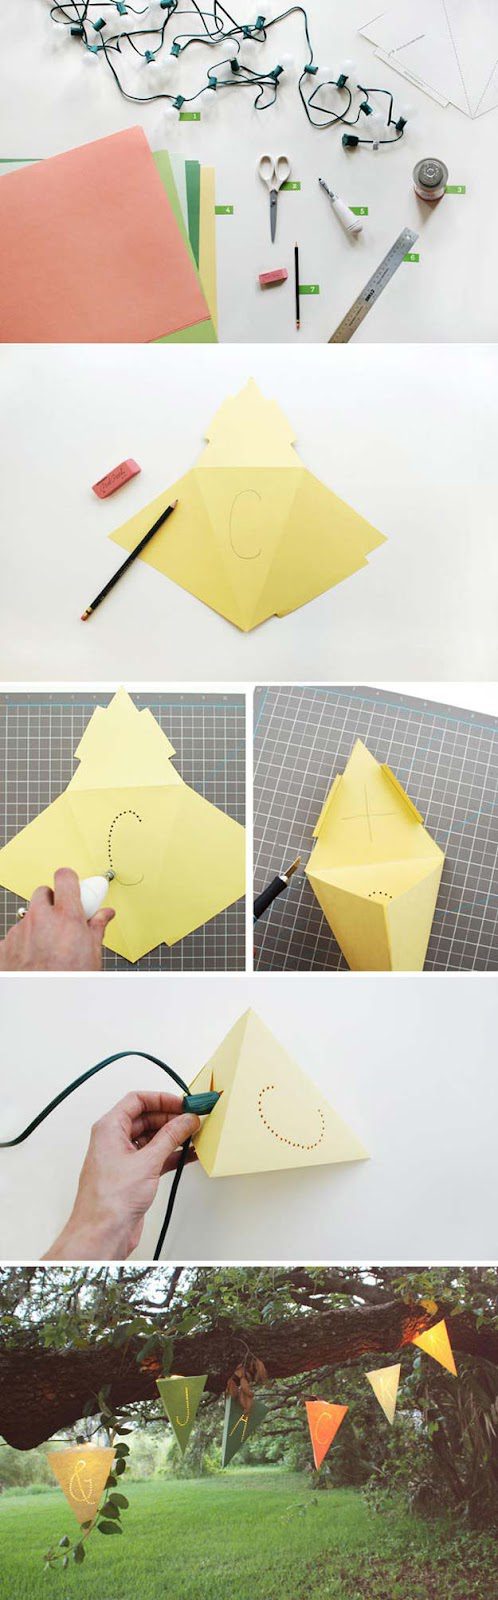
Next, draw a letter or design of your choice on the pennant. When you are done, punch holes along the lines you drew. Fold the tabs and apply glue on the opposite ends. After that, carefully pop the cafe bulb into the top part of the pennant, and you’re done.
Indoor Bloom
Flowers help beautify the environment and lift people’s spirits. This is why we suggest that you should ensure to have many flowers in your home. Fresh flowers can be a lot of work and very expensive. We were happy to find this DIY flower lights project.
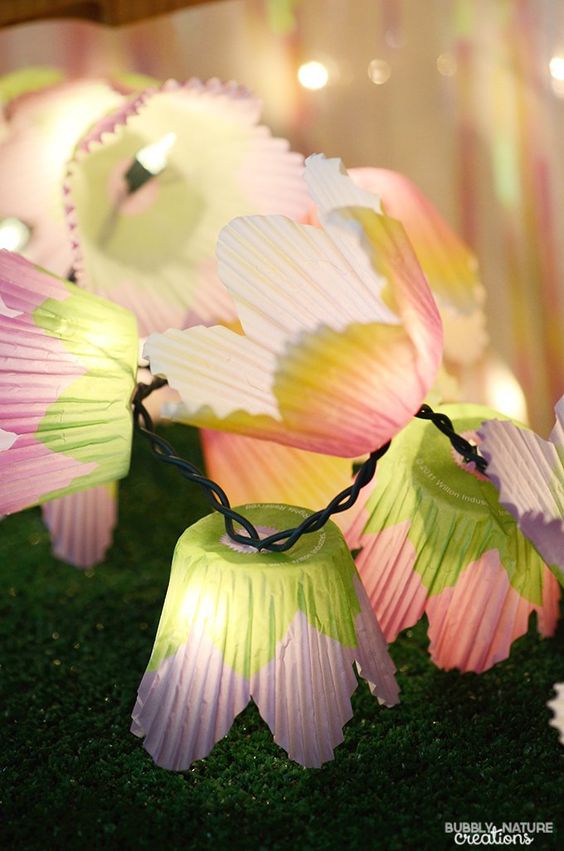
The main things you need are string lights and cupcake paper (both small and large). Now, let’s make some flowers! Get creative by making leaves and different styles, colors, and layers of flowers. Cut a small line at the center of your flower and push the light bulb through it!
Egg Carton Creativity
Egg cartons can also be turned into beautiful flower lights. Get an egg carton, gently cut it into a lovely flower shape, and paint the flowers (it’s advisable to paint the inner part before the outer part). Choose paint colors that most suit your decor and lifestyle.
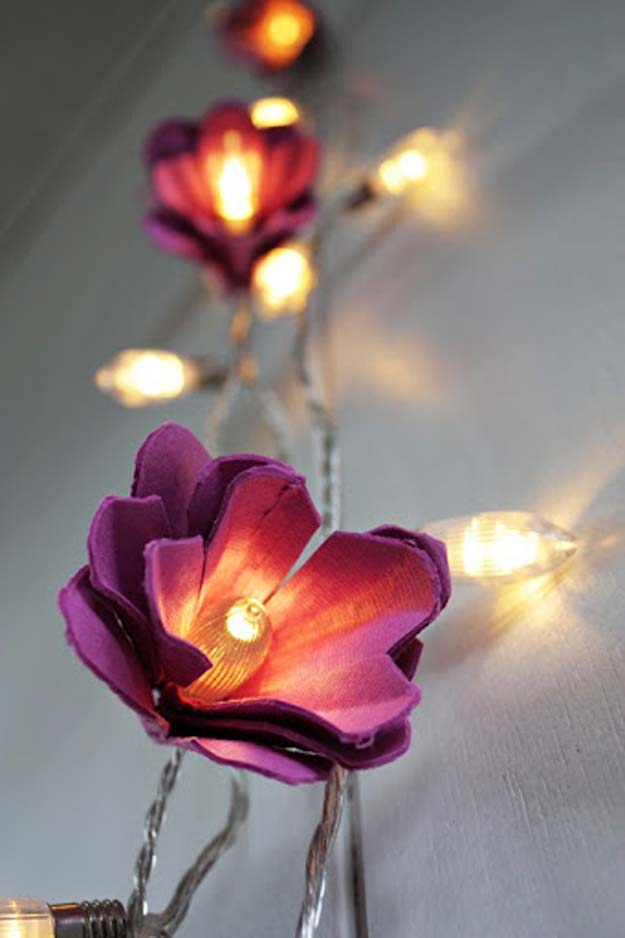
Use a utility knife to cut a small X shape at the bottom of the egg carton flower and assemble the lights through it. Add glue to the back part of the flower to hold it in place, and you’ll see the end product is impressive.
Amazing Burlap Garland
An example of an easy-peasy light DIY is this Lighted Burlap Garland. Get a string light and burlap ready (you can use two colors of burlap or more). Cut the burlap into 8 – 10 inch pieces, and tie them on the light string.
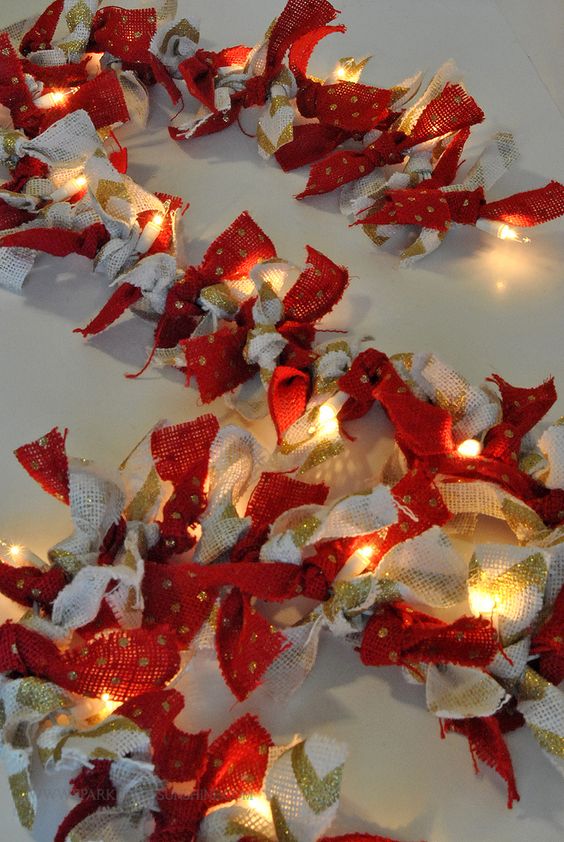
Tie the burlap just once or twice sporadically through the string of lights. Finally, place them on the surface you wish to beautify. This fantastic piece is a perfect decoration for Christmas or any event. It also gives a delightful and warm glow to your home.
Burlap Garland II
Here’s another way to spice up your home using burlap garland. You will need a long piece of burlap to achieve this project. Stretch the long burlap, place your string light along the inside, and then sew the burlap together.
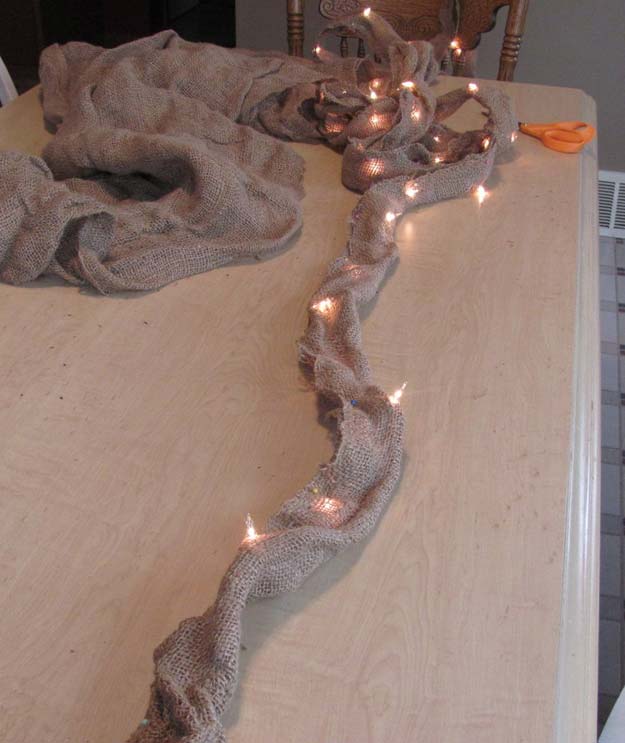
Just leave the ends open so you can plug them into the power source. Some light bulbs may pop out but that’s an advantage because you can alternate the bulbs in and out. Your bedroom decoration is ready to be used.
Watering Can
Kelly Dixon crafted this gorgeous DIY on her blog, Smart School House. This is a magnificent piece to put in front of your home or in your garden as a light-up watering can. There is no doubt this will be the talk of the neighborhood!
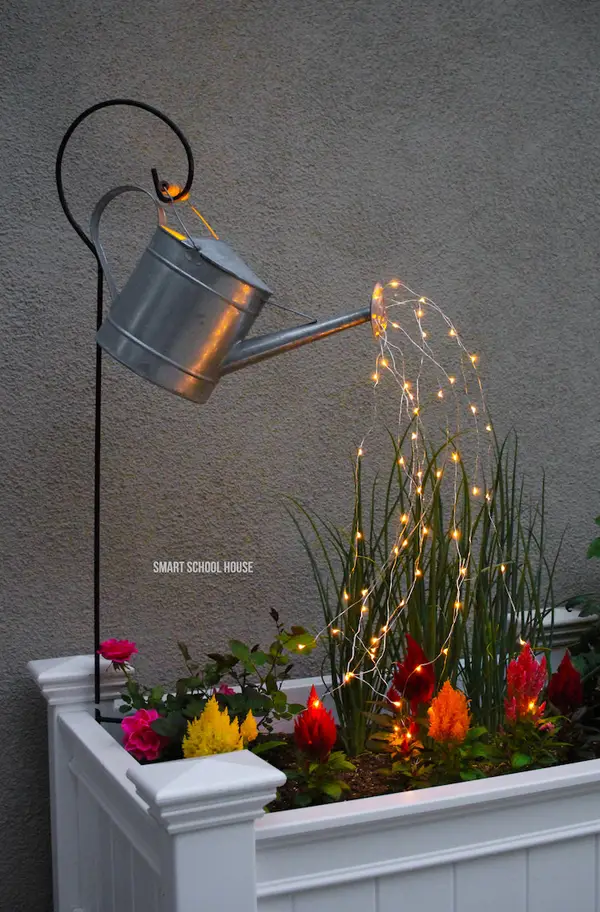
Dixon suggested finding a large watering can with a large spot with a showerhead for the spout. She placed the lights inside the can and pushed them out of the spout holes. She then hung the watering can on a hanging flower basket hook to get this fantastic display.
String Light Canopy
Certain things add a perfect glow to everything or every place, just like you see here. So if you’re looking for something similar, you’re at the right place. Simply purchase a very long string light and wrap it from one end of the ceiling to the other.
Ensure there’s a rod or a kind of support on the ceiling that will allow you to wrap the string lights around it. You can use as many string lights as possible. If you wanted to see the stars on a cool evening but couldn’t due to light pollution, this decor would do the trick to set a romantic evening!
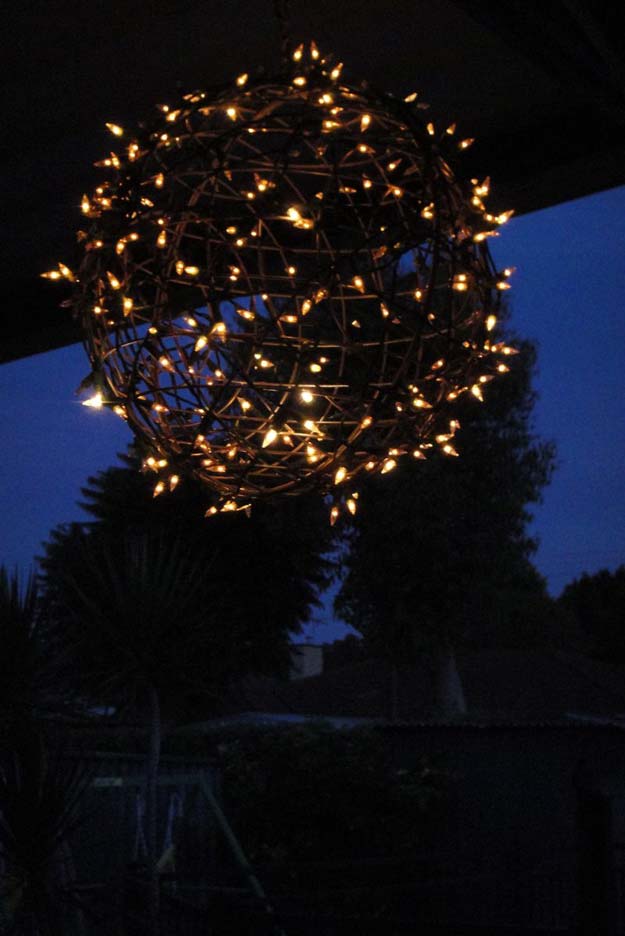
DIY String Light Chandelier
In truth, the presence of chandeliers adds a classic look to any space. But if you don’t have one in your home, the good news is that we will show you how to make your own! Several tools are required to make it, but you can get them in any hardware store.
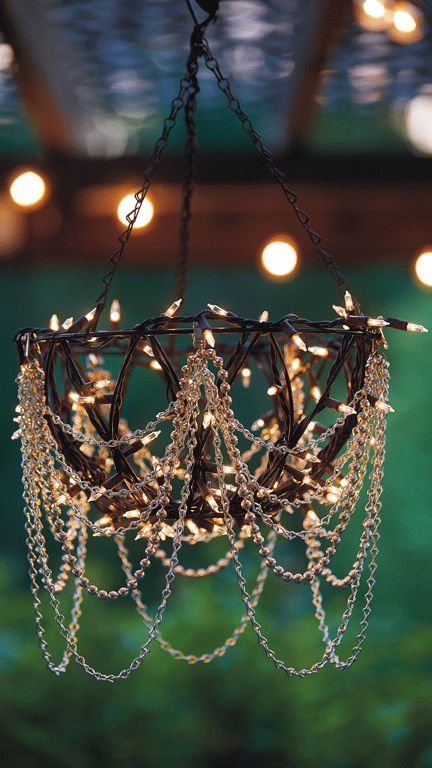
Since it’s a DIY, you can recreate this style or opt to get imaginative and create a masterpiece of your very own. This particular chandelier is perfect for any bedroom, our outdoor area and its true beauty shines at night or when it is dark.
Photo Booth Backdrop
The backdrop of a photo booth at an event is very important, and if you want yours to stand out, try this DIY out. Using PVC rods, create an arch to hang your lights and curtains. When the arch is set, carefully thread your curtains onto the rods.
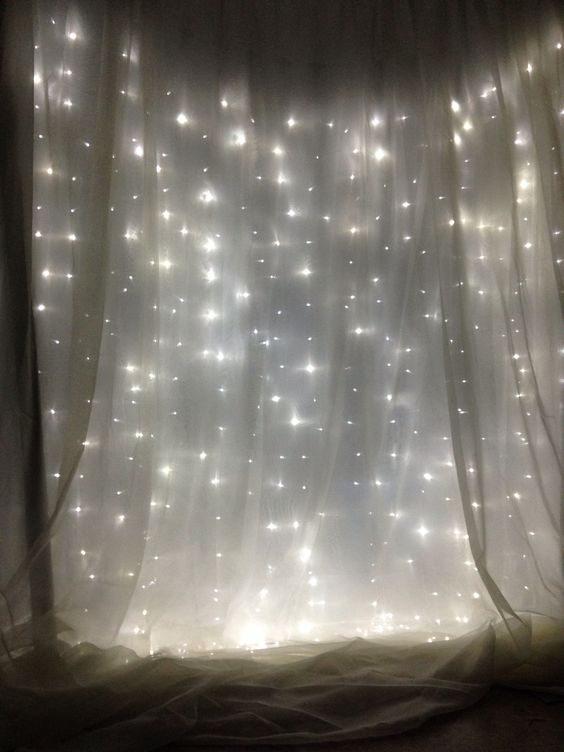
After the curtains are set, attach the string lights at the back of the curtain with safety pins or a needle and thread. You can tell a friend to help on this one to be faster. Adjust the string lights to your liking and watch the spectacle you just created.
Back Light
You like what you see, right? Here’s how to go about it. Simply get compressed styrofoam and paint it black. The panel in this picture was made by taping two 4′ x 8′ styrofoam panels together. Next, poke Christmas lights at random through the styrofoam.
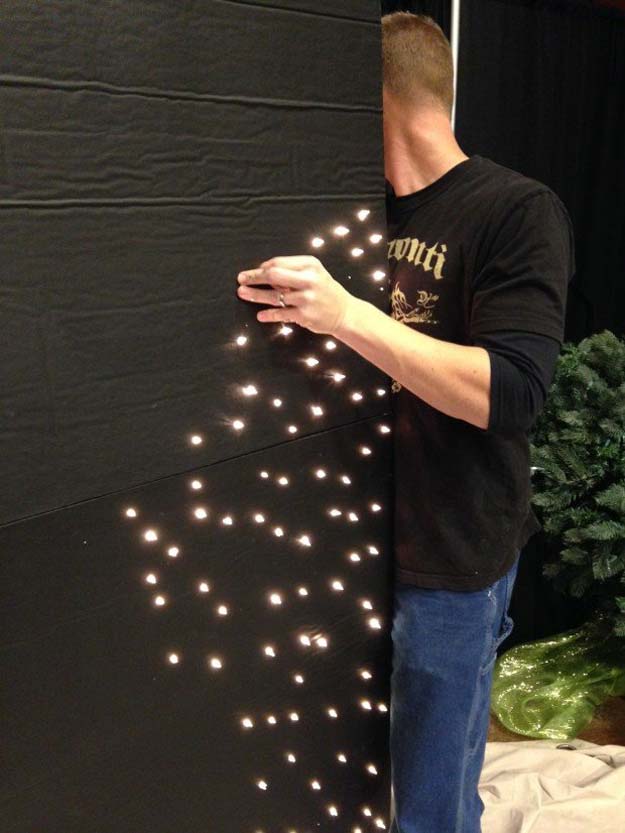
This gives it a radiant feel. For this piece, the designer used a total of six boxes of 300 lights. If you are worried about how to place the styrofoam, simply make a wooden frame and tack it on the frame. If you want to take this to the next level, you can draw out an image or scene and place the light bulbs accordingly. A great personalized decor idea is to write your name across the board and create the holes along those lines to see your name in the stars!
DIY Wine Bottle Lights
Please don’t throw away empty wine bottles; instead, use them as lighting designs! Gather some clean and empty wine bottles together. Place the bottles properly on the table and mark a spot on the bottom of the bottle to drill a hole.
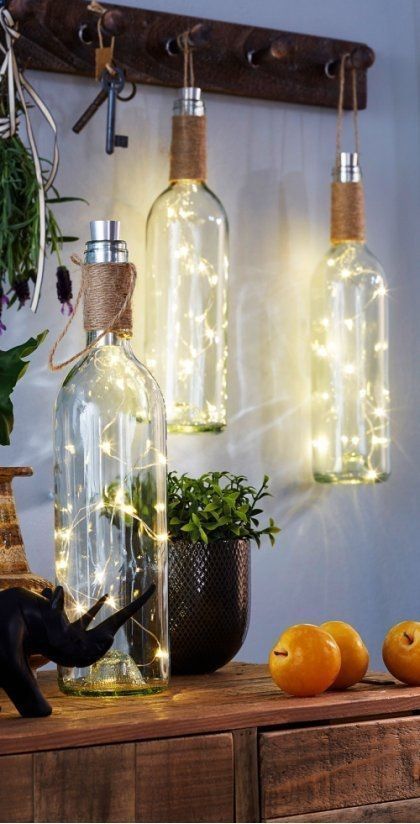
Put the string light through the hole on the bottom of the wine bottle, leaving only the plug outside the bottle. Lastly, put a stopper at the end of the string coming out of the bottle. The stopper will keep the wire intact and prevent it from being cut by the glass edges. You can make the stopper from electrical tape.
DIY Vision Board
Youtuber, Jtru, showed us how she crafted this gorgeous vision board. Using a corkboard size of your choosing, the first thing that this crafter did was bring out her glue gun and glue the plastic floral and leaf garland. After that, you can intersperse the fairy lights throughout the flowers.
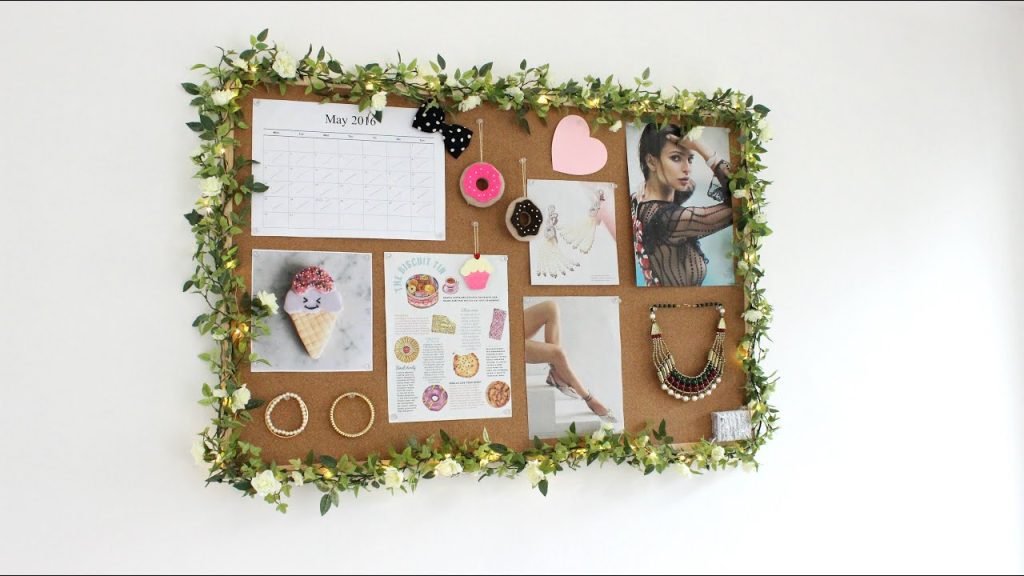
One follower suggested putting this fairy light garland around a mirror; that’s another gorgeous idea! In the morning, looking at this vision board would start our day off on the right foot. We love that she chose to hang some jewelry on it as well.
Light Up Your Bicycle
This is undoubtedly an extraordinary idea to help you light up your street and your bicycle. You can do it in a few simple steps. Firstly, hold the bicycle in place and get two strings of light ready. Then simply begin wrapping it around the bike.
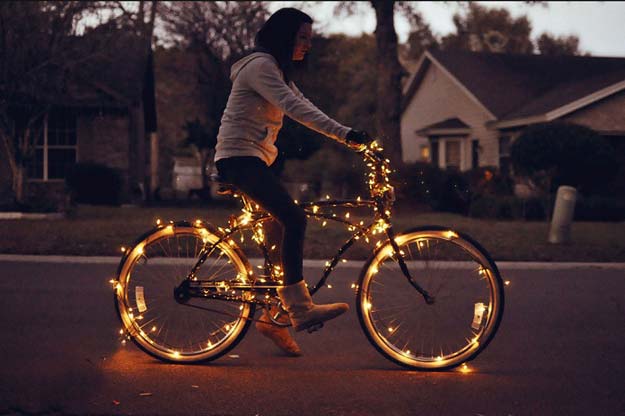
When you reach the bicycle tires, carefully place the string lights toward the inward circle of the tire. If you put the light bulbs at the edge of the tires, they will break when you’re riding. Now, you will get noticed wherever you ride!
Fairy Globe
If you come across some good ol’ circular basket frames, you can use them for this fantastic DIY. They will come in handy for outdoor decorations for your balcony or patio. Start by spraying the entire basket with silver paint to give it a metallic splash.
Wrap the string light across the basket’s frame. The small bulbs will prevent the wire from slipping off. Next, use a chain or a hook to attach the globe to the roof, and your fairy light globe is ready to be used! Of course, you can make this hanging lantern available in any shape.
Black Cats
Cat lovers should get ready for this next hack as it is easier than it looks. Be sure you have some poster boards of black card stock ready. Draw a simple cat face and cut out your template, trace the template onto the card stock, and cut out as many as you require.
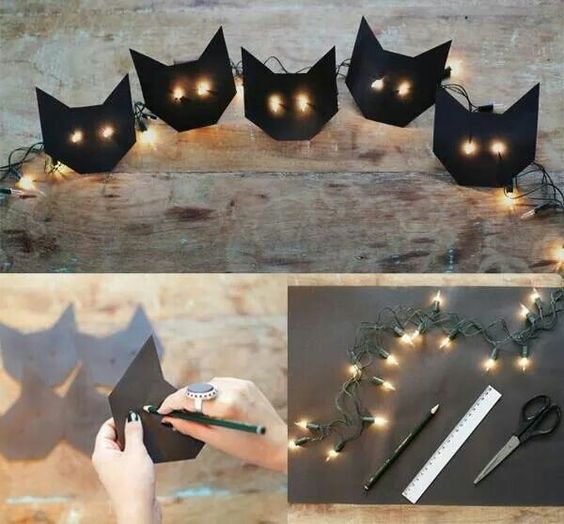
Once you have cut the cat heads, use a hole punch to create two eyes in each cat. Attach the string lights to the cat by inserting the light bulb through the eyes. Hang them on a bright background to really make them pop!
DIY Origami light
As complicated as this light looks, it’s worth all the effort in the end. This particular project can be done during weekends so that you will have enough time to explore your creativity. To achieve this look, you will need drawing paper and a set of string lights.
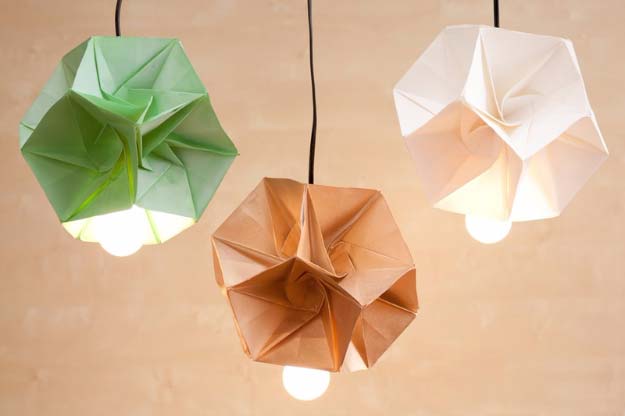
The first step is to choose the design of the origami. Sometimes, it can be a tad difficult to find the perfect lampshade to fit the decor in your home. That is why origami lampshades are the perfect choice to spice up your space. You can choose which design and what color paper you will use.
DIY Fire Pit
You won’t need much more than some logs and fairy lights to make a flameless fire pit. Place the logs accordingly and string the fairy lights around the logs to create a safe and cozy fire pit. The bonfire can be “lit” indoors for a romantic night in or bring the “warmth” outdoors in the summer nights when extra heat isn’t required.
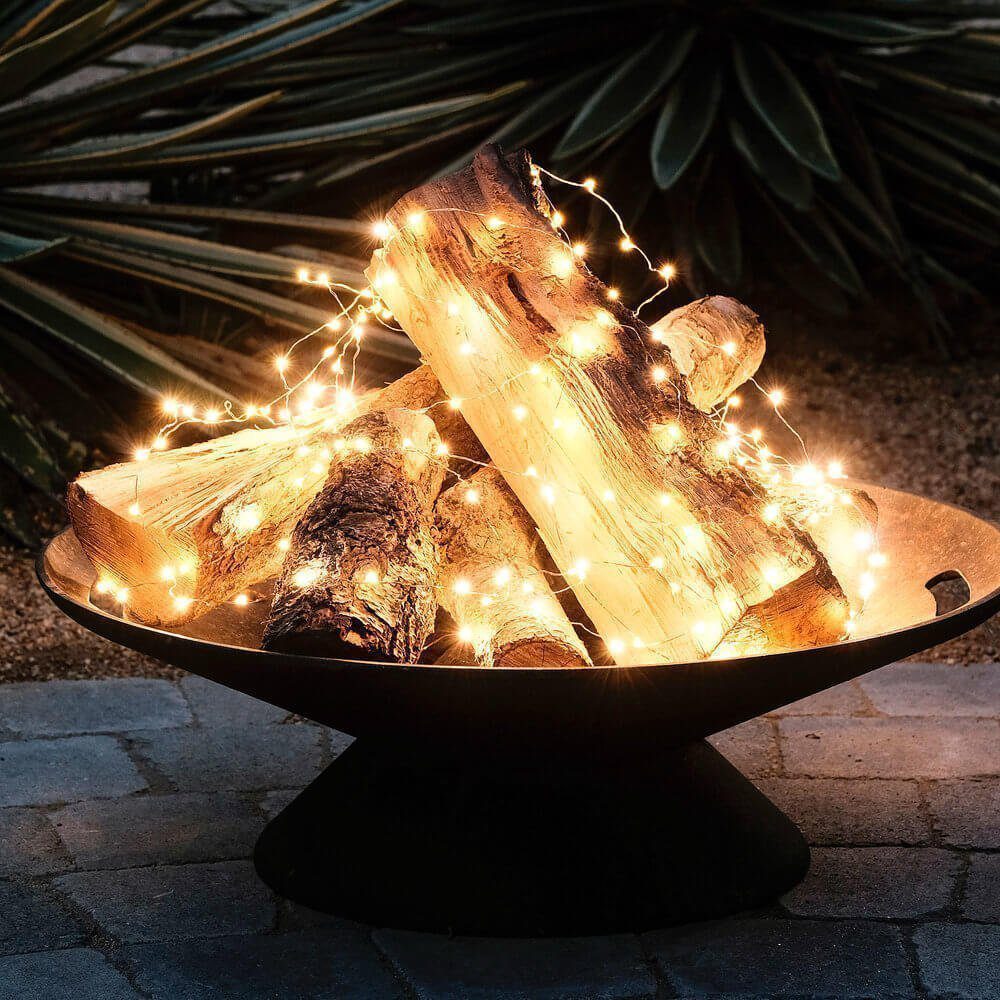
An iron or copper fire pit to put the logs in would make this even more authentic. And if the mood is right and you decide to make an actual bonfire later, just remember to remove the twinkling lights and of course do it safely outdoors!
Photo Display
You don’t have to pile up all your favorite photos in an album stuffed beneath drawers anymore. Now you can make them come alive! Use string lights to create a magnificent photo display, and bring all those memories to life.
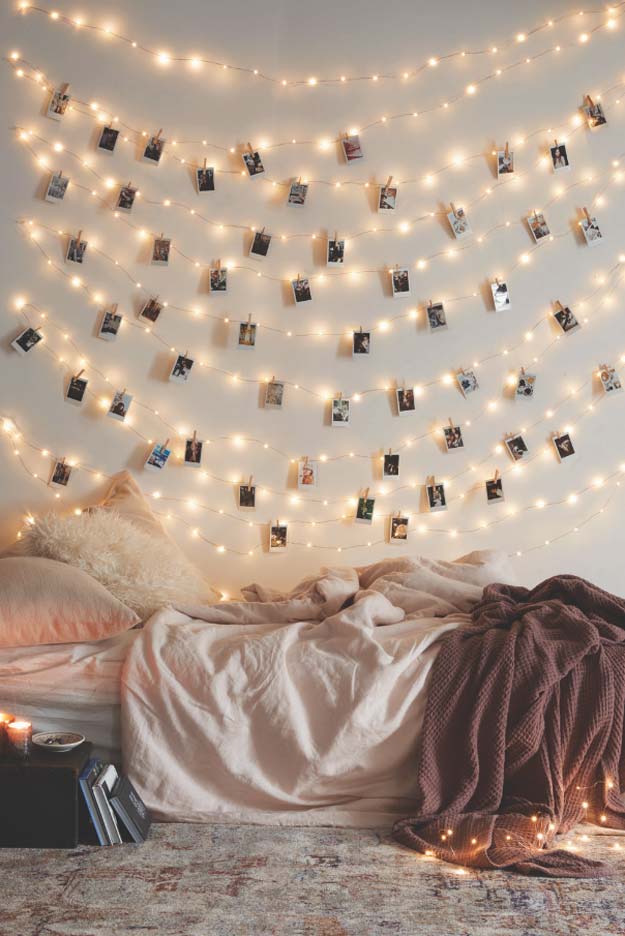
Here’s how to go about it. Arrange the string lights on your wall elliptically (or any shape you want) and attach your photos carefully using small wooden pegs. At the end of the day, you will have a great big smile on your face when you see the results.
Love is in the Air
That’s not all. There is another way to make your favorite photos come alive. This way is a little different from the first. Arrange your photos to create a big heart, then use string lights to outline the edges of the shape.
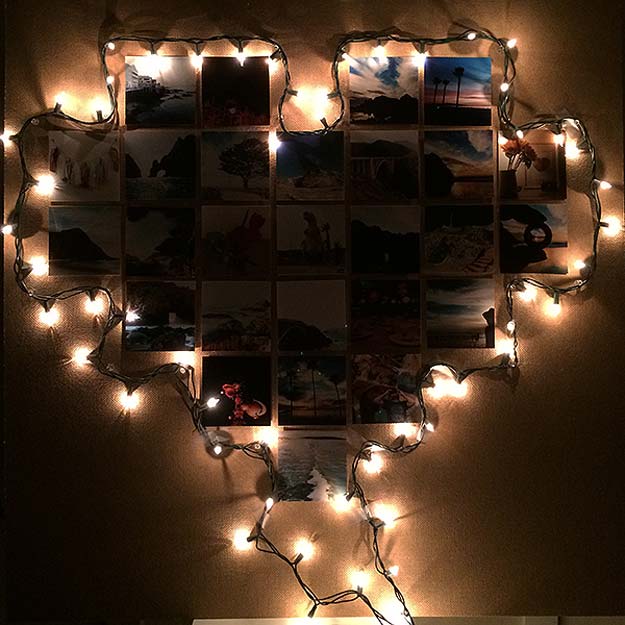
This would be great if used as a surprise for Valentine’s Day for your loved ones or another way for you to commemorate a special event. Otherwise, if you want to light up your home with love and beautiful memories every day, this is the best way to go about it.
Rare Halloween Design
Haloween just got better with this design. Hollow out a pumpkin and clean the inside thoroughly. Do a rough sketch on paper and use dotted lines to draw any design on the pumpkin with a permanent marker. You can then use a screw driver and hammer to bang out each hole but we have a better idea.
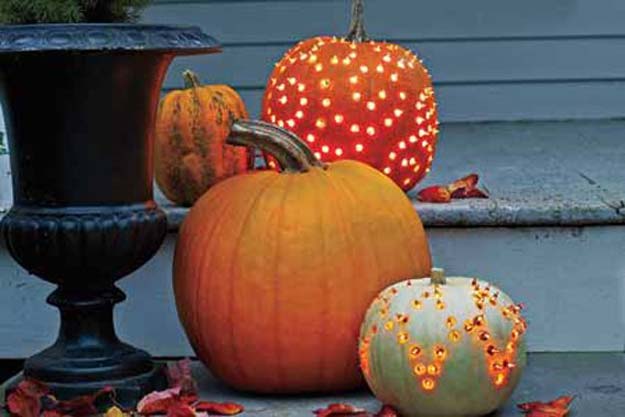
Use a drill or driver to bore holes where you made the dotted lines. Insert the string light and a bulb, ensuring that the bulb should go halfway through each hole. Light up the pumpkin when it’s evening, and you have a homemade pumpkin design that can last throughout Fall.
Top-notch Christmas Designs
Christmas designs come in various forms, but this one right here is so outstanding that everyone will ask you where you bought it. The best part is that it is effortless to make, as it takes just 10 mins. Some apothecary jars (old ones) will come in handy.
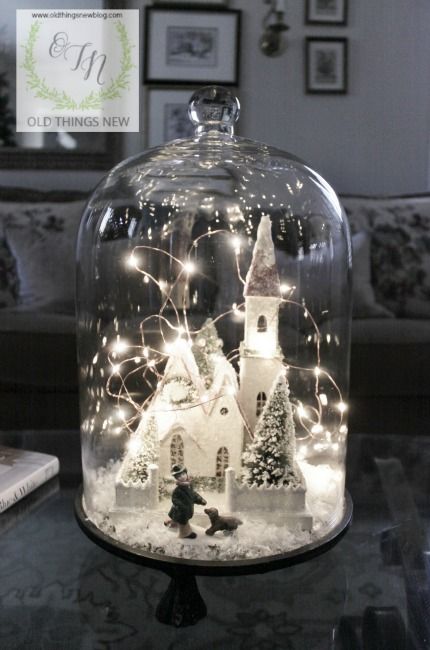
Add some snow (plastic confetti snow), the string lights, and some winter elements like trees and village pieces, and you’re done. Ensure you arrange them properly for a clear view. What matters most is that you’re happy with what you’ve done.