
Sprucing Up A House: 45 Interior Decor Tips To Make Any House Look More Appealing
If you’re like most homeowners, you’re always looking for ways to improve your home’s look. But it’s not always easy to get started. That’s why we’ve created this list of DIY home decor ideas to help you add a little style to your space without breaking the bank.
One of the best things about DIY home decor is that most of the time, you get to use items you already have around your house. For instance, if you have a good collection of old books, you can use them to create a unique bookshelf. Or, if you have a bunch of picture frames that are gathering dust, put them to good use by hanging them up as art.
Keep reading to find more ideas.
1. Hanging wood shelves
If you’re on the hunt for a creative way to spruce up your home, try building your hanging wooden shelves and nailing them on the wall. This project is relatively easy to do, and it will give a touch of rustic charm to your space. Grab some wood boards, a saw, screws, nails, and sandpaper.
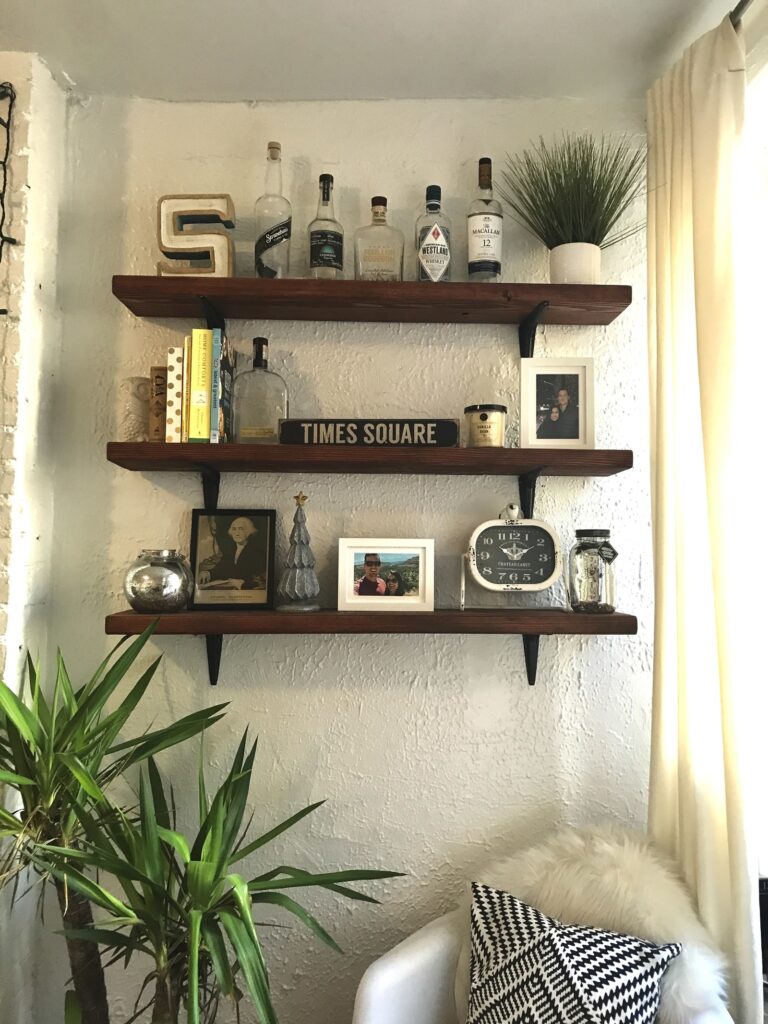
Cut the boards in the length and width you want, and then use sandpaper to smooth out the edges. Next, it’s time to attach the shelves to the wall. Find two studs in your wall and then screw the shelves into place. Nail the shelves into the wall to add some extra support.
2. Make a fluffy rug
If you’re looking for a unique and fluffy rug to add to your home decor, why not try making your own? It’s easier than you might think, and you can customize it to match your home’s style. Here’s what you’ll need multi-use netting, scissors, cotton piping, and rubber bands.
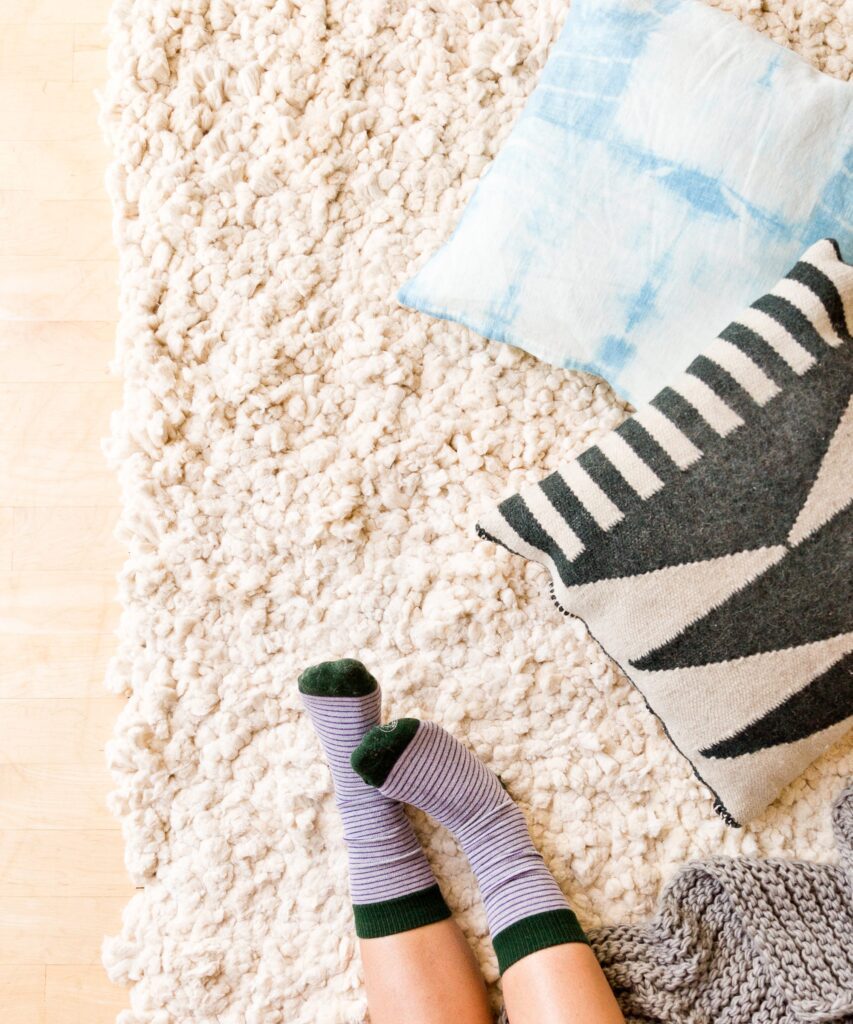
To start, cut the cotton into about three inches long strips. Then, thread one strip of cotton through the cotton piping. Continue doing this until all of the netting fabric is used up. Once you’re finished, fluff up the rug to give it some texture.
3. DIY globe clock
Looking for a unique clock that will stand out in your home? Why not try making your globe clock? This DIY project is relatively easy to do, and you can customize it to match your existing home decor. To start, you’ll need to cut a globe in half.

You can find a globe at almost any local store that sells home decor items. Once you have your globe, use a clock-making kit to attach the clock mechanism to the top of the globe. Now all you’ve to do is add your personal touch with stickers and paint.
4. Small popsicle stick shelf
One easy and fun project is to make a hexagonal shelf out of ice cream sticks. To make this shelf, you will need ice cream sticks, glue, paint, or stain. Start by gluing six ice cream sticks together in the shape of a hexagon.
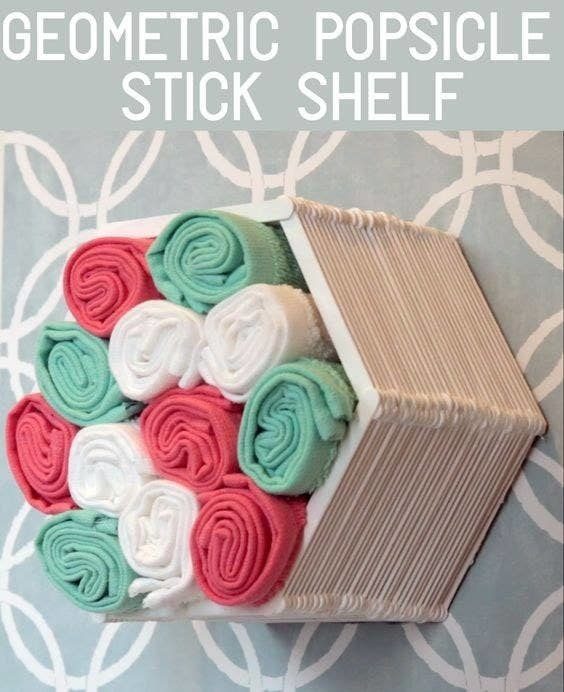
Once the glue has dried, you can paint or stain your shelf if desired. Then, use the remaining sticks to create shelves within the hexagon by gluing them perpendicular to the hexagon’s sides. That’s it. Your new shelf is ready to use!
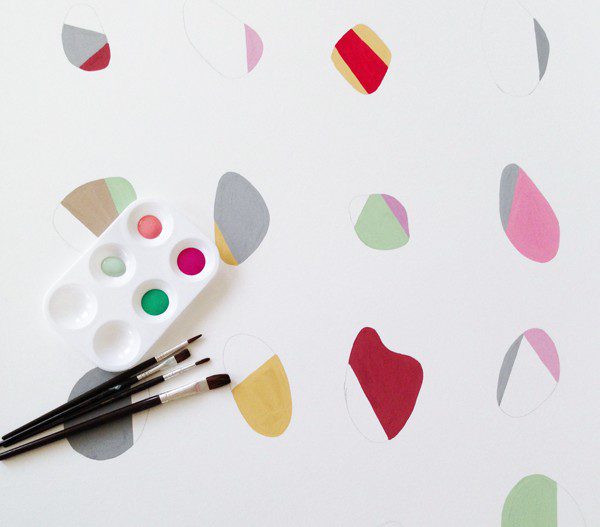
5. Confetti design on flower vases
Whether you’re looking to add a vibrant pop of color or simply want to personalize your home décor, painting your flower vases is a fun and easy project that anyone can do. It simply requires a little paint and some creativity. Gather up any empty vases you have around the house.
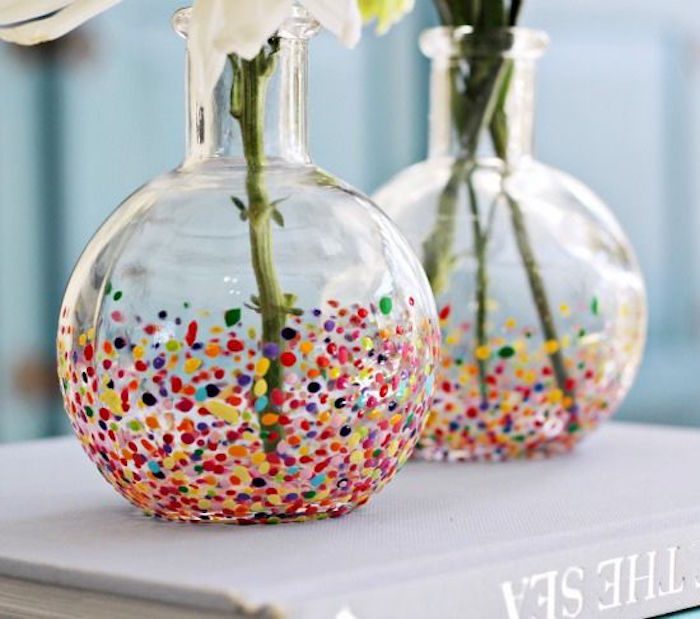
If you don’t have any vases on hand, you can often find them for cheap at thrift stores or local garage sales. Once you have your vases, decide on the colors you want to use. You can either go with a single color or mix and match to make a more colorful confetti design.
6. Patterned pillow covers
One of the best things about plain white pillow covers is that they can be easily transformed with a little bit of fabric paint and some masking tape. This is a fantastic way to include a pop of color or pattern in your home décor without spending much money.
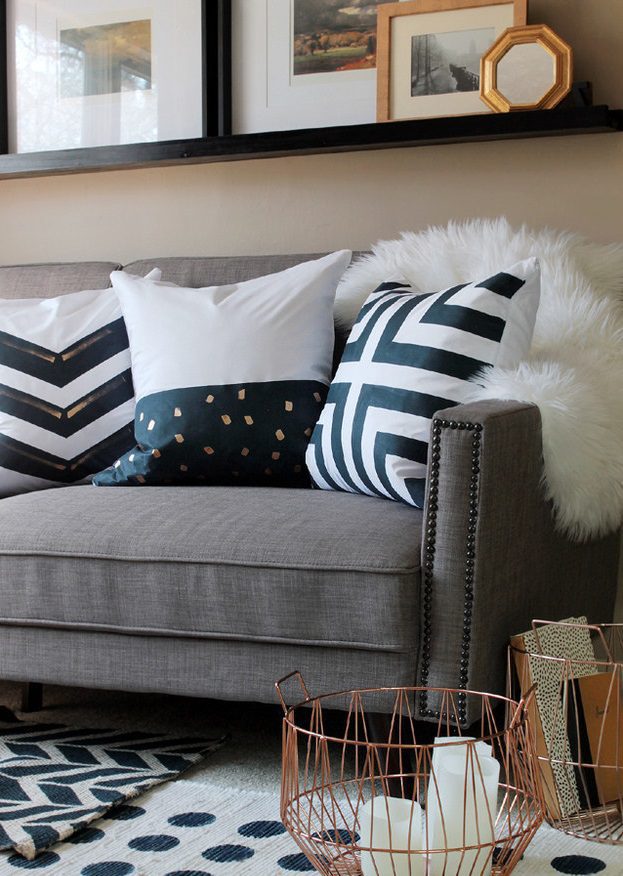
Plus, it’s a fun project you may do with your kids or friends. You’ll need some plain white pillow covers, fabric paint, and masking tape. You may get all of these useful supplies at your local craft store. Once you have everything, you’ll just have to pick the design.
7. Easy marble clock
If you’re on the hunt for a quick and easy option to add a splash of luxury to your house, why not try using marble design contact paper to cover a circular board? You can then attach clock-making kit parts to the board to create an easy marble clock.
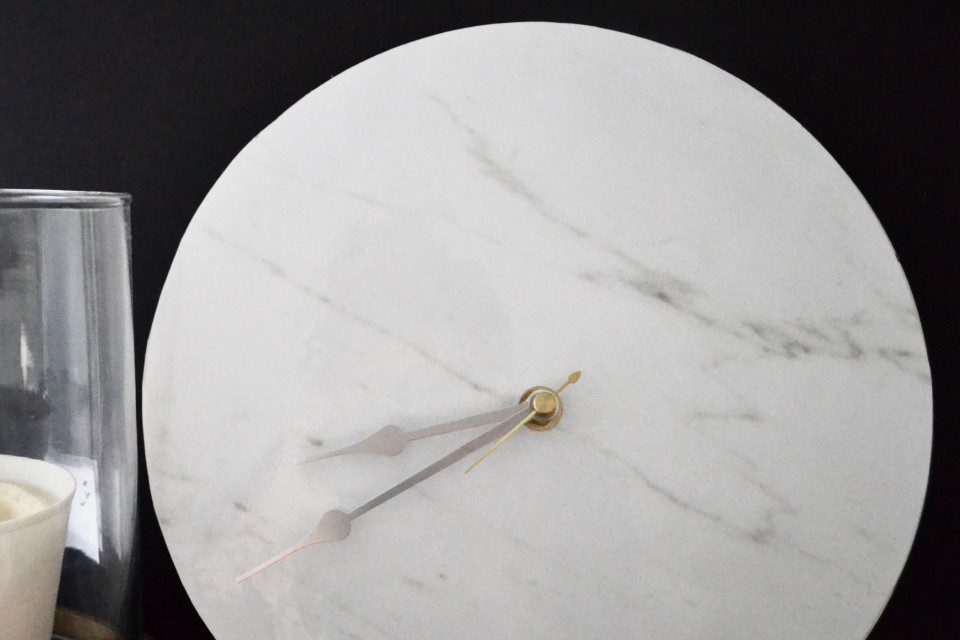
Marble design contact paper is available to order in various colors and patterns. And because it’s self-adhesive, it’s quick and easy to apply. Just make sure you smooth out any bubbles as you go. Once your contact paper is in place, it’s time to attach the clock-making kit parts.
8. Decorate fridge with washi tape
If you’re bored with your old fridge and looking for a quick and efficient way to spruce it up, why not try decorating it with washi tape? Washi tape is a decorative tape that comes in various colors and patterns.
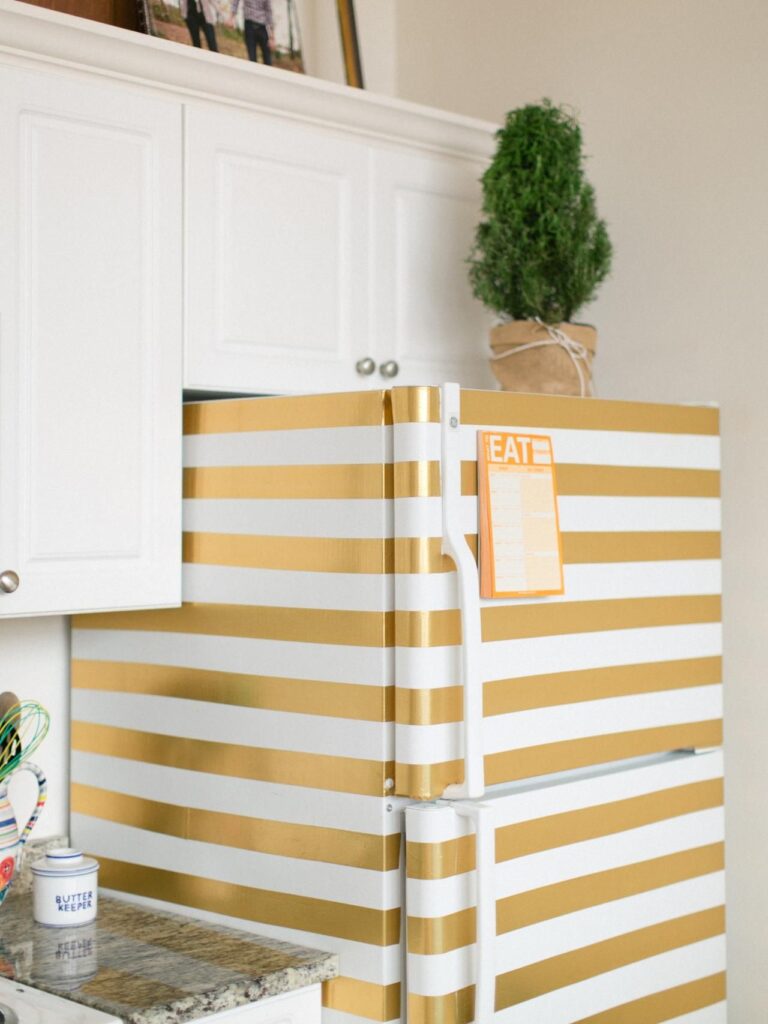
You will easily find something to match your home’s décor. You may choose a patterned washi tape and mix it with a bold color to make a design. Plus, it’s super easy to apply and remove, so you may change up your fridge’s look as often as you like.
9. Painted canvas cloth rug
If you’re looking for an exciting and creative way to include a personal touch to your home, you can try making your own painted canvas cloth rug. This project is uncomplicated and only demands a few materials: canvas cloth, paints, and a paintbrush.

Lay your canvas cloth out on a flat surface. Apply a thin layer of paint across the fabric using your paintbrush. When the first layer of paint is cured, you can add a second one. When you’re happy with the coverage of your rug, let it dry completely before placing it in your home.
10. Wool cactus pin cushion
Wool felt is an excellent material to use for home decor projects because it is durable and easy to work with. For this project, you will need 1/4 yard of wool felt in green, scissors, needle and thread, and polyester stuffing.
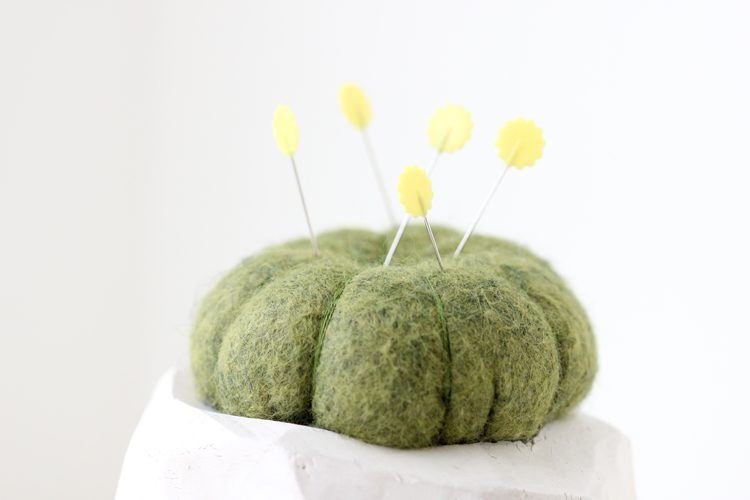
To make the cactus, cut a triangle shape out of the green felt. This is going to be the body. Sew the two sides of the green felt together, but leave a space at the bottom. Turn the cactus right side out and stuff it with polyester stuffing. Sew the bottom opening closed.
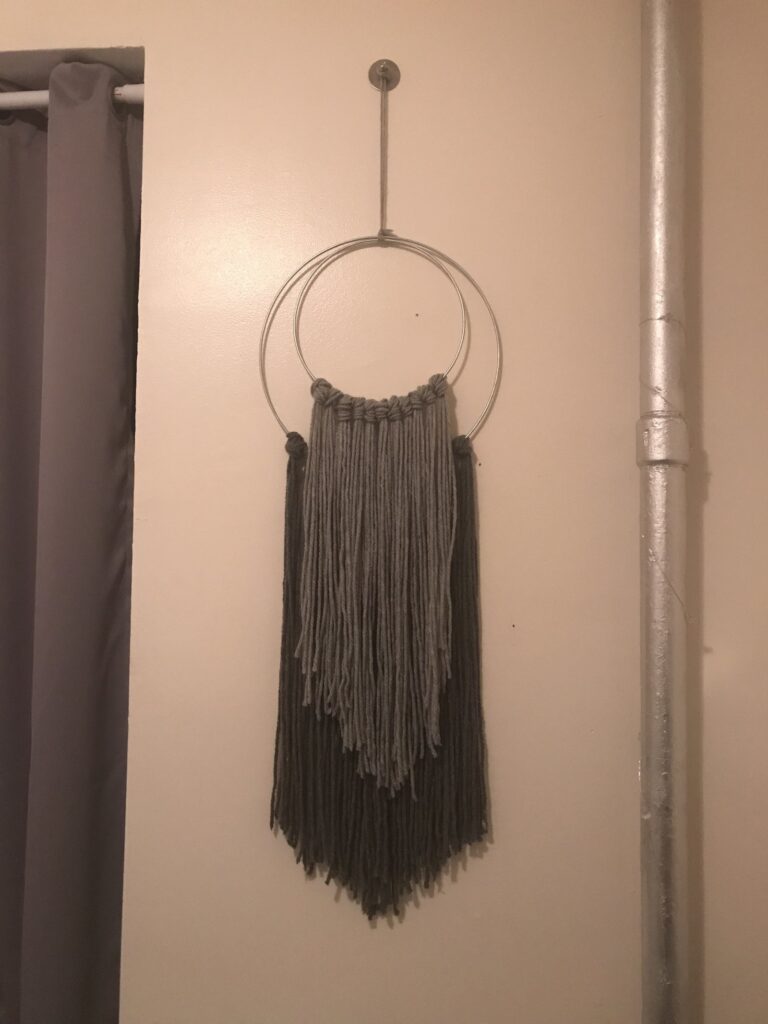
11. Hula hoop headboard
If you’ve been looking for a fun and unique DIY project to add some personality to your home, look no further than this Hula hoop headboard! Using a large hula hoop and colorful yarn, you can easily create a one-of-a-kind headboard that will add pizazz to your bedroom.
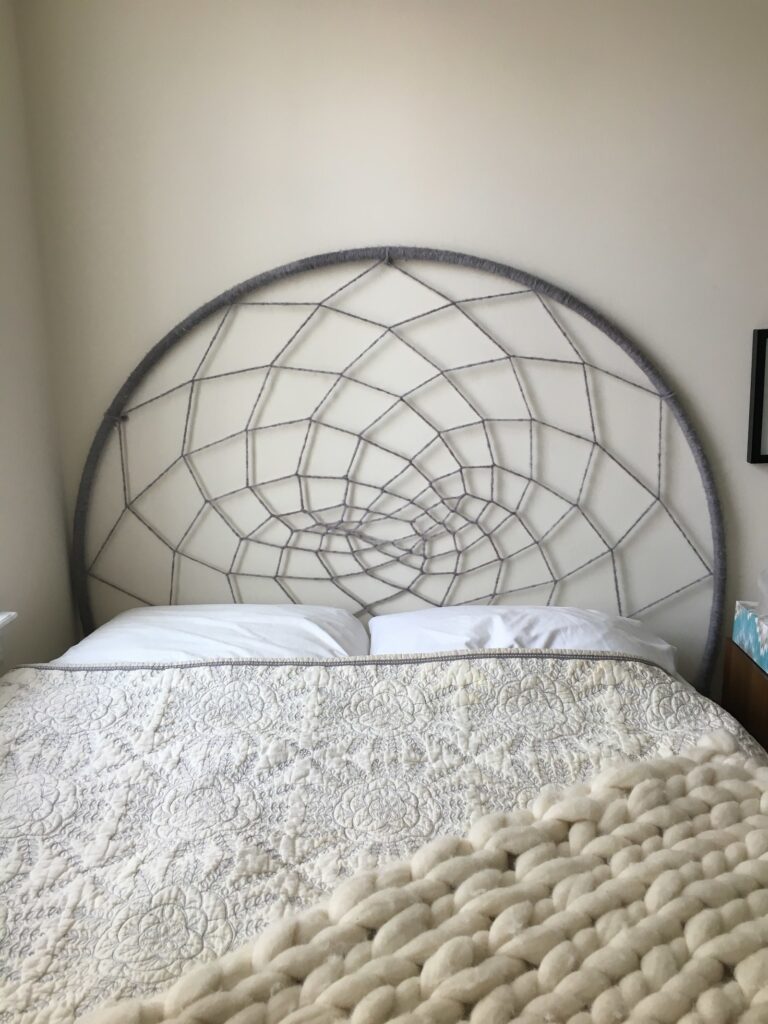
Start by wrapping the hula hoop with one color of yarn and securing the end with a knot. Continue wrapping the hoop until it is completely covered. Then, cut the yarn and tie off the end. Repeat this process with the remaining two colors of yarn, wrapping them in different directions.
12. Framed posters using wooden slats
Wooden slats are an inexpensive way to frame posters, and hanging them using a jute rope is an easy way to add a rustic touch to your decor. You can find wooden slats at most craft stores, or you may repurpose an old pallet.
To hang your poster, simply nail the slats to the top and bottom of the poster, then thread the jute rope through the slats and knot it in place. You may make these for the kid’s room or for the kitchen with recipes to make beautiful touches to your home.
13. Marble gold table
Instead of buying an expensive marble table with golden accents, you can DIY it at a fraction of the price. Grab a marble slab and get it cut into a circle or rectangle. Start by painting your hairpin legs gold. You can use spray paint or regular paint and a brush.
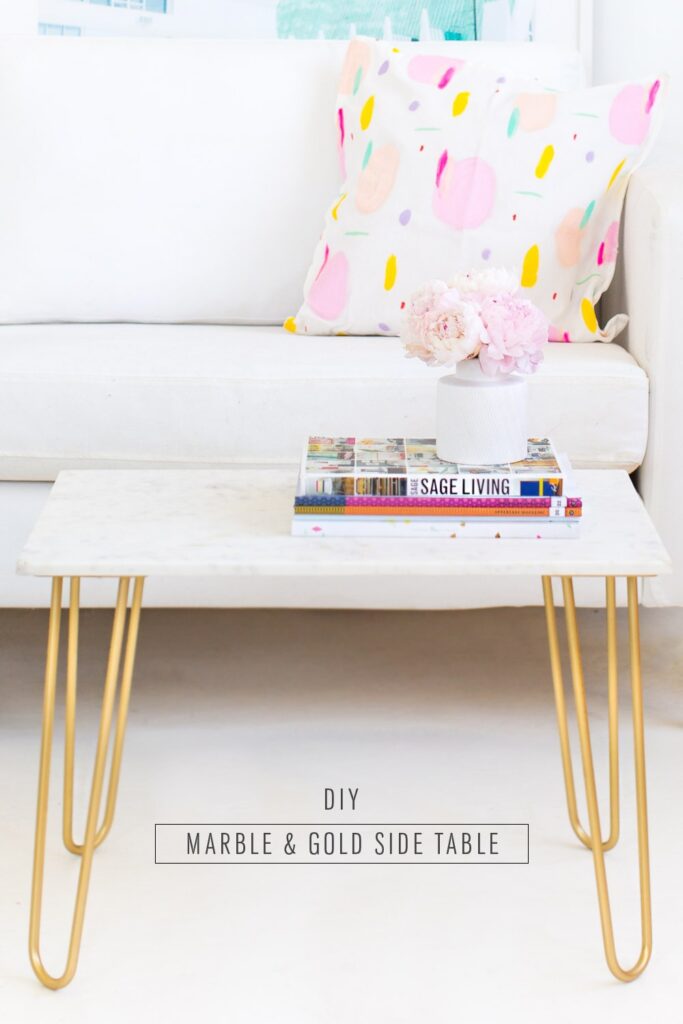
Once the legs are dry, attach them to your marble centerpiece table top using screws or nails. Your new marble centerpiece table with gold hairpin legs is now complete! Enjoy your handiwork, place it in the living room and show it off to your friends and family.
14. DIY leaf art for walls
When you’re looking for an exciting way to spruce up your home décor, why not try a DIY project? A framed leaf makes a beautiful and eye-catching piece of art for your wall. It’s really easy to do! Here’s what you’ll need: a dry leaf, a double-sided glass frame, and tape.
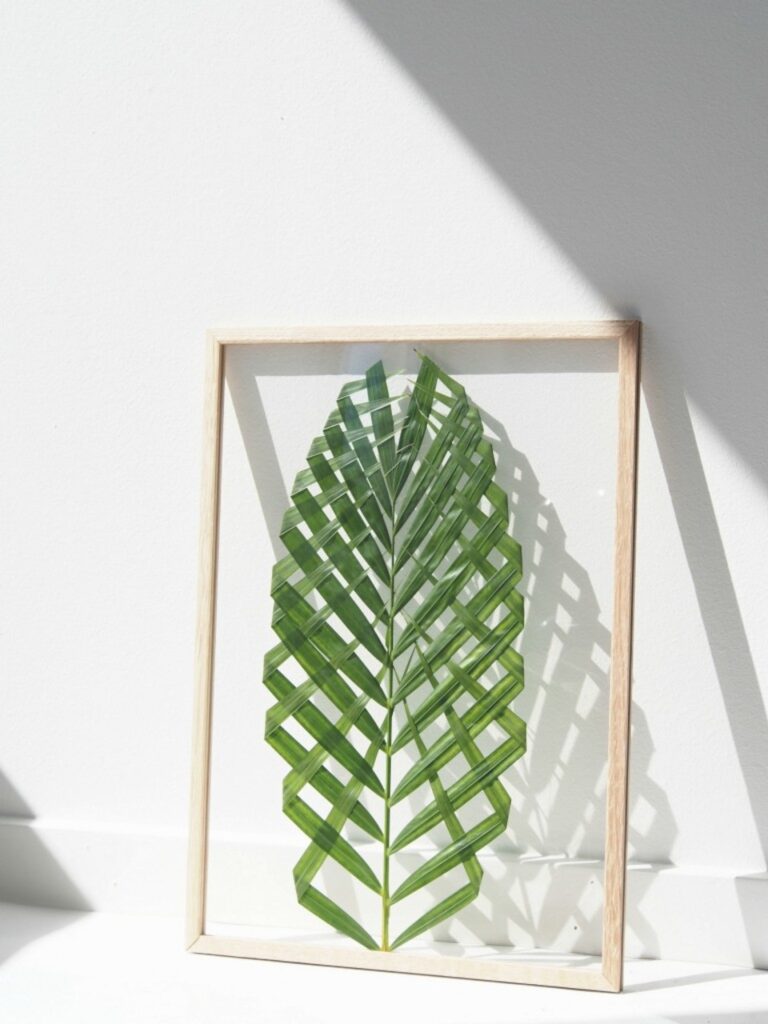
First, find a pretty leaf. You can use one from your yard or go on a nature walk and search for the perfect one. Once you have your leaf, place it inside the glass frame. Use tape to secure the leaf in place. Now hang your new piece of art on the wall and enjoy!
15. Mid-century plastic planter
To get that “mid-century plastic planter” look, start with a basic plastic planter. You can find these plastic planters at many home stores or online, then just add a wooden piece to the base. You could also use small nails to attach the wood base to the plastic planter.
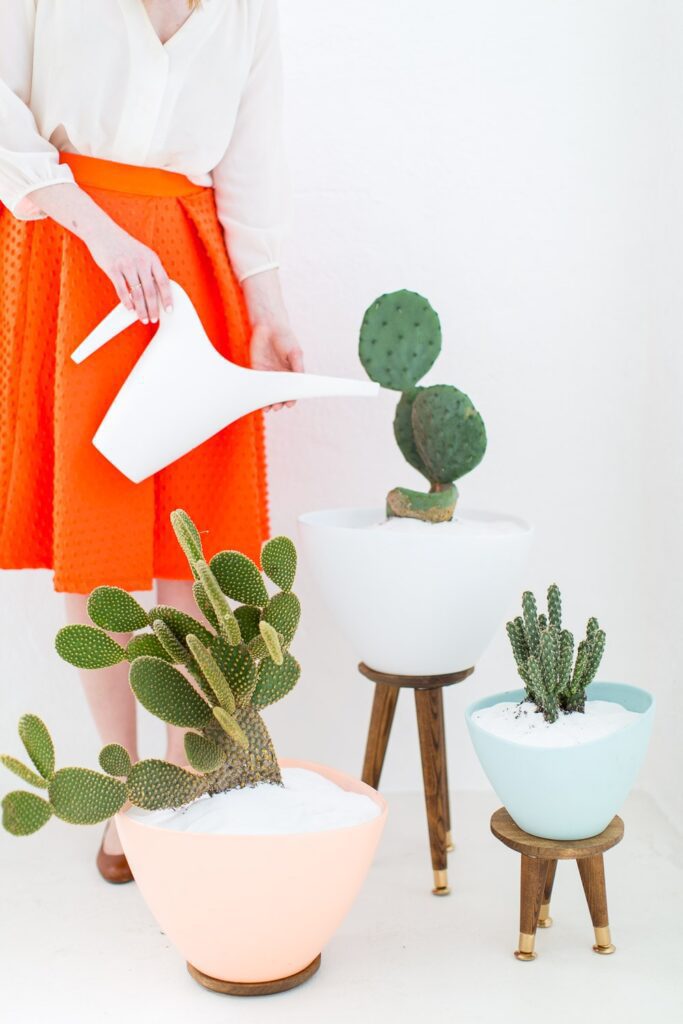
This will give your planter a more vintage look and feel. Once your base is attached, fill your planter with the soil and plants of your choice. These could be succulents, cacti, or other small plants. Be sure to water them regularly and enjoy your new mid-century plastic planter!
16. Draw on a tea set
When it comes to tea cups, there’s nothing more classic than a plain white set. But why settle for ordinary when you can add your personal touch? With a bit of creativity, you may turn a simple tea cup set into something special.
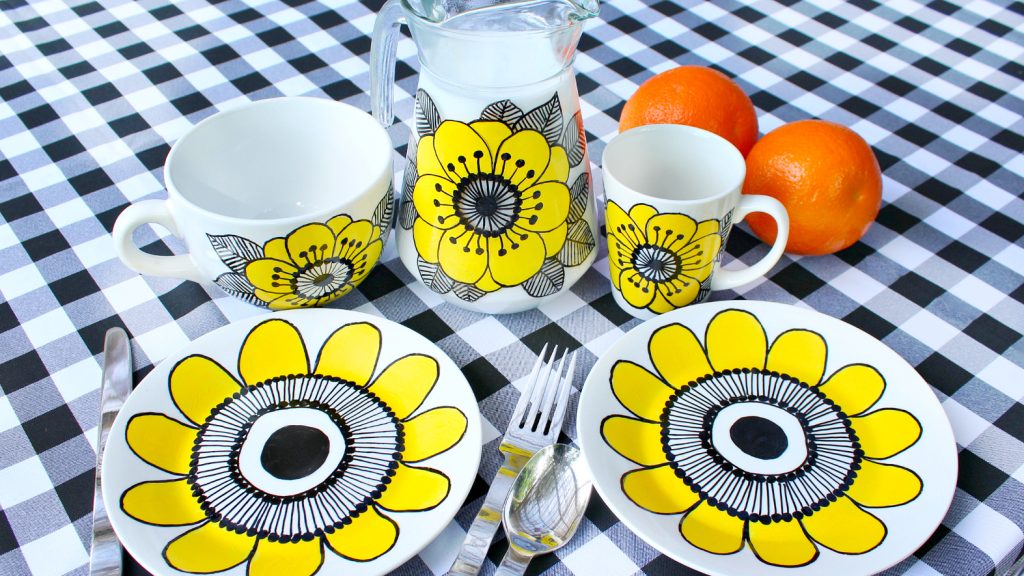
Pick up a plain white tea cup set from your local dollar store. Get some bright markers in your favorite colors. Draw simple patterns on the cups, such as stripes or polka dots. Be creative! Let the markers dry, and enjoy your new Marimekko-inspired tea cup set!
17. Plywood vintage breakfast tray
One of the most popular DIY home decor ideas is to use plywood to make a vintage-style breakfast tree. This is amazing to add some extra character to your kitchen or dining room. Also, it’s a very inexpensive assignment that anyone can try. To make a vintage-style breakfast tree, you will need plywood.
First, you will need to cut the plywood into rectangular pieces using the jigsaw. You will stain each piece of plywood. To create a vintage look, we recommend using a dark stain for the bottom piece and a light stain for the top piece. Nail the pieces together to make a tray.
18. Light-up marquee sign
Try making your own light-up marquee sign using cardboard letters and string lights! This DIY project is easy to do, and you can customize it to spell out any word/phrase you want. Grab some Cardboard letters (you may find these at most craft stores), string lights (battery-operated ones are best), and scissors.
First, decide what word or phrase you want to spell out with your marquee sign. Once you have that figured out, attach the string lights to the back of the cardboard letters using tape or glue. Start at the top of the letter and work your way down, wrapping the string lights around.
19. Polka dot fridge
If you’re looking for a simple and inexpensive way to add a touch of fun personality to your home, you can try giving your fridge a makeover with some cute contact paper dots. All you need is some adhesive contact paper (you may find it at most craft stores) and a sharp pair of scissors.
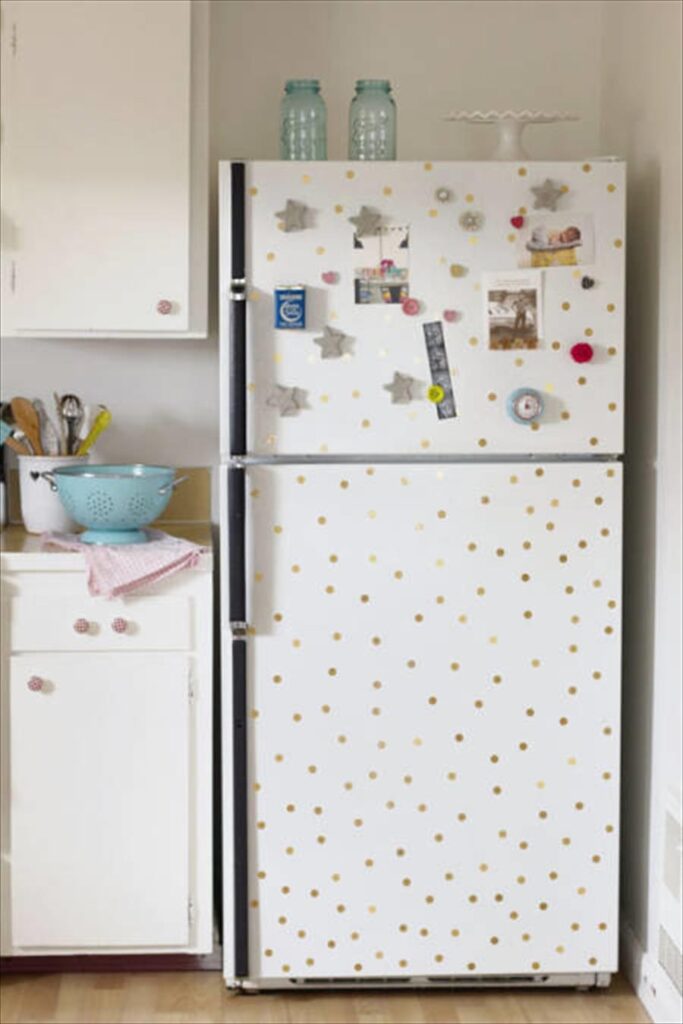
Cut the paper into small circles, then peel and stick them onto your fridge in any pattern or design you like. Not only will this add a fun hue of color to your kitchen, but it’s also an excellent option to use up any leftover contact paper you might have from other projects.
20. Brick bookends
Paint is one of the most versatile tools in a crafter’s arsenal. A fresh layer of paint can illuminate any room, and it’s a superb manner to add your personal touch to your home décor. Why not try painting some discarded bricks in a fun color to make brick bookends?
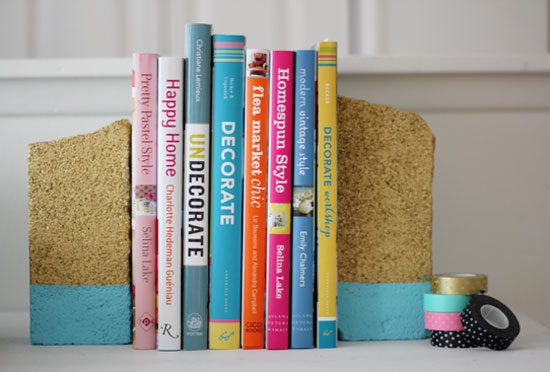
If you don’t have any at home, you can find bricks at your local hardware outlet or home improvement center. If you’re using new bricks, you’ll want to clean them first with soapy water and a stiff brush. Once they’re clean, let them dry completely. Now it’s time to get creative.
21. Cinder block desk
If you’re looking for a fast, affordable and simple way to spruce up your home office, consider making your desk out of cinder blocks and plywood. This simple project can be completed in just a few hours, giving you a sturdy and stylish desk that is perfect for any space.
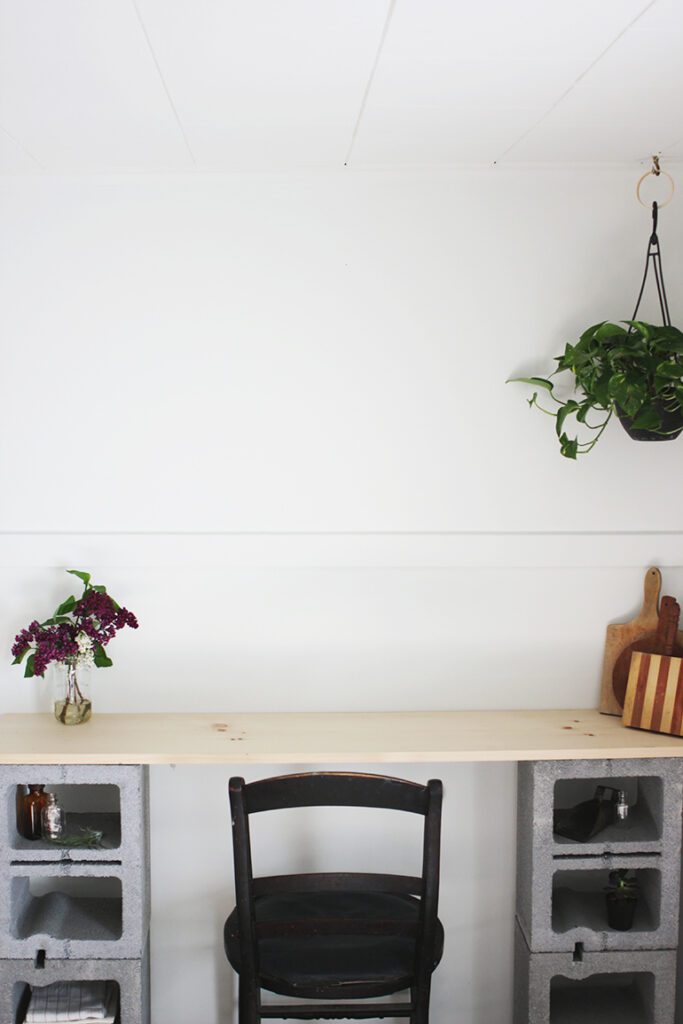
To get started, you will need eight cinder blocks and a sheet of plywood. First, lay out your six cinder blocks, three on each end. Then, place the sheet of plywood on top of the cinder blocks and use the drill to attach the two pieces together with the screws.
22. Paint the floor
Vinyl and linoleum are popular flooring materials often used in homes for flooring. Both materials are easy to care for and may last for a long time if you take proper care of them. However, vinyl and linoleum can become dull and lackluster over time.
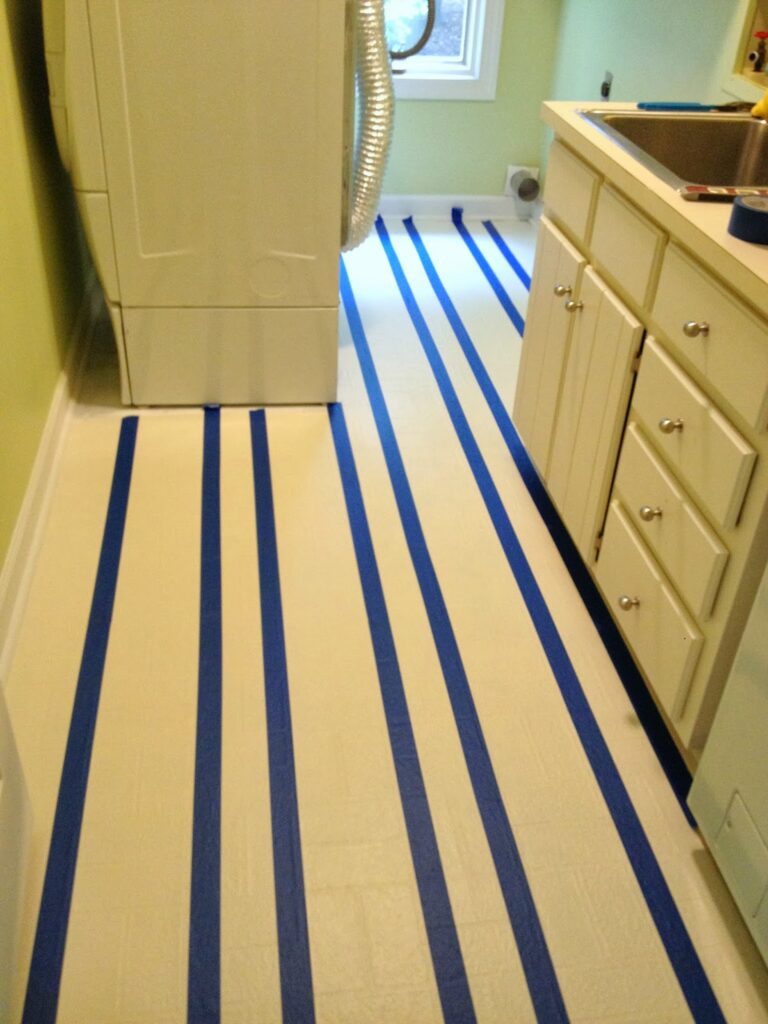
If your vinyl or linoleum flooring is starting to look dull, you may be wondering how you can spruce it up. One option is to paint your vinyl or linoleum flooring. This can be a great way to give your floors a fresh new look. First, you’ll need to choose the ideal paint.
23. Vertical storage for kitchen
If you’re short on space in your kitchen, you can create more storage by making vertical storage for pans inside your cabinet. This is a wonderful way to arrange your pots and pans and frees up space in your kitchen. To create vertical storage for pans, remove everything from your cabinet.
Measure the interior of the cabinet and cut some pieces of wood or cardboard to fit. Make sure the pieces are tall enough to hold all of your pans. You may add some magnetic hooks to the cabinet door and hang pans and pots from them.
24. Knit a chunky blanket
A chunky knit blanket is the perfect way to add some more warmth and coziness to your home. This type of blanket is usually made with thick yarn, which makes it ideal for chilly evenings or winter months. Knitting a chunky blanket may be a bit of a challenge, but the result is worth it.
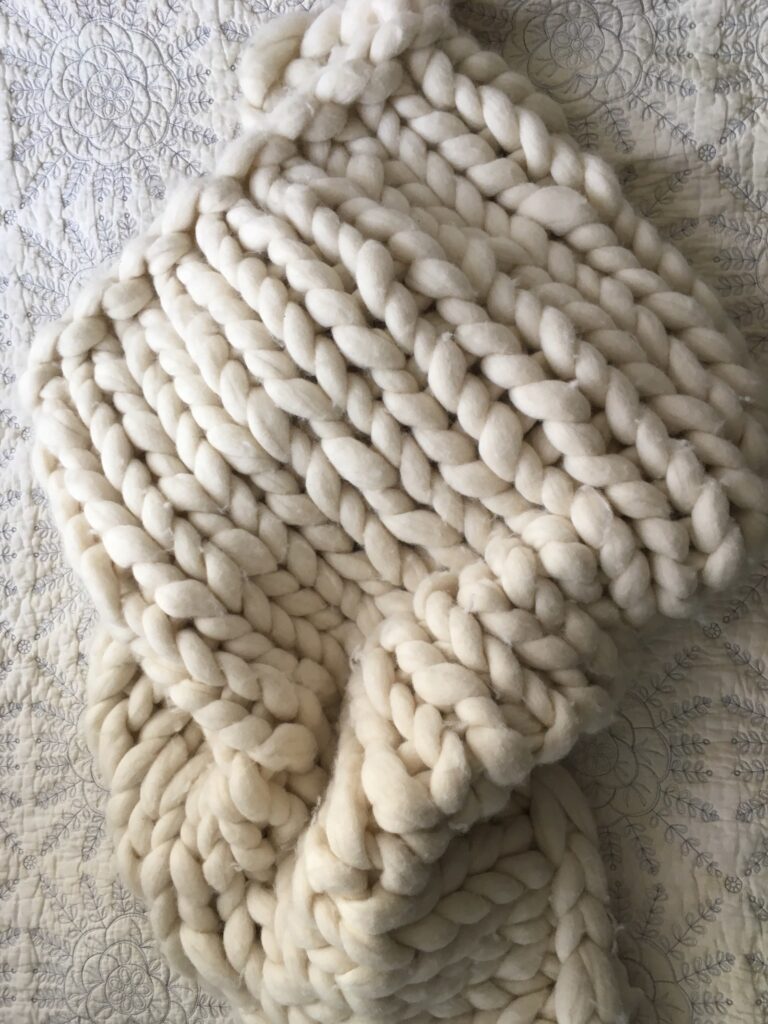
You’ll want to use a chunky yarn for this project, such as super bulky or jumbo weight. Avoid using a thinner yarn, as it will be much harder to knit with, and the final product will likely be too flimsy. Use large needles. Since you’re using thick yarn, you’ll also need large knitting needles.
25. Easy, minimal art
Add a little extra flair to your home décor without going overboard. Easy to find and usually inexpensive, minimal art is a great option to personalize your space without going too crazy. Whether you’re looking for a new piece to hang above the sofa or something to spruce up a wall, minimal art is excellent.
And because it’s so minimal, it’s easy to change up your look whenever you want without having to redecorate the whole room. If you’re unsure where to start, try searching for minimalist art designs and try to copy them on the canvas.
26. Frame the bathroom mirror
When you’re picking out a new frame for your bathroom mirror, there are a few vital things to make a note of. First, think about the style of your bathroom. Is it modern or traditional? If you have a regular bathroom, you might wish to choose a classic wood frame.
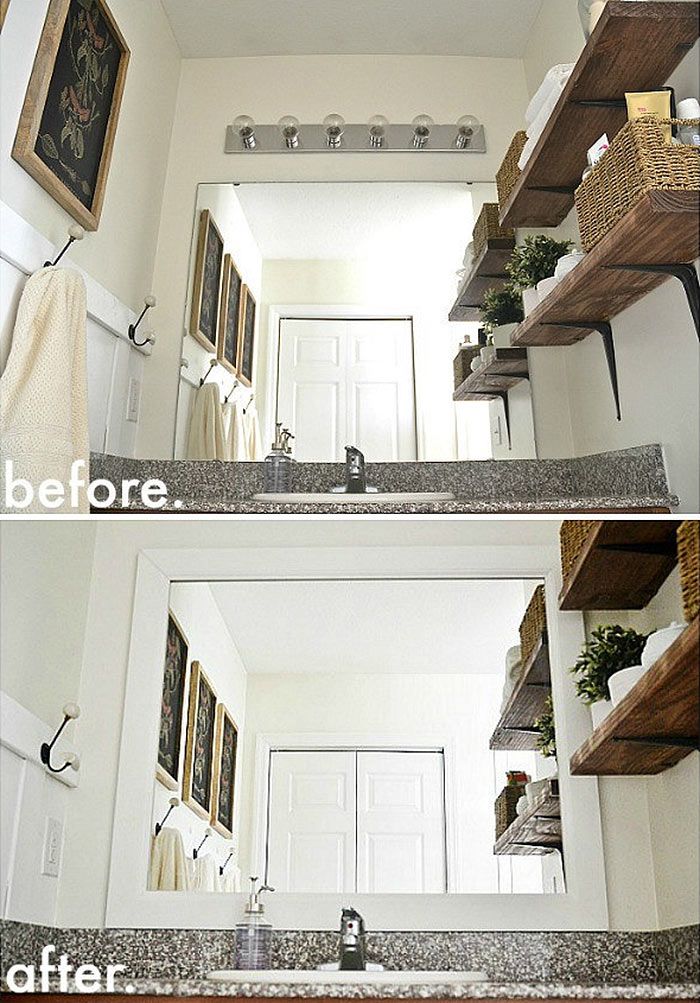
If your bathroom is more modern, experiment with different materials and finishes. When you pick the style of frame you’d like, measure your mirror. Write down the width and height of the mirror and the depth of the frame. With these measurements, start shopping for frames!
27. Glitter pillow covers
Make some glitter pillow covers to have a fancy couch without too many additions. All you need is some strong fabric glue and glitter, and you can create unique and sparkly pillows for your home. To get started, cut out some fun shapes from craft felt or another type of fabric to add glitter.
Then, use fabric glue to attach glitter to the fabric. You may be as crafty as you like with this DIY, so have fun with it! Once your glittery pillow covers are complete, simply slip them over some plain pillows and enjoy your new home decor.
28. Wooden box frames on photos
If you have some old picture frames and wooden boxes lying around, put them to good use with this creative home decor idea. Glue the frames onto the boxes, then hang them on the wall to create pretty shadow shelves. You may paint the frames to get them looking similar.

Use chalk paint or metallic spray. Fill the shelves with whatever you want so you can add a personal touch to the rooms of your home. Also, stick photo frames on these boxes for a raised photo frame look on the walls.
29. Tile the mirror border
If you wish to add a bit of personality to your décor, consider tiling the border of your mirror. This is a relatively simple project that can be completed in the afternoon, and it’s a fantastic way to add some color and interest to your space.
Grab an old mirror, tile adhesive, grout, tile spacers, a wet saw, and tile nippers (if you’re using glass tiles). When you have your materials, get started. The first step is to clean the mirror to enable the adhesive to stick correctly. Next, apply the tile adhesive to the back of the tiles.
30. Gold canvas pillow covers
If you’re looking for a fast and simple way to make your home décor stylish, consider investing in some gold canvas pillow covers. These pillows are a great way to inject a bit of glamour into any room and can be used to access both formal and informal settings.
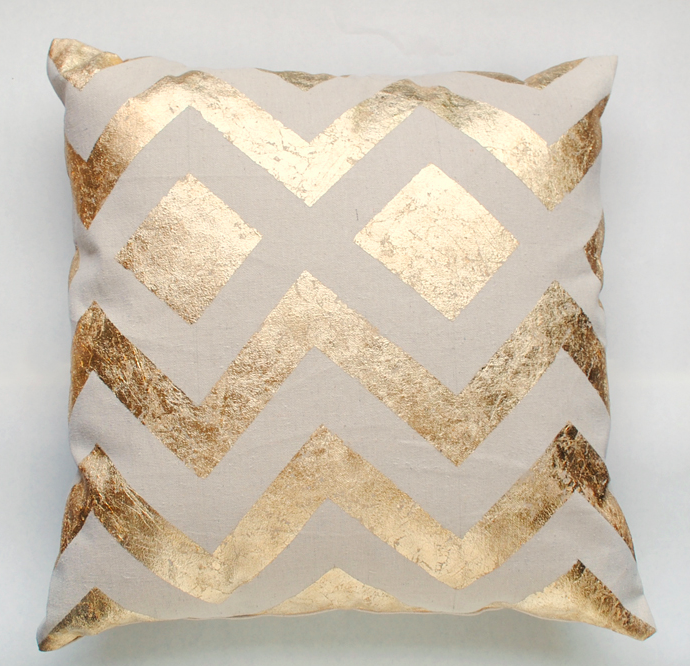
Best of all, gold canvas pillow covers are relatively inexpensive, so you can easily find a style that fits your budget. You need some gold fabric paint and masking tape to DIY these pillows. Let the paint dry before putting pillow inserts inside.
31. Minimal balcony table
If you have a small balcony in your home, you may quickly turn it into a bar by repurposing a piece of countertop and some table legs. Screw the legs into the countertop, and then you can add whatever decorations you like. You may add shelves.
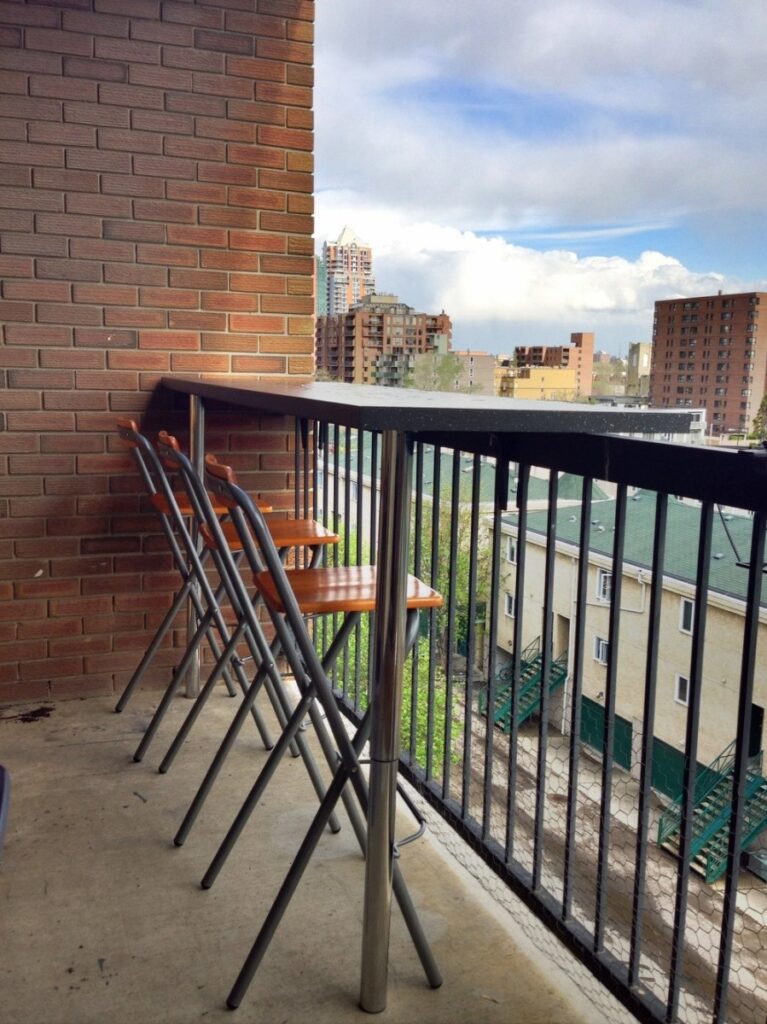
Install this at the edge of the balcony to use railings as support for the table. You can use this bar to store your bottles, glasses, and bar accessories. It’s a great way to use a small space and keep a place to relax and entertain guests.
32. Quirky wooden crate side table
A wooden crate can make a great side table. Find crates at most home improvement stores or online. Here are some creative tips on how to turn a discarded wooden crate into a side table. Sand the crate to help the paint or stain to adhere better.
Next, apply a coat of paint or stain. Be sure to use a new paintbrush or roller specifically designed for use with crates or other rough surfaces. Once the paint or stain is dry, add legs to the table and any additional decorations you like.
33. Copper pipe plant stand
Spruce up your space by making a copper pipe plant stand with a tile base. This project is simple enough for even the most novice DIY-er, and the results are stunning. To make your copper pipe plant stand, you’ll need eight copper pipes, copper elbow joints, felt pads, and ceramic tile.
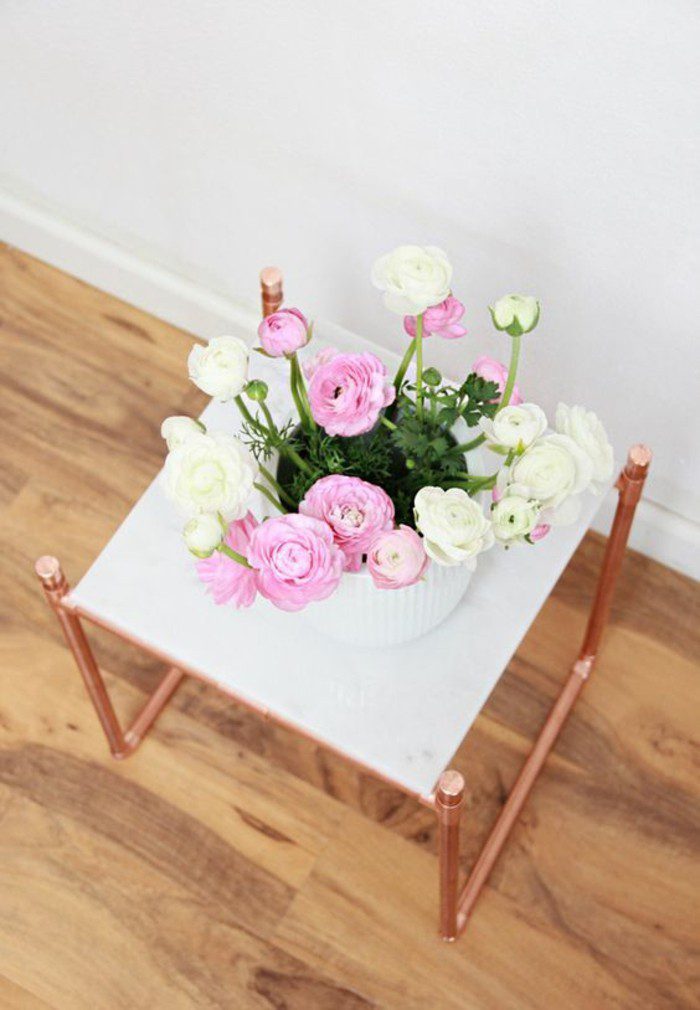
First, assemble your pipes and joints to create a square frame. Make sure all of the connections are strong and tight so that your frame is sturdy. Attach the felt pads to the bottom of each pipe leg to prevent scratching your floors. Adhere your tile to the top of the frame using tile adhesive.
34. Copper frame mirror
If you have a framed mirror that you’re looking to spruce up, why not try adding some copper leaf? This is a relatively easy project that may add a layer of elegance to your home. Clean the surface of the mirror with a soft cloth. This will help ensure that the adhesive will stick properly.
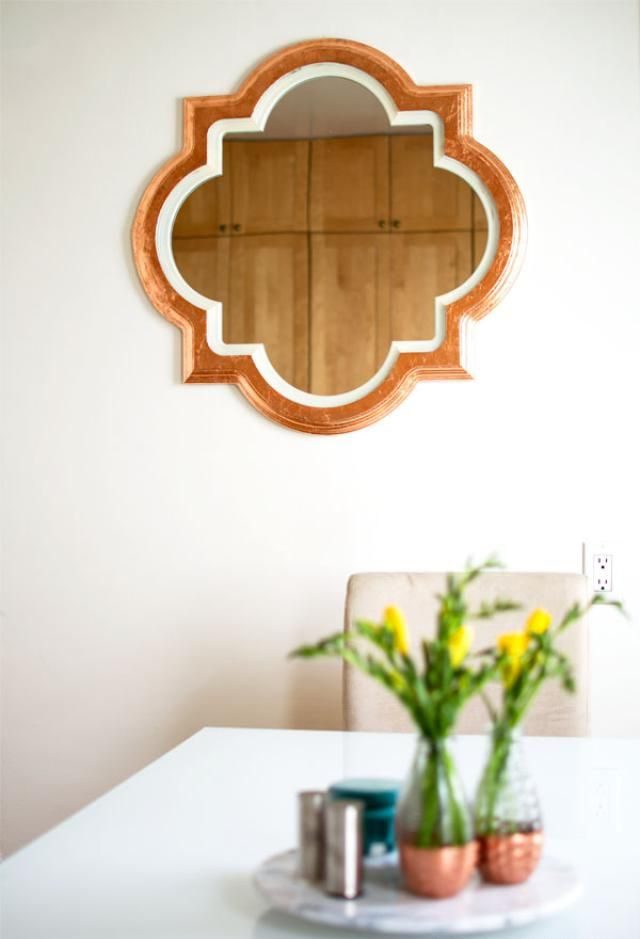
Next, use your brush to apply the adhesive to the surface of the mirror. Be sure to apply it evenly so that the copper leaf will adhere properly. Now it’s time to apply the copper leaf. Start by gently pressing it onto the adhesive. Use a soft cloth to lightly brush over the leaf.
35. Frills on the wall hanging
Metallic wall hangings are all the rage these days. What better way to upgrade your home with a touch of luxury to your house than with a metallic wall hanging with frills on it? This project is easier than it looks, and you may find all the supplies you need at your local craft store.
Here’s what you’ll need: a metal wall hanging frame, frilled trim, or yarn to make frills. Take the metal frame and paint it. When dry, it’s time to add the frilled trim. Simply glue or tape the trim around the edge of the metal. Let dry completely. Hang it on your wall and enjoy.
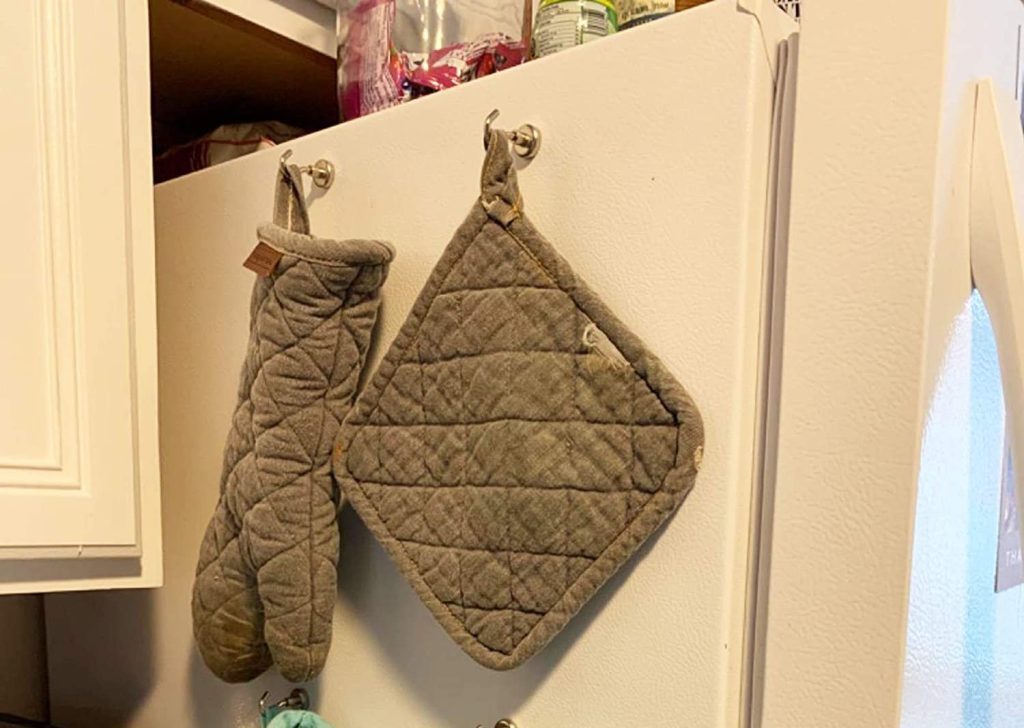
36. Adhesive hooks to the rescue
One of the smartest ways to organize your kitchen is to install adhesive hooks inside your cabinets. This way, you can store measuring cups and spoons within reach without having to rummage through your drawers every time you need them. Plus, it’ll free up some much-needed space in your crowded cabinets.
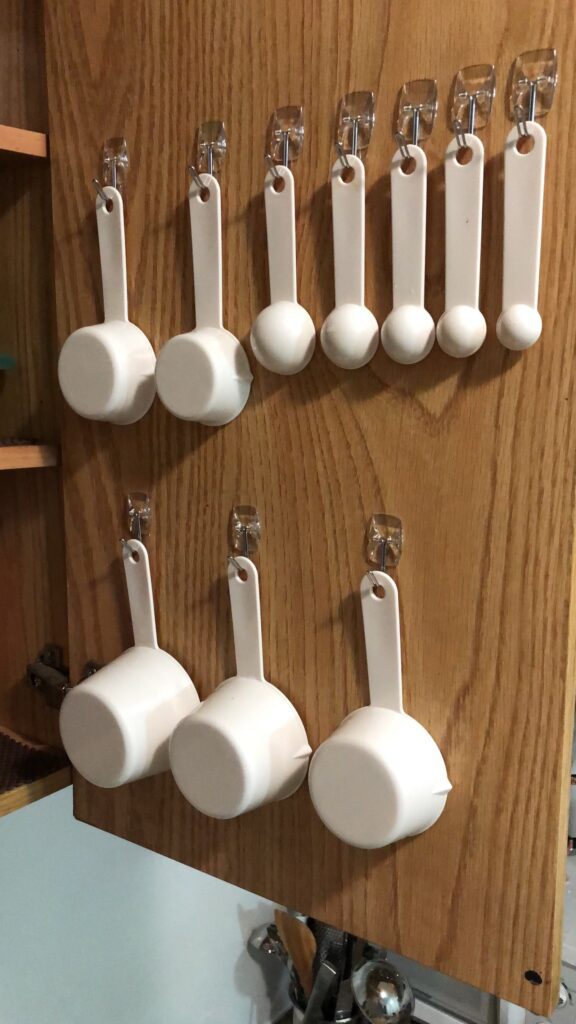
Just peel the back paper from these hooks, and install them at an equal distance inside the cabinet. Put a good amount of pressure on them so that they don’t fall off when you hang the spoons and cups. You can install as many as you need.
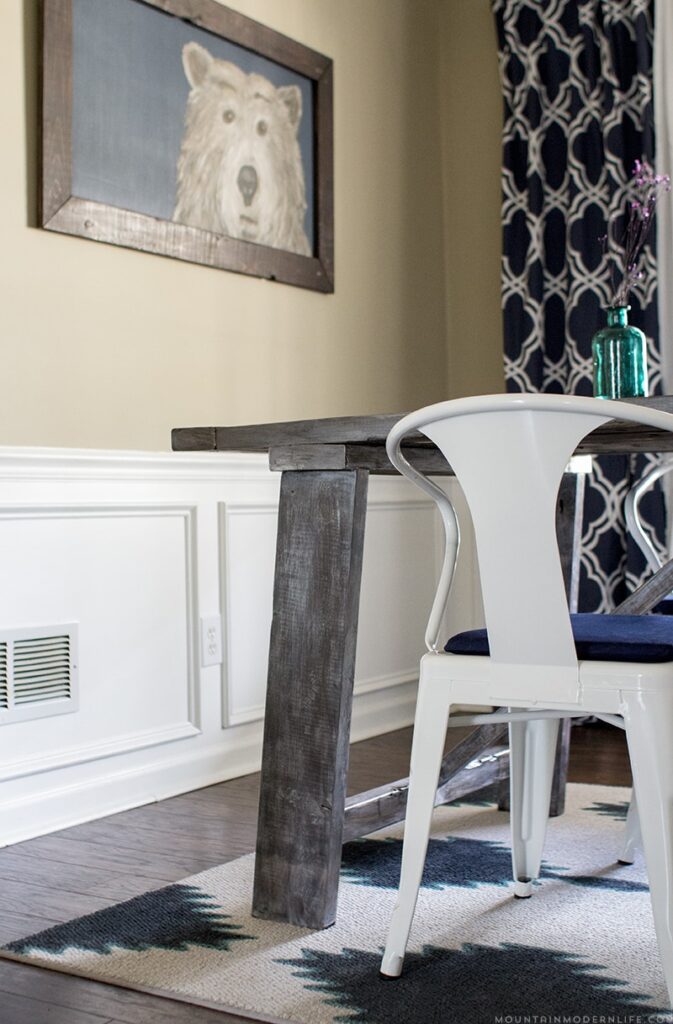
37. Midcentury-style coffee table
Adding metallic legs to an old table is a simple way to create a midcentury-style coffee table. This project is easy to do and only requires a few supplies. First, remove the old legs from the table. Next, measure and cut the new legs to size.
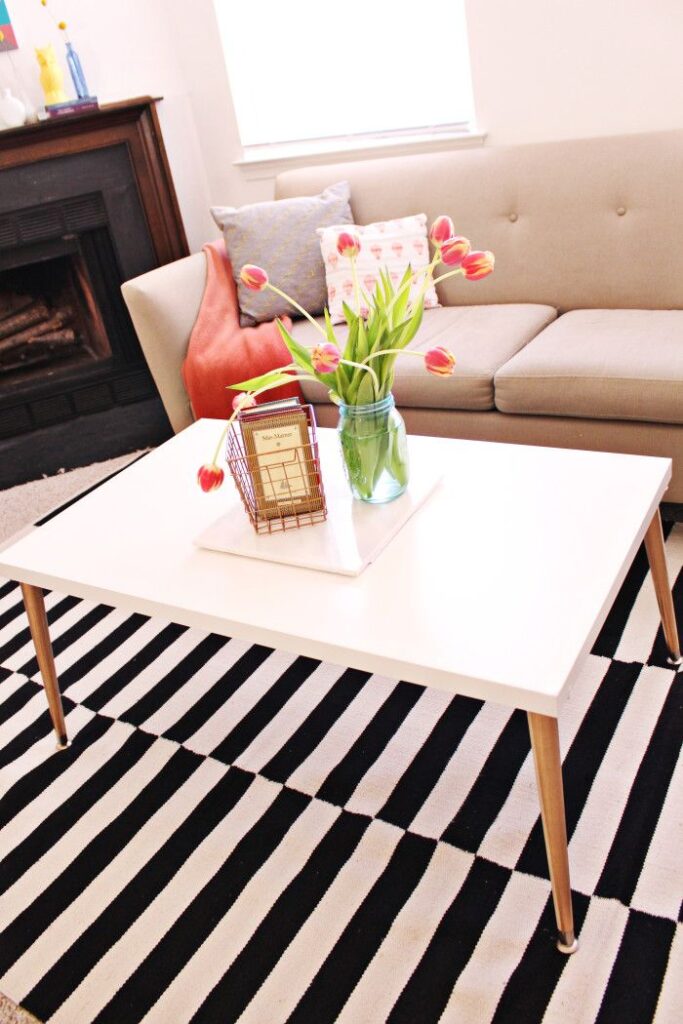
Attach the new legs to the table using screws or nails. Add any finishing touches, such as painting or staining the legs. This project can be completed in a few hours and is a great way to update an old piece of furniture. Plus, it’s a budget-friendly way to get the midcentury look you love.
38. Rocky planter decoration
When it comes to upgrading your home, there are endless possibilities. If you’re looking for something unique and eye-catching, why not try decorating with small rocks? It’s great to add a personal touch to your space. Gather some small rocks from your backyard or local park.
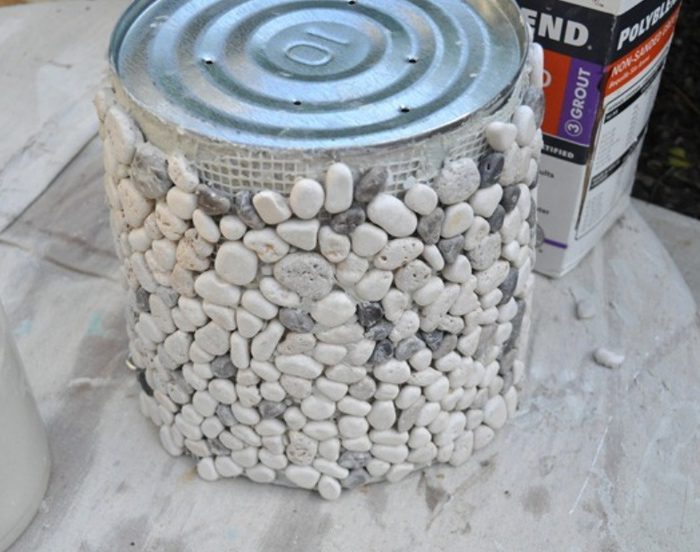
Once you have a good selection, it’s time to begin planning how you want to arrange them. You could create a simple design by placing the rocks in a line or shape. Get creative and make a more complex design. Once you’ve decided on your design, Start gluing the rocks in place.
39. Cubby into a side table
If you have a square cubby that you’re not using, why not turn it into a side table? It’s a great way to add extra storage space or surface space to your home. Plus, it’s a simple project that anyone can do. Get a square cubby, a drill, screws, and a screwdriver.
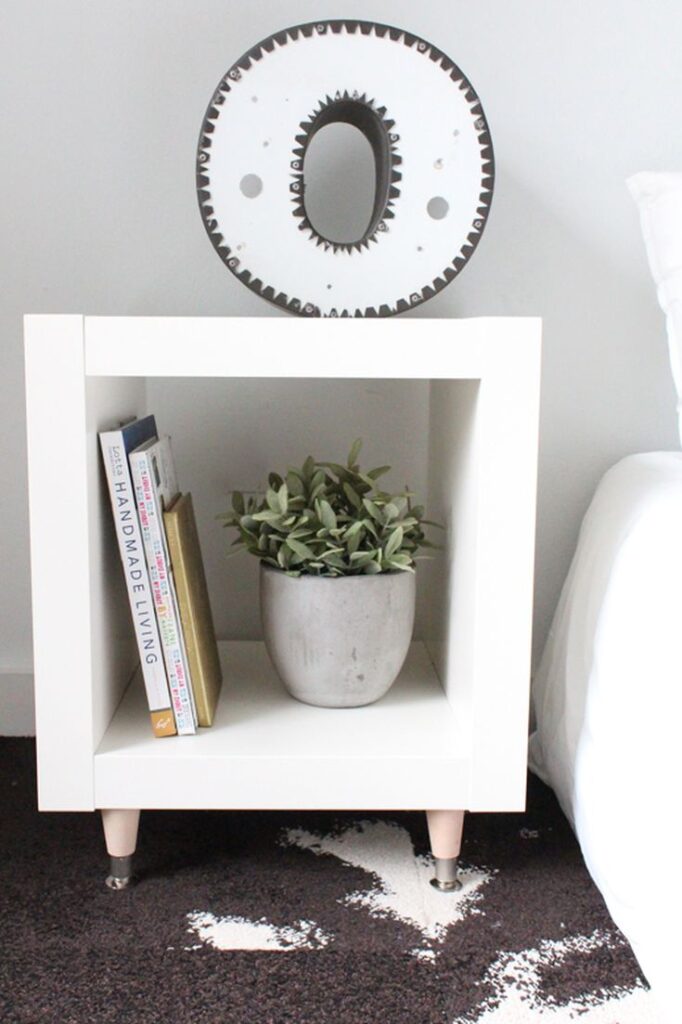
Using a drill, create four holes in the cubby where you’ll be attaching the screws and the legs. If you’re using a saw, you can cut the cubby down to size if needed. Otherwise, just leave it as is. Next, attach the screws and legs to the holes you created.
40. Custom-painted rug
Adding a custom-painted rug is an easy way to include personality and style in your home. Rugs are a great way to combine color and pattern in a room, and they can also help protect your floors from wear and tear. Choose a material that is durable and easy to clean.
When choosing to custom paint a rug, it’s essential to consider the colors and patterns that you want to use in your home. Once you’ve selected the perfect rug, the next step is to decide on the design. Use a stencil or freehand technique to create your design and paint.
41. Graphic canvas design
Adding a simple geometric graphic design to your canvas can spruce up your place. It can add some personality and pizzazz to an otherwise bland wall. Plus, it’s a great way to show off your creative side. There are a few things you may keep in mind when adding a graphic design to your canvas.
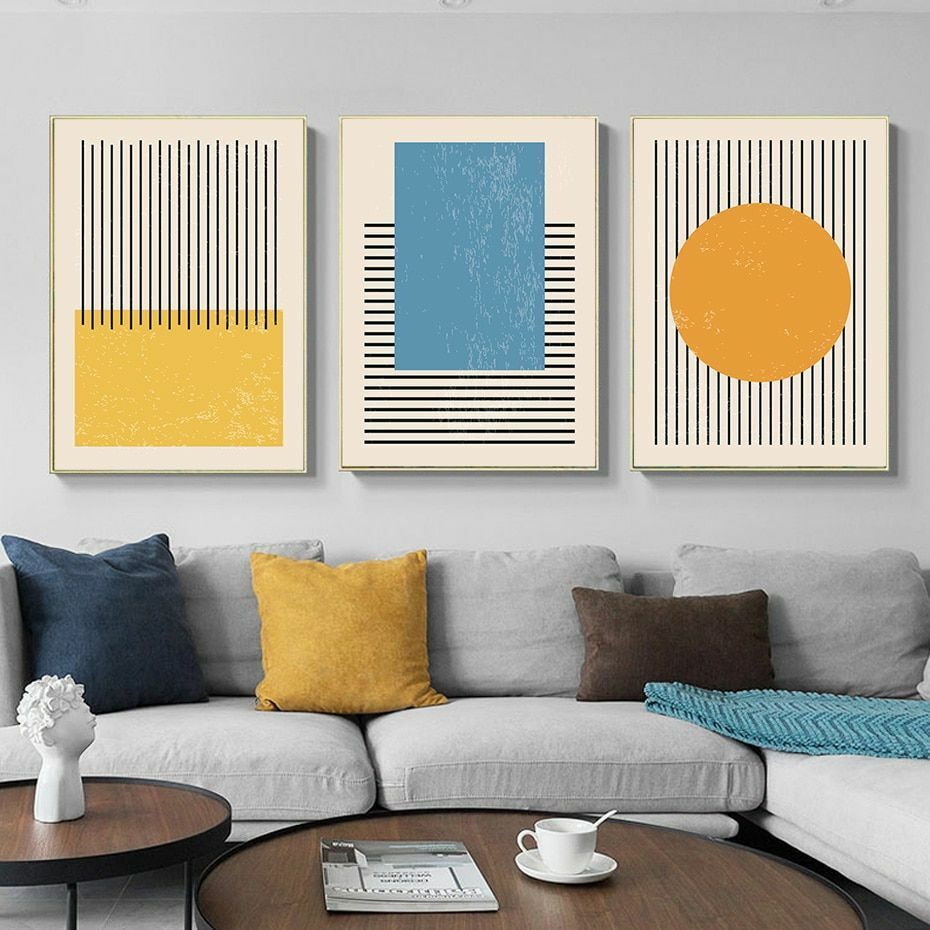
First, you’ll want to choose a design that is relatively simple. Complex designs can be overwhelming and take away from the overall look of your room. Second, you’ll want to make sure the colors you use go with the rest of your decor. You don’t want your graphic design to clash with the room.
42. Rustic wood pallet clock
If you’re looking for a rustic yet chic addition to your home decor, consider making a wood pallet clock. This project is relatively simple and can be done using a wood pallet and clock-making kit. To start, find a wood pallet in the size and shape you want for your clock.
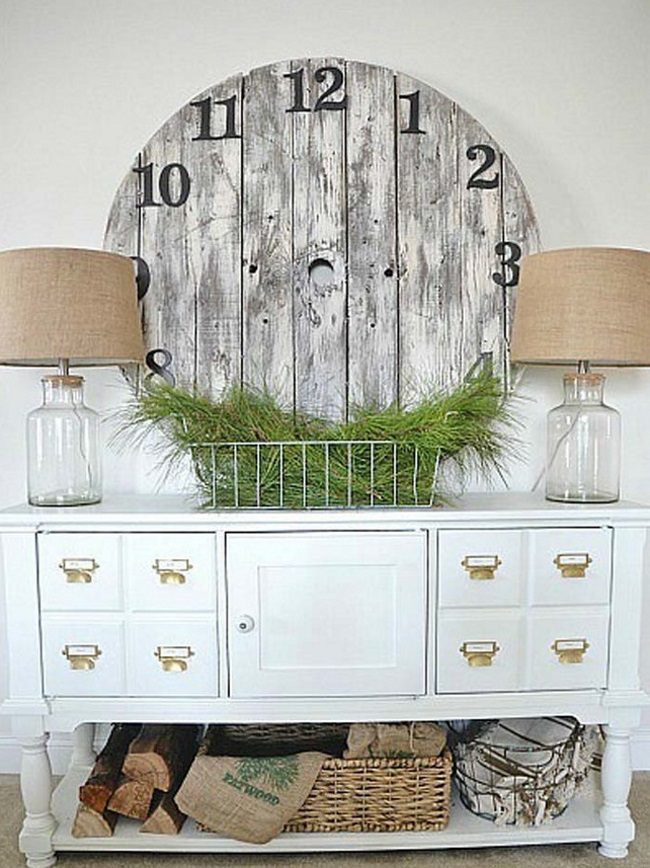
You’ll find one at a local hardware store or online. Once you have your pallet, sand it down to create a smooth surface. Use a clock-making kit to create the clock face. You can find these kits at most craft stores. Once the face is complete, attach it to the pallet using screws or nails.
43. Address wooden wall planter
Making your wooden wall planter is a fantastic way to deliver some personality to your home décor. Plus, it’s a great way to display your house number and address! First, you’ll need to gather some supplies. You’ll need a piece of wood, a drill, screws, sandpaper, paint, and plants.
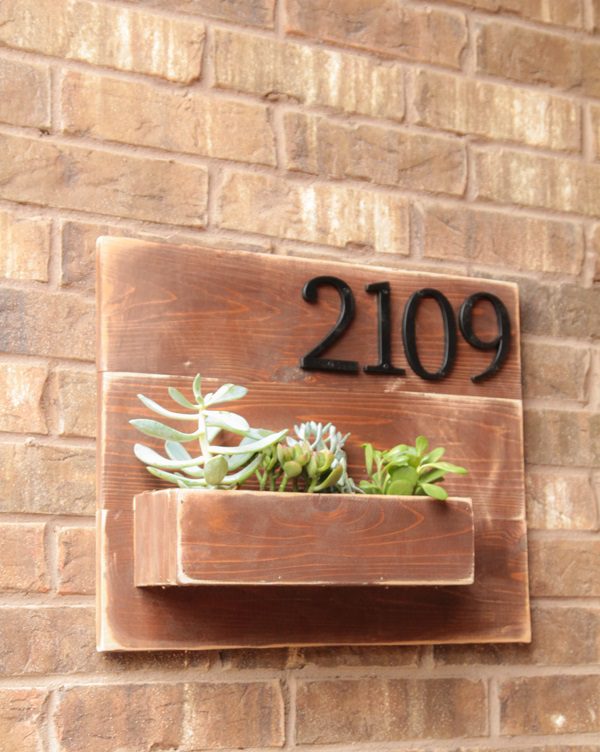
Once you have all of your supplies, start by sanding down the wood. This will help the paint adhere better. Use a permanent marker to write your house number and address on the front of the planter. Now you have a unique and personalized way to display your address!
44. Printed photos on shoe boxes
Organizing your home can be daunting, but it doesn’t need to be! There are plenty of simple and affordable DIY home decor ideas that will instantly spruce up your space. One of our favorite DIY home decor ideas is printing photos on paper and then sticking them on shoe box covers.
This is a great idea to display your favorite memories while also getting rid of clutter. Plus, it’s a super easy project that anyone can do! To get started, simply gather some old shoe boxes and clear out any unwanted shoes. Once you have your shoe boxes, choose your favorite photos to print and hang.
45. Wall grid from wire shelves
Adding a wall grade works as a great focal point for the wall. To make a wall grid using wire shelves, you’ll need wire shelves, coat hooks, key hooks, and picture-hanging hardware. First, mark on the wall where you want the center of your grid to be.
Then, using a level, mark the top and bottom of each shelf. Drill pilot holes and screw in the brackets. Install the shelves by clipping them into the brackets. Now you can start decorating! Hang pictures, keychains, and other memorabilia from the hooks to personalize your space.