
Rustic Revival: Home Décor Crafts For An Enchanting Cottage Vibe
Are you struggling to find ways to freshen up your home decor? Are you looking to add a personal yet natural touch but don’t know where to start? These nature-inspired DIY home decor projects are the perfect way to spruce up any room in your house without breaking the bank.
With a little bit of nature-inspired creativity, you can easily make your own pieces that are just as unique—if not better—than what you’d find at a high-end home goods store. From woodland scenes to rustic elements, these projects are perfect for any nature lover. If you’re partial to the cottage-core aesthetic and feel calmer in nature, then we know you will find at least one project on this list that fits your personality!
Faux vine wall decor
Add some green to your décor without worrying about water or sunlight. You can make it with any faux plant you like, and it’s effortless! Start by cutting the wood strips into small pieces that will be easy to work with. Then, take the fake plant vines and wrap them around the wood strips.
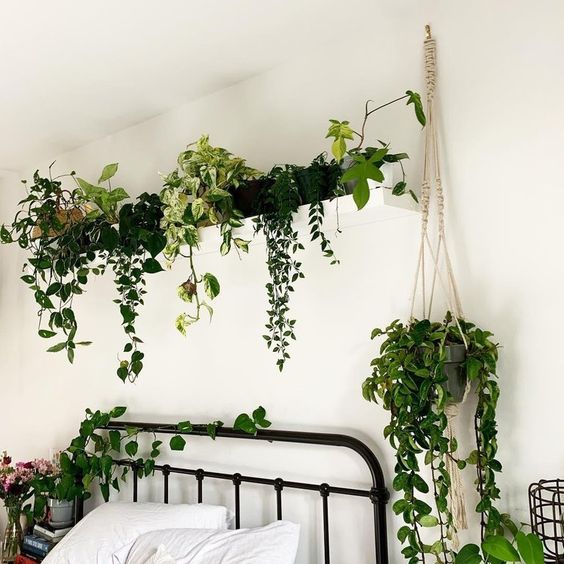
Ensure that you tightly secure them in place with some hot glue. Once the vines are in place, start attaching the entire piece to your wall using nails or screws. Lastly, hang additional leaves or other decorations from the vine to bring your wall decor to life.
Indoor moss display
If you’re looking for a rustic way to spruce up your home, why not try an indoor moss display? Moss is a low-maintenance home decor option that yields a beautiful display. Basically, you can achieve that country look without actually having to live in the middle of the woods.
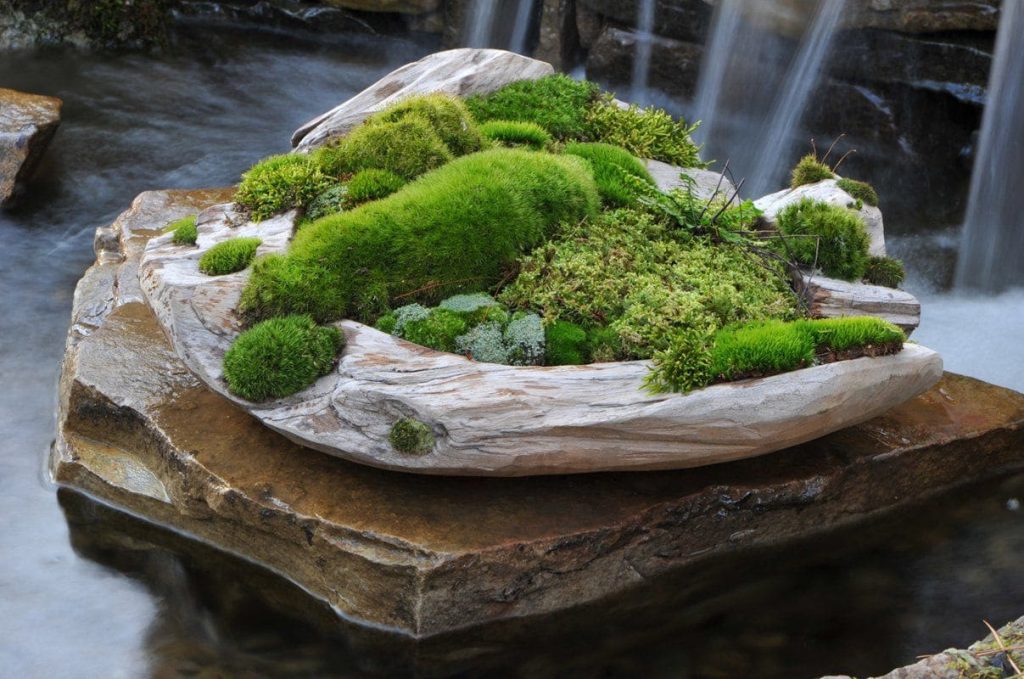
First, choose your container. Check thrift stores or discount stores for glass jars, vases, bowls, or anything else that will hold plants and has an attractive shape or design. For the moss arrangement, you can use organic materials like hollowed-out logs or tree stumps.
Large wooden mirror frame
A large mirror will help any room appear more prominent as it reflects the light. This is an old trick to maximize small spaces and make them appear larger. The easiest way to DIY a wooden mirror frame is to cut the wood to size, then use wood glue and clamps to hold it together while it dries.
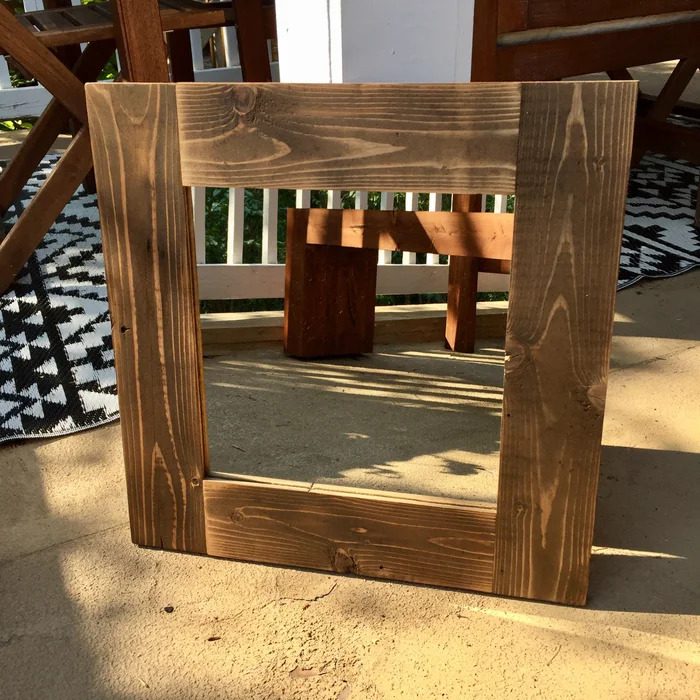
You could also use dowels or nails to fasten the pieces together. If you want the frame to have a bit of a distressed look, you can try sanding it down slightly after it’s glued together. Be careful not to sand away too much of the wood—you want to give it a little aged appearance.
Artistic wooden books shelf
Are you looking for a creative and unique bookshelf to make your home stand out? If so, then consider making your own DIY wooden bookshelf! With some basic carpentry skills and a little creativity, you can easily create a one-of-a-kind bookshelf that will be the talk of the town.
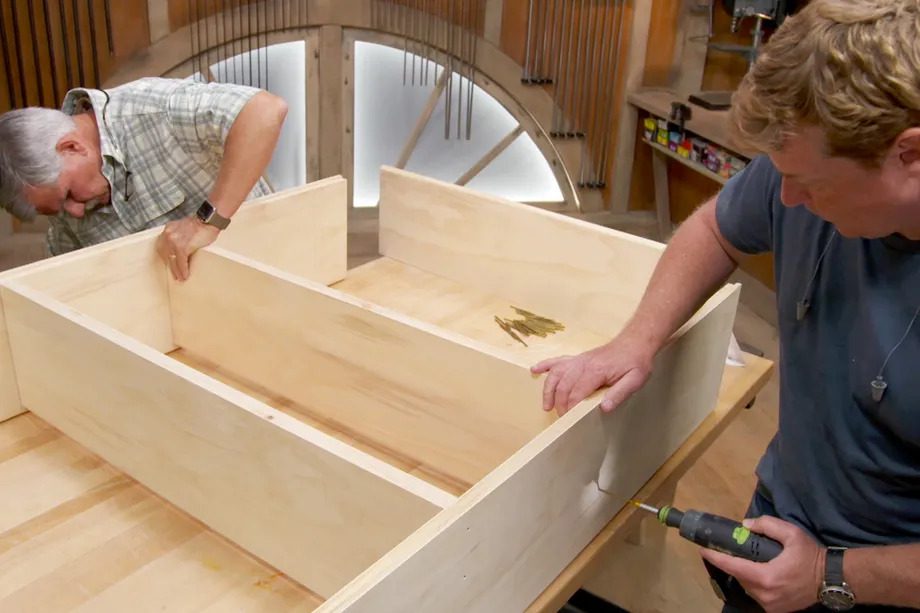
Gather some wood boards in the desired size and shape for your bookshelf. Once you have your wood, use a saw to cut out any decorative details you want to include. After cutting out your design, use sandpaper to smooth down the edges. Then it’s time to start putting everything together.
Try a monochromatic rock display
If you wish to experiment with more color, setting up a gradient rock display may add some charm to your home decor. Take any container that can accommodate the colorful rocks. You may pick a woven basket in light earthy tones.
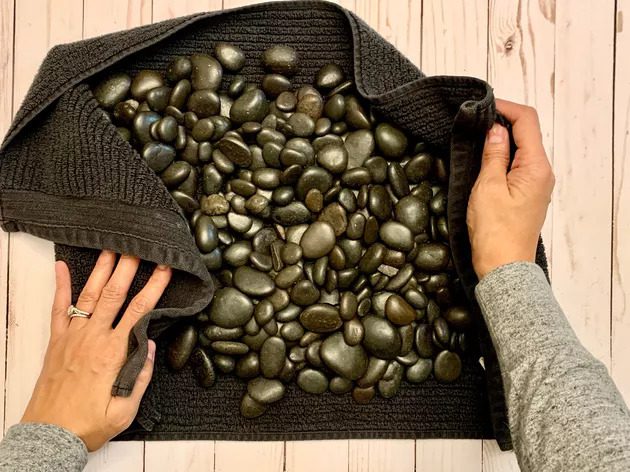
Choose a color pallet for your rocks and assemble them to form a color gradient, starting from a lighter shade to a darker shade. Use different-sized rocks for some more dimension. Instead of mixing the stones in different colors, this will give a polished appearance.
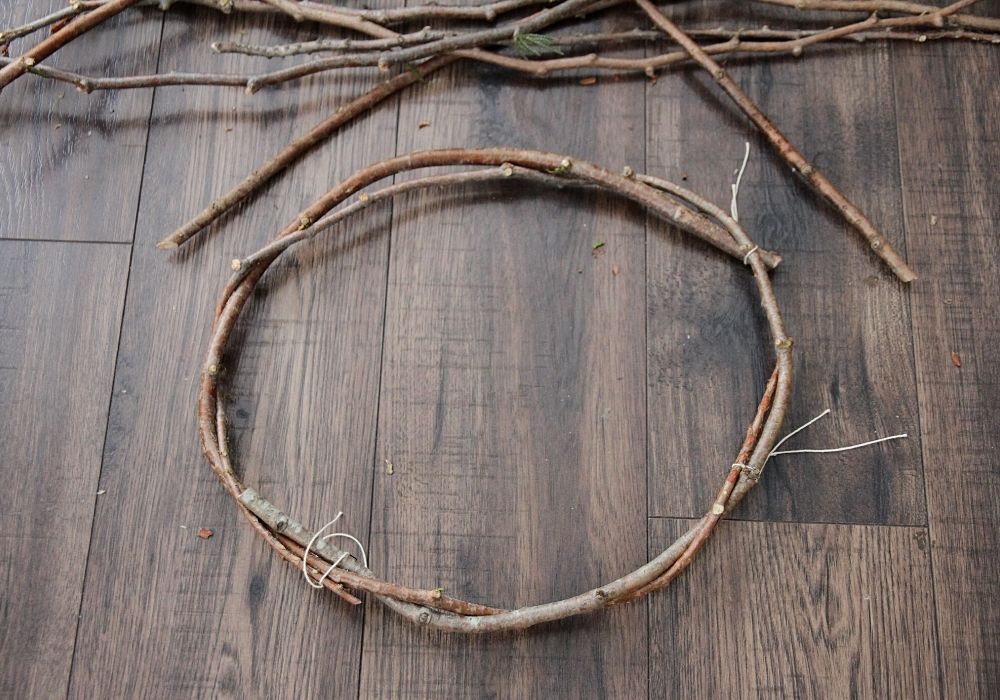
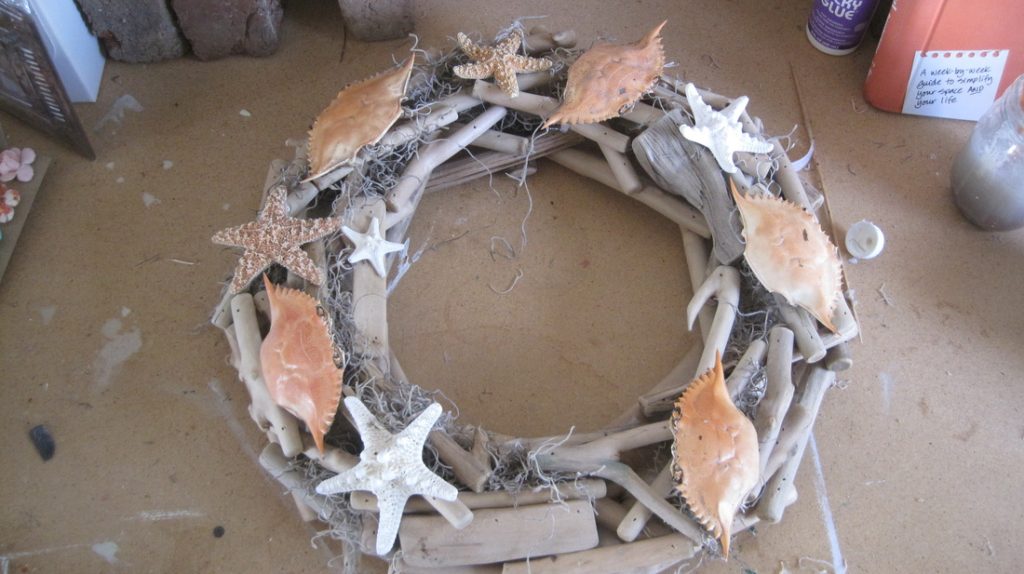
Triangle twig wreaths
You may use wreaths on the front door or in the hallways. They do not always have to be circular. Triangle ones are equally charming in their own way. Gather three sturdy twigs of approximately the same length. Tie the ends of each twig together with some floral wire or sturdy string.
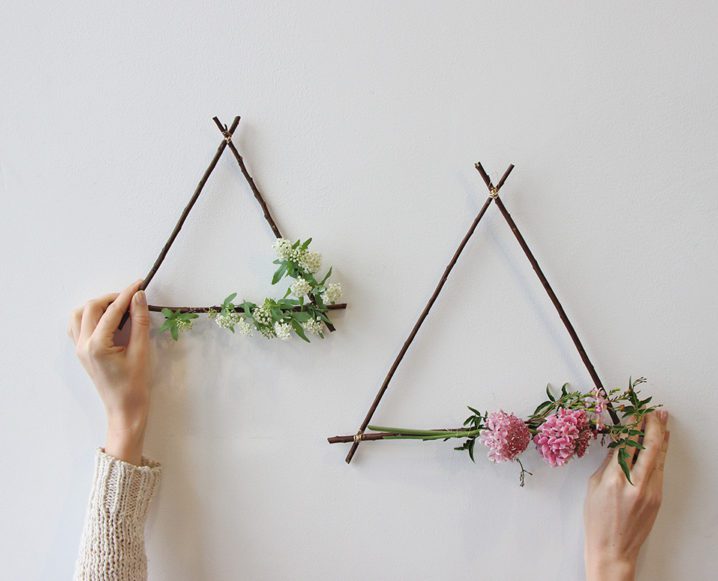
Weave the twigs making sure to keep them tight against the wreath form. Once you have woven all three twigs into a triangle shape, use more wire or string to secure them, then trim any excess wire or string away. Add your favorite flowers or greenery to dress up your wreath.
Rock collection display
There are a lot of different ways that you can display your rock collection. The most eclectic way is to use a board and wires. This allows you to see all of the rocks in your collection and makes it easy to add new rocks as you get them.
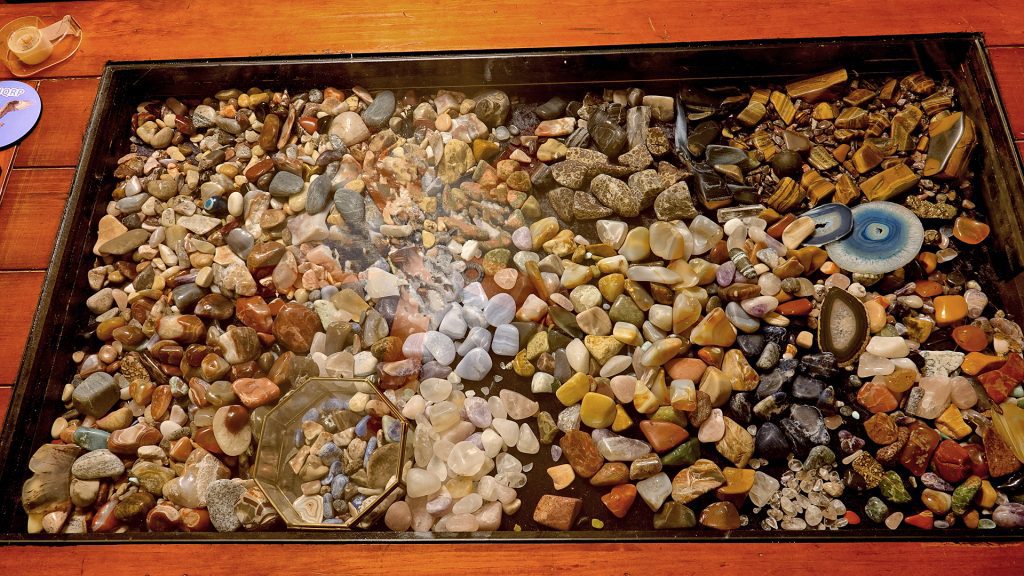
Use wires to hold the stones and then wrap them around the board. This creates an interesting 3D effect that is eye-catching. Plus, it’s a great way to save space and still be able to see all your rocks in one place.
Wooden clock
It may not be the most accurate clock; however, it will look fantastic for your decor. Use an old clock or buy a clock-making kit from a crafting store. Find a branch that is about the right thickness and length for your desired clock.
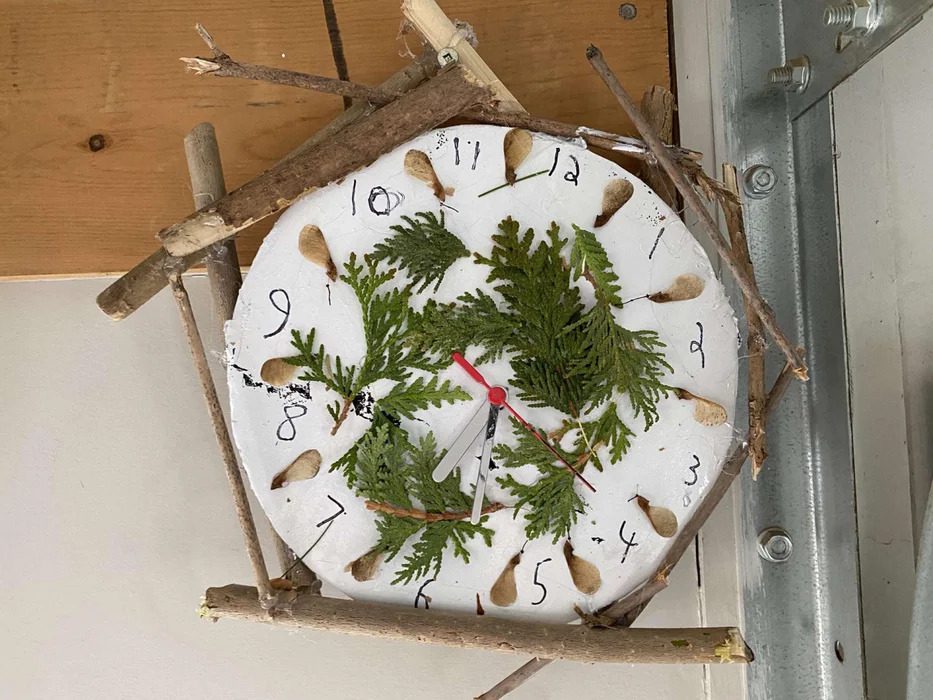
Cut the branch into two pieces, one for the hour hand and one for the minute’s hand of the clock. Next, connect the two pieces of wood with some strong wire or cable, making sure that the holes line up correctly for the clock to work.
DIY driftwood planter
Add natural decor to your home with decorated planters. You can use any driftwood you find, but make sure it’s clean and free of sea life or other organisms. Start by finding a planter that’s the right size for the driftwood you select.
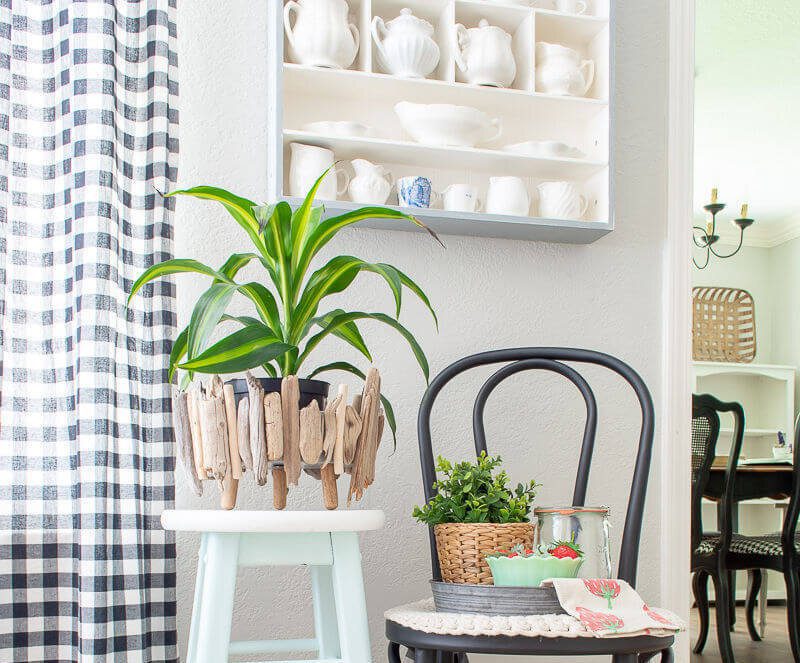
Drill a few holes in the center of the bottom of the planter for drainage, then use a hot glue gun to attach the driftwood to the bottom of the pot. Add soil and plants to your planter, and enjoy your new natural decor.
Picture frame using sticks
To make a picture frame using sticks, you’ll need a large stick, saw, and twine. Cut your stick into four pieces, ensuring they are all equal in length. Two of the pieces will be for the top and bottom of your frame, and the other two will be for the sides.
Next, use your saw to notch out a small space at each end of the side pieces. This is where your top and bottom pieces will fit into. Once you have done that, it’s time to start assembling your frame. Use twine to tie the sticks together to form a rectangular picture frame.
Earthy pressed leave frames
There’s nothing quite like the beauty of pressed plants, is there? There’s something so ethereal and delicate about them. And what better way to showcase them than in a double-sided glass frame? Making pressed plant frames is pretty straightforward. You only need double-sided glass frames, some plants, and heavy books.
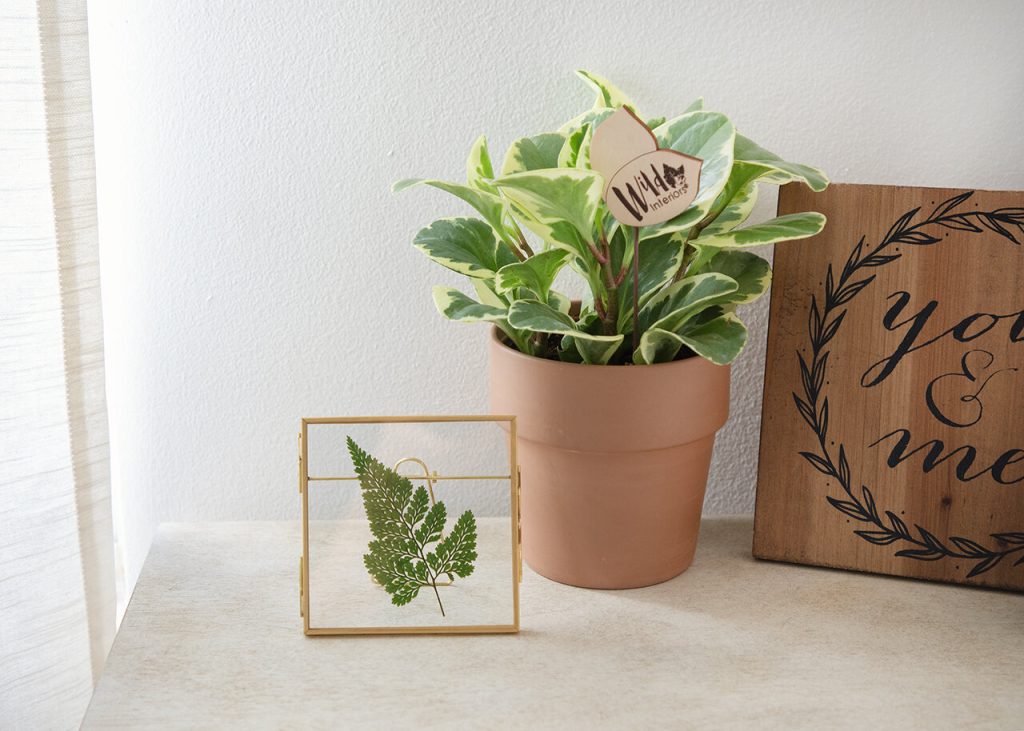
Gather your supplies to begin. You’ll find double-sided glass frames at most craft stores or Dollar stores. Choose plants with leaves large enough to fill the frame. Add the leaves to the frame and use books to put pressure on them.
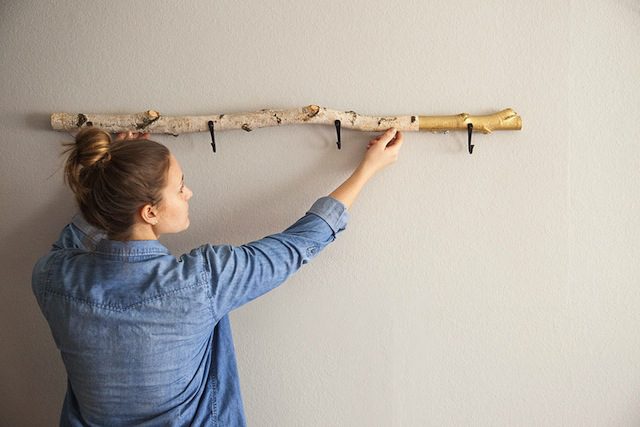
Driftwood coat rack for hallways
Driftwoods make great coat racks because they’re sturdy and attractive and add a touch of natural beauty to your home. Find a large piece of driftwood. It should be at least four feet long and reasonably straight. If it’s too curved, it won’t work well as a coat rack.
Next, use a saw to cut the extra pieces from the driftwood. Sand the edges of your driftwood pieces so they’re smooth. You don’t want anyone getting splinters from your coat rack. Once the edges are sanded, add nails or hooks and hang the piece on the wall.
Wood and stained glass art
When reusing old wood and glass scraps to create new artwork, there are no limits to what you can do. With a bit of creativity, you can fashion all sorts of beautiful pieces–from stained glass window hangings to intricately carved wooden sculptures.

This can be a fun and rewarding project if you have some basic woodworking skills under your belt. It’s also a great way to add a personal touch to your home décor. You can carve anything from simple geometric shapes to more elaborate designs. Pick your favorite shades to stain the glass.
Nest in a cage
Nests are works of art—masterpieces of engineering and design. And what’s more, they’re made by natural-born architects: birds! So it makes perfect sense to bring a touch of nature into your home by displaying a nest in a cage.
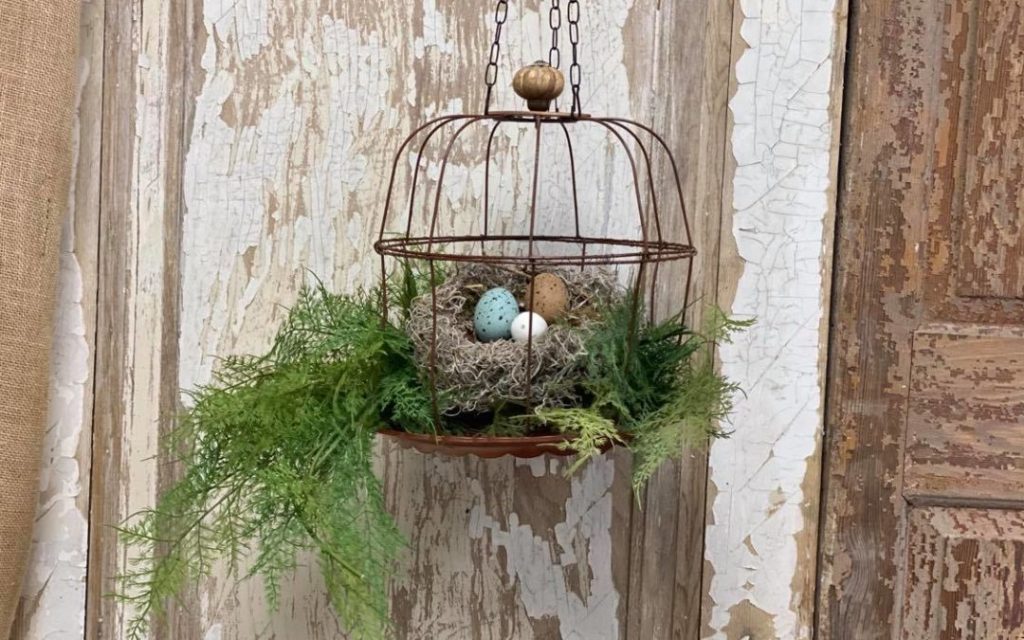
You can use an abandoned nest from your garden and place it in the cage. Clean it properly to make sure it’s free from insects. Try hanging the cage or place it on a table. You’ll notice immediately how it will add a touch of beauty and warmth.
Show your collection
Consider using a wooden bowl if you’re looking for a unique way to display your collection of nature finds. This stylish approach will showcase your feathers, acorns, stones, and shells in a chic way. Plus, it’s easy to change up the look of the bowl by rearranging your items.
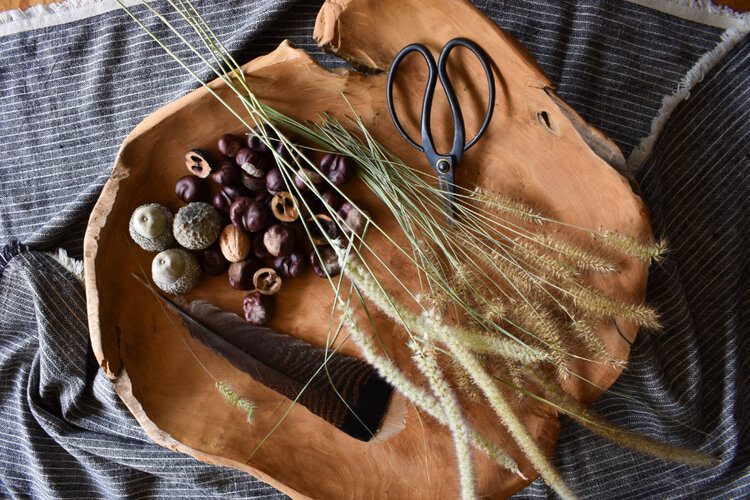
You may display it on the coffee table to add an earthy vibe to the space. Don’t shy away from mixing different elements in various proportions. Go ahead and experiment until you find the perfect arrangement for your natural collectibles.
Windchime from the sea
Grab some seashells, a wooden stick, string or wire, and a few essential tools to make your seashell wind chime. You can find seashells in most craft stores or online. You will use the wooden stick to hang the shells, and you need something sharp to poke holes in the shells, too.
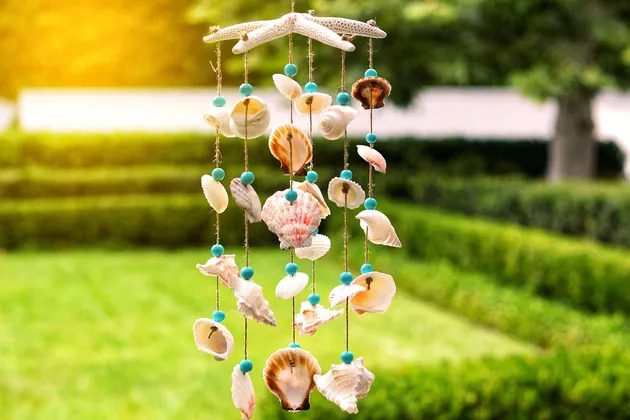
Next, use the sharp object to poke two holes in each shell – one at the top and one at the bottom. The hole should be big enough for the string or wire to fit. Create a garland of a few shells and hang it on the stick. Repeat the process for all the shells.
Blanket ladder using birch
Can’t seem to find a cool way to display your blankets and throws? You can easily make your own birch log blanket ladder with just a few supplies! Gather some birch logs. You can usually find these at your local hardware store. If not, you can order them online.
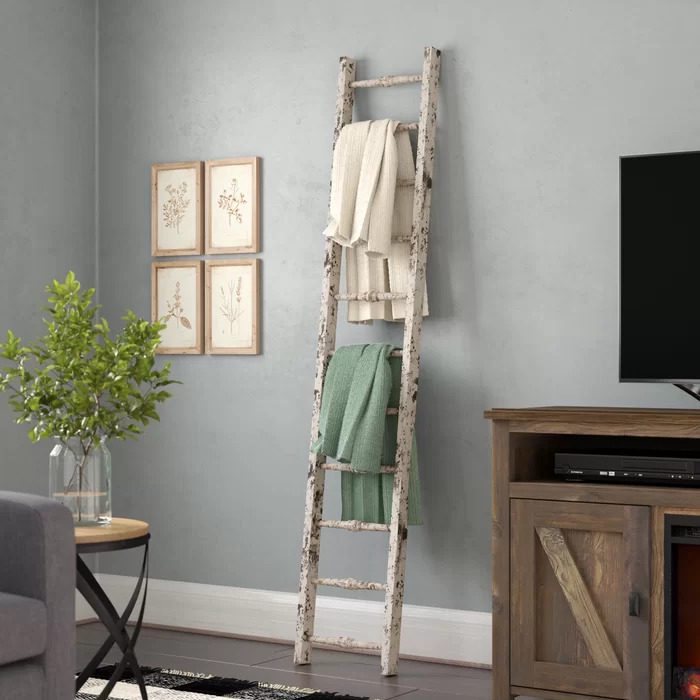
Once you have your logs, cut them to even lengths using a saw. Make sure they’re all the same size so your ladder will be sturdy. Ensure to and down the edges of each log piece so they’re smooth. This step is important because you don’t want anyone to get hurt.
Make a tree art sculpture
This is a great way to reuse dry branches and give them a new life as an art sculpture! To make the tree art sculpture, you’ll first need to gather a few dry branches. You can find them lying on the ground in your neighborhood or park.
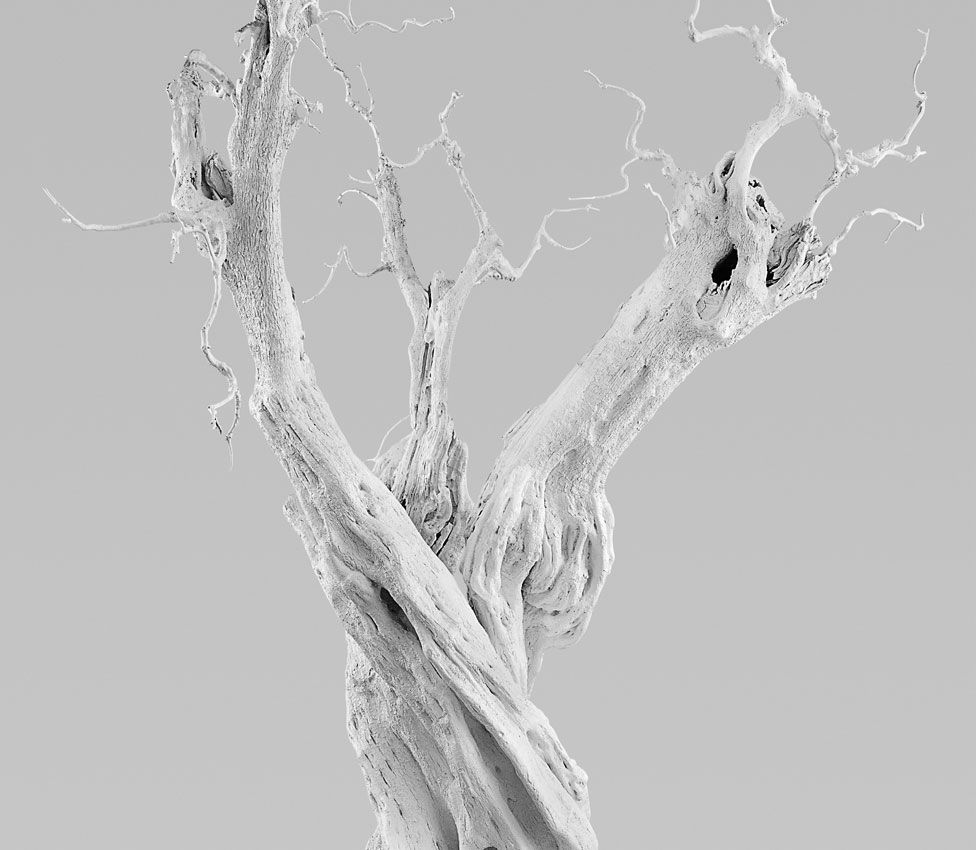
Once you have a few branches, break them into smaller pieces that will fit comfortably inside of a concrete block. Use a silicone planter to pour concrete while ensuring the branches are in the right place. Make sure to place them in such a way that they form a tree-like shape. Let the concrete dry overnight.
Fancy caliper display
This is a great project for those of you who love spending time outdoors collecting rocks, plants, and other nature finds. Not only will you have a beautiful display case to show off your treasures, but you’ll also be keeping all of that natural beauty within easy reach.
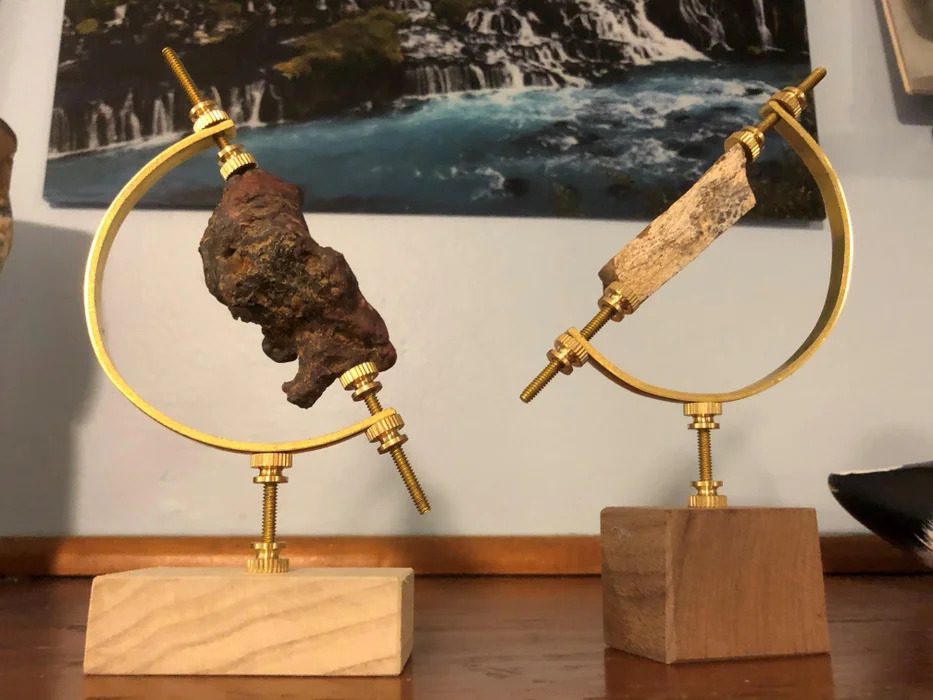
All you need is a caliper, some wood glue, a hammer and nails, and a saw. Cut the wood to size using the saw. You may skip this step when using rocks. Use the wood glue and the caliper’s holding mechanism to keep wood or rocks in place.
Turtle on the wall
This is a fantastic option to add a natural touch to your home decor! You’ll enjoy adding some character and uniqueness to your space with an old turtle shell on the wall. Simply find an old shell at a flea market or online and mount it on the wall with some screws or nails.
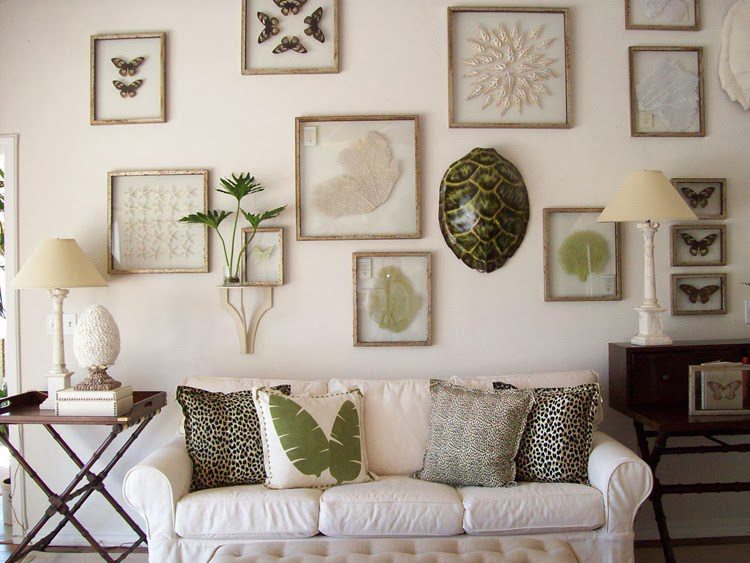
You might need to clean up the shell before mounting it, but that’s all there is to it! If you’re feeling creative, you could even paint the shell a different color or give it a coat of sealant to protect it from wear and tear.
Fresh moss wreath
Making your own wreath involves many options, so you must keep a few things in mind. Make sure you choose fresh moss that is vibrant and green. If the moss starts to brown or dry out, it won’t give your wreath the same lush look.
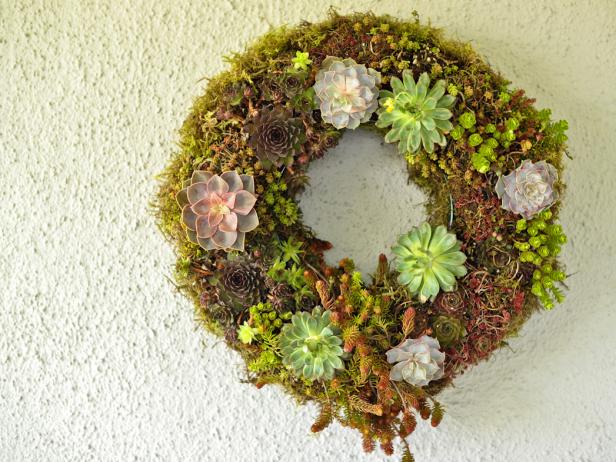
Consider what kind of frame or base you’ll use for your wreath. A metal or wireframe will give you an excellent sharp outline, while a grapevine wreath will provide a more natural look. Start by wrapping your frame with moss and continue wrapping until the entire frame is covered.
Mounted deer skull
Hanging a deer skull on the wall may show more of your personality to your guests. You’ll need to clean the deer skull thoroughly. You can do this by submerging it in a bucket of water with some dish soap for 24 hours. Then, rinse the skull with clean water and let it air dry.
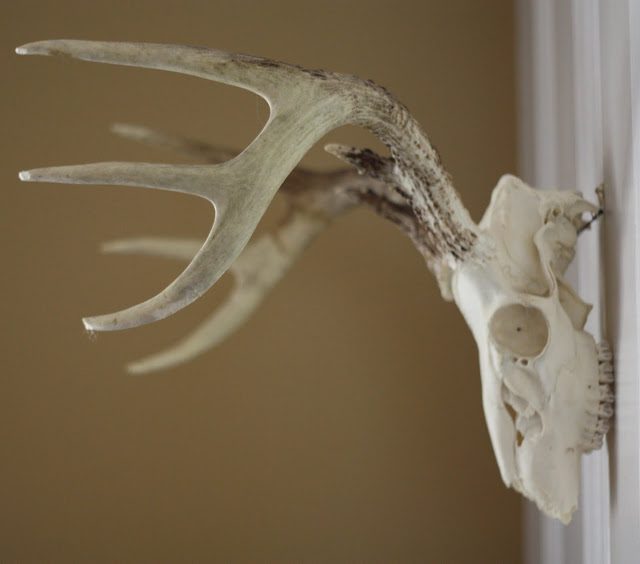
Next, you’ll need to mount the deer skull on a wall. To do this, you’ll need a few supplies: a drill and some screws to hang the skull. First, drill screw holes into the top of the skull. Screw the skull and hang it on your chosen wall. Ensure it’s secure and level.
Geometric wooden bookends
Bookends are a great way to add some personality and function to your bookshelf. Not only do they keep your books from falling off the shelf, but they can also add a decorative touch. And you can never have too many books ends.
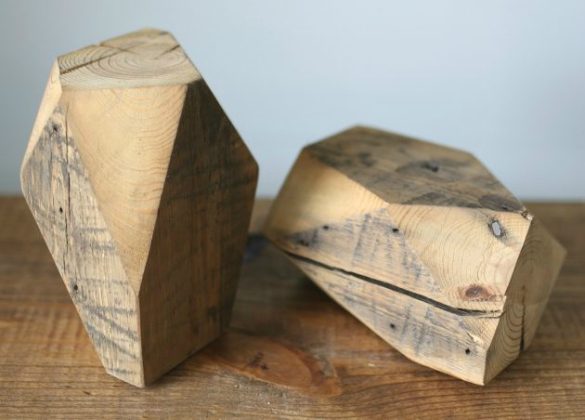
Start by finding two pieces of wood of the same size and shape. You can either use two pieces of lumber or repurpose an old piece of furniture. If you’re using lumber, make sure to sand it down after cutting it in geometric shapes so that it’s smooth.
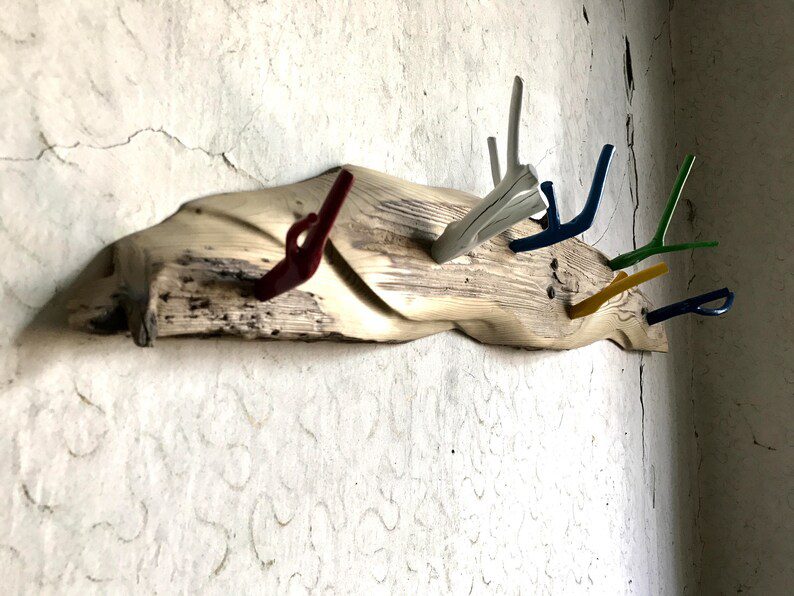
Make a quirky driftwood hanger
Constructing a driftwood hanger is easier than you might think! All you need is some driftwood, a few nails, and some string to hang on the wall. If you want to get creative, you may add some beads or shells for decoration.
Next, arrange the pieces of driftwood on a flat surface in the shape that you want your hanger to be. Once you’re happy with the arrangement, gently hammer the nails into the driftwood at each corner to secure the pieces together. Add nails to act as hangers.
DIY clay leaf dishes
Leaf dishes are a great way to add a touch of nature to your table. They’re also surprisingly easy to make! Collect some leaves from your yard or local park. If they’re dirty, give them a quick rinse. Roll out a piece of clay until it’s about 1/4 inch thick.
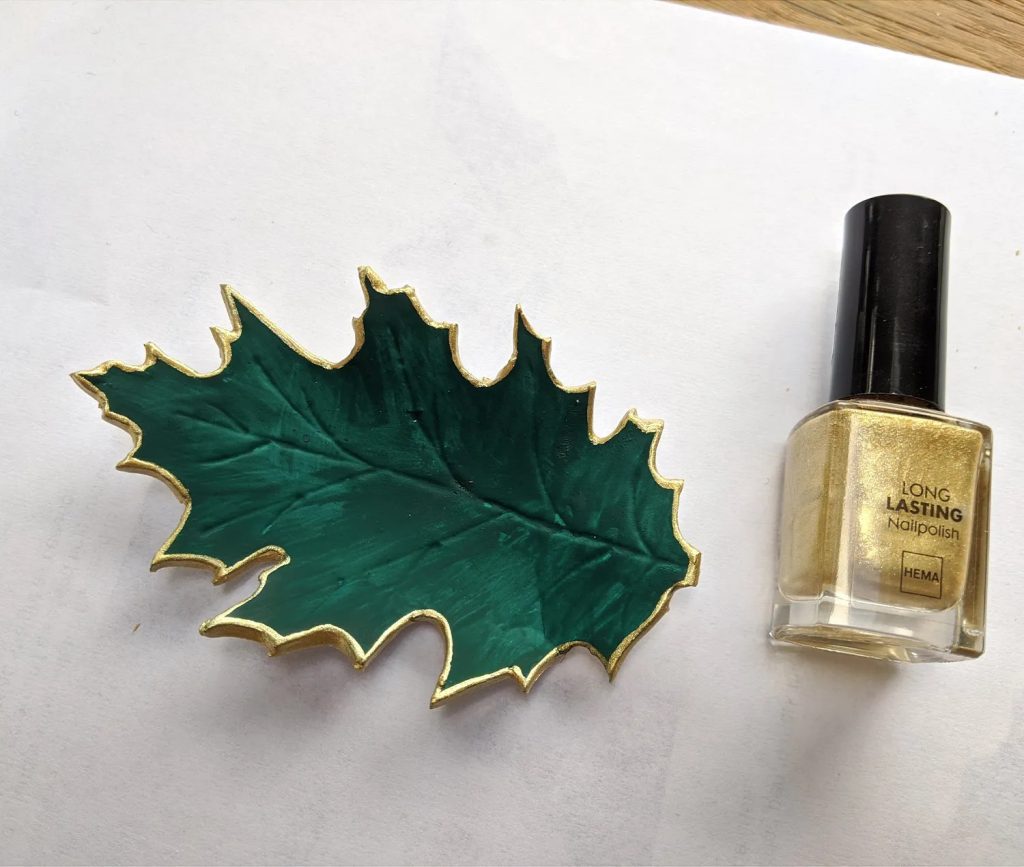
Place the leaves on top of the clay, then trim around to have tidy leaf-shaped pieces. Use a toothpick to make small holes in the clay for ventilation and to prevent burning. Carefully transfer the leaf dishes to a baking tray and bake at 275 degrees F for fifteen minutes. Paint the trays when cooled down.
Rocky cactus
Cactus isn’t hard to keep alive. However, many feel like they can’t keep up with them. For those unable to keep their plants alive, this is the perfect DIY project to add a bit of greenery indoors. First, search for stones that have a shape similar to a cactus. Wash them and let them dry.
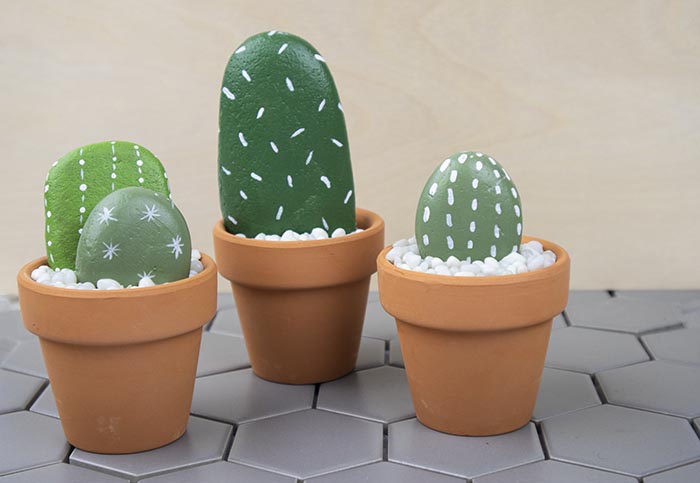
Paint the stones to look like a cactus and leave them to dry for a few hours. Once the paint is dry, grab small pots and fill them with marble chips and shavings, so the stones have a base to stay in place. Insert one-fourth of the stone inside the pots.
Wreath using wooden elements
One of the best things about pine cones is their versatility! Not only are they great for wreaths, but you can also use them to make garlands, centerpieces, and more. Moreover, using pine cones will make these wreaths last longer than the moss ones.
To make a pine cone wreath, start by tightly wiring together a bunch of pine cones. Then, create a circular form out of the wire and attach the wired pine cones to it. Finally, cover the wreath in moss or other greenery, and you’re done.
Use branches for wall art
An enjoyable and easy project that can brighten up any room in your home. All you need are some branches, a saw, strings, and paint. Collect some branches from your backyard or a park. Make sure to choose relatively straight branches with few knots or bumps.
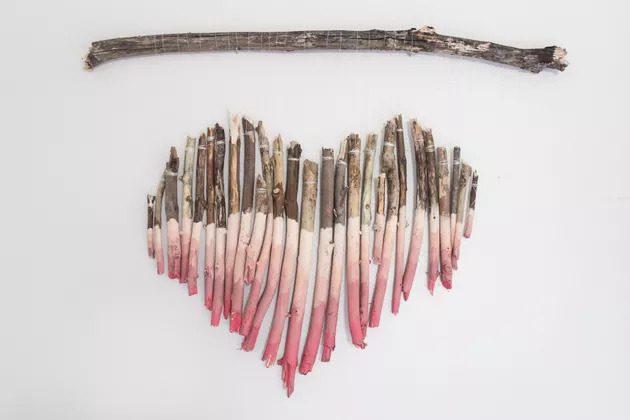
Tie each branch to the main wood component forming a heart shape or any other of your choice. Paint the branches in whichever color you like. You may use a light pink shade for the heart-shaped wall art or create a monochromatic look. Hang them up on your wall and enjoy.
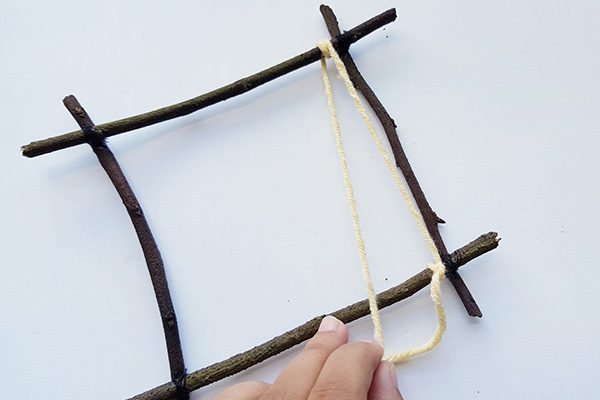
Cozy macrame art
With a little bit of creativity and some crafty knots, you can create beautiful pieces of Macrame art using sturdy twigs! Find a nice, thick branch that’s at least 1 inch in diameter. Then, using colorful yarn or string, simply tie intricate knots all around the branch to create your masterpiece.
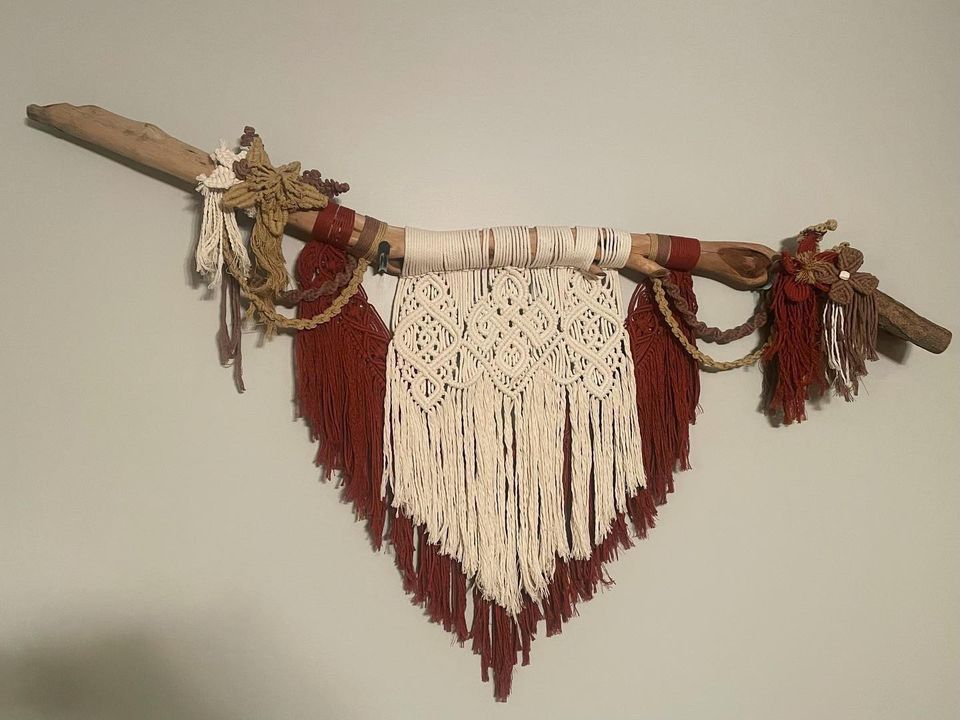
Trim any excess string or yarn, and admire your beautiful Macrame art. Add some plants or flowers to really bring your artwork to life, or simply hang it up as-is for a fun and unique piece of home decor. Experiment with different types of twigs and yarn colors to create different looks – the possibilities are endless.
Simple plank for decor
Sanding and painting wooden sticks is a great way to add some natural decor to your home. The key is to sand the wood evenly and then apply a few coats of paint. You can also distress the wood by lightly sanding the edges after you’ve painted it.
This will give your wood a unique, rustic look that will complement any room in your house. The great aspect of this project is that it can be as simple or detailed as you want. You may use white shells to decorate the plank after sanding.
Nature-inspired art on shelves
Add some natural flair to your home décor; why not try making a fungi shelf? You may use mushrooms that grow on trees for shelves. Find mushrooms that are woody, hard, and look sturdy enough to be used on walls. They should be free from damage and not be rotten inside.
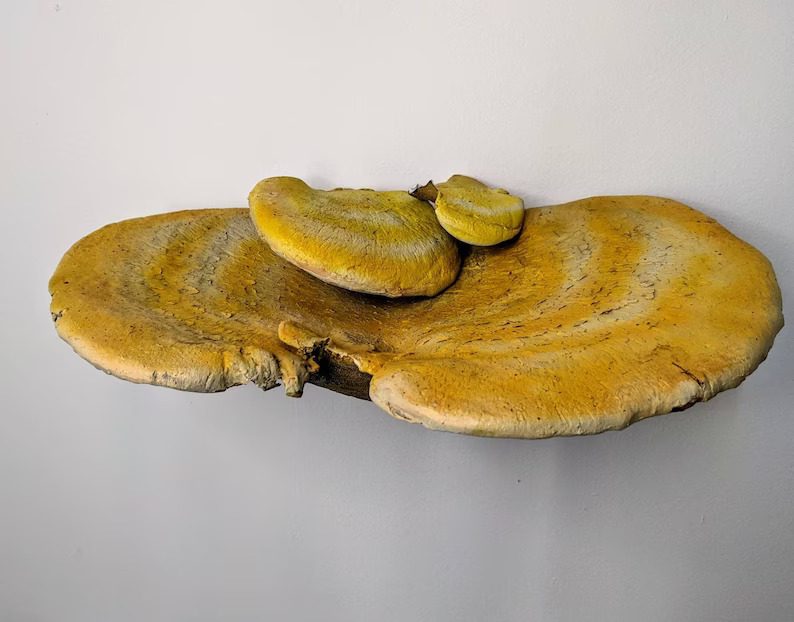
Collect a few different ones to assemble on the wall. Do not wash the mushrooms as it may rot them. Leave them to dry for four to five days and bake them at 325 degrees for an hour. Cut the back of the mushroom to be straight and attach using nails to the wall.
Try mushroom magnets
You may do this DIY with kids as a fun activity. Grab some air-dry clay, a magnet, and an oven. Roll the clay into a ball and then press it down to form a disk. Cut out a small mushroom cap from the disk using a sharp knife or scissors.
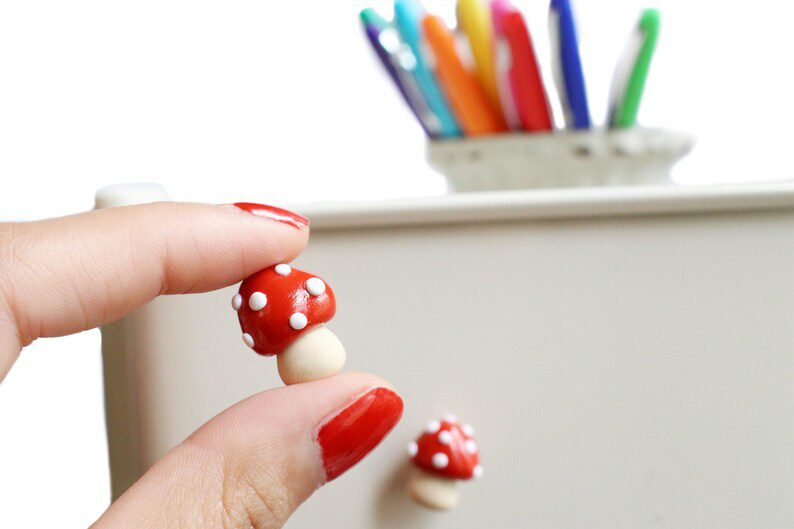
Make a small hole in the top of the mushroom cap with your finger or a pencil, and insert the magnet. Bake in an oven preheated to 175 degrees Fahrenheit for about 20 minutes, or until the clay is hard and dry. Let it cool before displaying it on your refrigerator door.
Dry herbs at home
Making an herb drying rack using a macramé ring, curtain clips, and macrame strings is easy. Cut two pieces of macrame string and tie a large knot on one end of each piece of string—thread one piece of string through the hole in the center of the macramé ring.
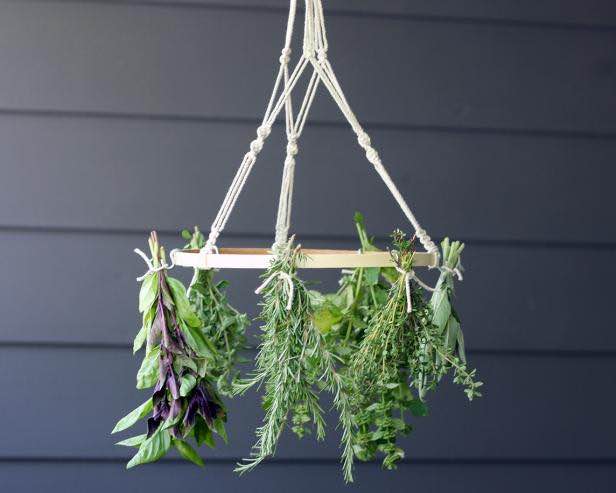
Tie a small knot at the other end of the string to secure it in place. Repeat steps 3-4 for the other piece of string. Add the curtain clips onto the ring, spacing them evenly apart. Make sure to space the herbs out so that they can dry evenly.
Delicate bird nest shadow box
Shadow boxes add a three-dimensional element to the space. They are delicate in looks and are super easy to create. You may hang these on the wall as a centerpiece or combine them with other artworks with a nature theme.
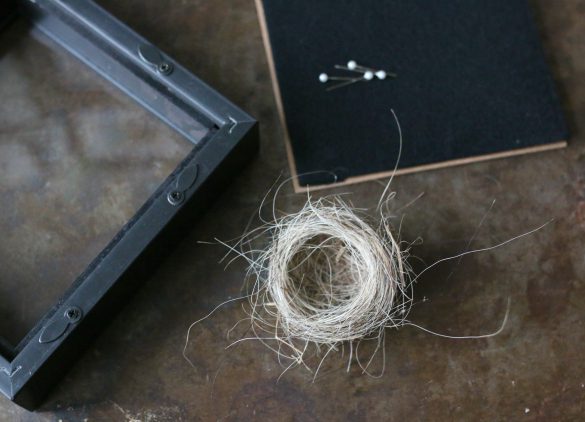
This decor piece is easier to make with smaller nests. You may not be fortunate to find a real bird’s nest; you may shop at a craft store for the supplies. Apart from the nest, you’ll need a glass box, glue, and pins to secure the nest to the box.
Use dry leaves to make a wreath
Dry leaves and twigs may not seem like the most obvious choice for making a wreath, but with a little creativity, they can create an exquisite and unique decoration. Collect a variety of dry leaves and twigs from your yard or garden. You can also find dried leaves at most craft stores.
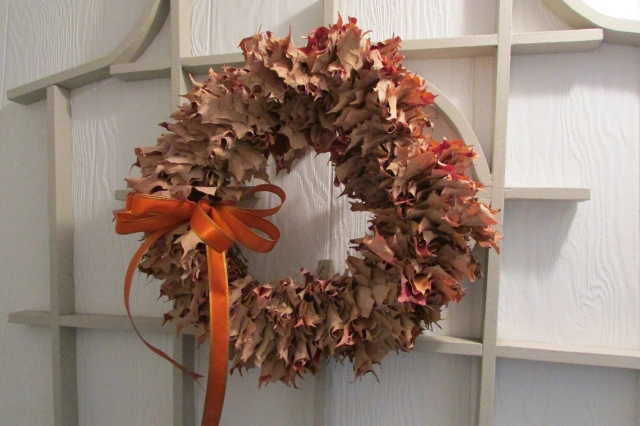
Arrange the leaves and twigs into a wreath shape on a piece of cardboard or another flat surface. Once you’re happy with the arrangement, glue or tie the pieces together to secure them in place. Hang your finished wreath on a door or wall, or use it as tabletop décor!