
Add Some Glam To Any Space With DIY Dashes Of Bright Neon
The 80s is the decade that gave birth to many wonderful memories, including Michael Jackson’s moonwalk, the Super Bowl shuffle, the fantastic discovery of Luke’s father, who, by the way, turned out to be Darth Vader, and most importantly, the topic of this article – the neon craze which took over the 80s but has since disappeared, until it’s recent reappearance to reclaim the glory that once belonged to it. If you’re an 80s kid, you’ll probably remember how neon things can add personality as well as cheerful vibes to an otherwise lifeless place. So, if you’re keen on getting a taste of the neon craze, we’re here to share 45 ways that you can subtly level up your neon game in your home!
Neon Furniture Feet
Drastic changes in our homes aren’t for everyone, especially if it includes neon. Neon may be a fun and cheerful element to add to your home, but it’s definitely not a change that we’d get used to in a short period of time.
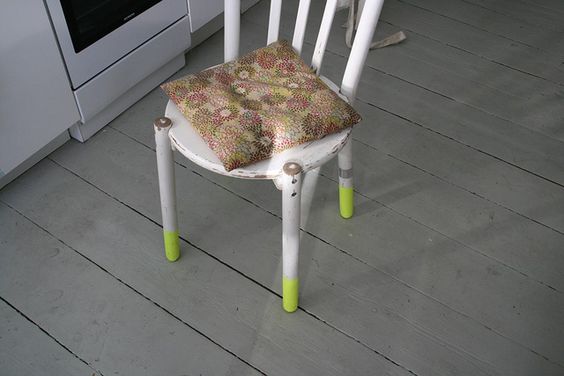
Therefore, for those testing the waters around neon elements, try to incorporate small neon changes. For example, painting your furniture feet in neon colors is a small change so that you can get the rough concept of how neon elements would look around your home.
Neon Animal Pushpins
Furthermore, another small change to slowly incorporate neon elements in your home is experimenting with small objects like refrigerator magnets and pushpins. Corkboards often come with regular pushpins, which are kind of boring to look at, not to mention use. This is where neon sweeps in to save the day.
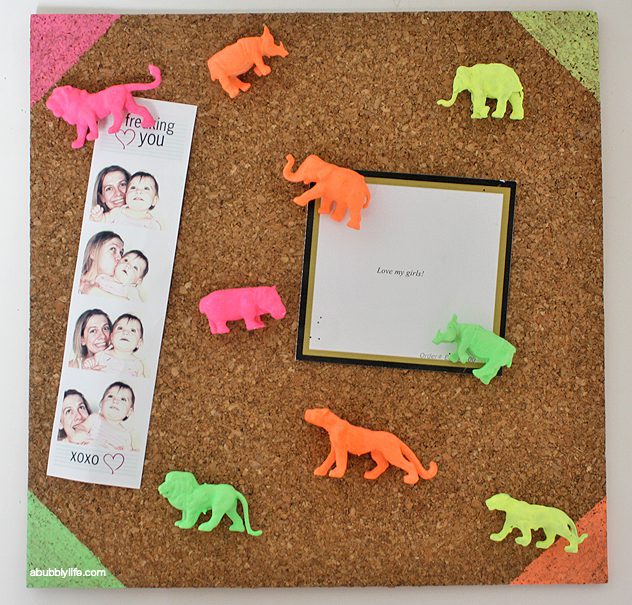
Neon-izing the pushpins makes them more fun to use; the animal pushpins you see in the picture above are what make them even more unique. Simply purchase plastic animals and glue thumbtacks to the bottom of each animal; finish off by painting them in neon colors.
Neon Trays and Pots
Moreover, small objects like trays and succulent pots are another place you could experiment with neon elements. By adding small touches to your home slowly, you’d be able to roughly capture the idea of a neon-ized home and how you feel about it.
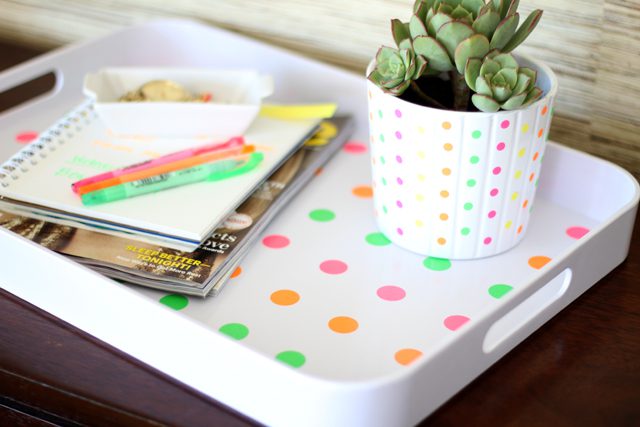
With the plain trays and succulent pots in your home, simply stick some store-purchased neon stickers on them. After that, apply a thin coat of mod podge so that the stickers will be able to endure some wear and tear.
Neon Glitter Clocks
Wall clocks are everyday household items that we often use to check the time. Ordinary wall clocks are great, but uniquely decorated ones will put a smile on your friend’s and family’s faces. So, go ahead and give your clock a makeover by dressing it up in neon glittery colors!
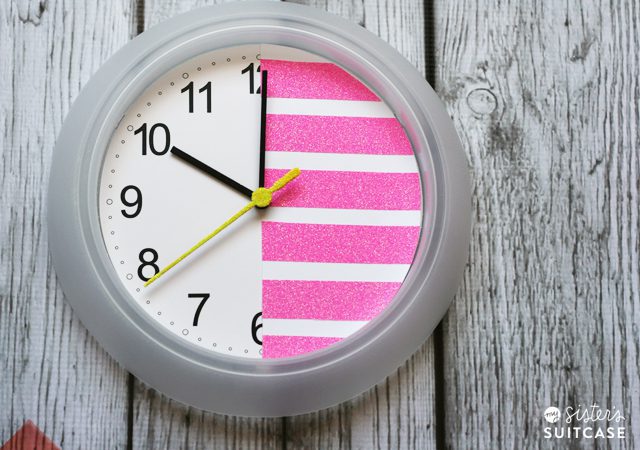
You can do so by removing the clock hands first, then painting the clock in neon colors. For a little more pizzazz, add glitter to your masterpiece. Finally, paint on the numbers and reattach the clock hands. This is also a fun activity to bond with your kids over!
Neon Trim Tea Towels
Monica Geller in Friends has 11 towel categories that vary from beach to guest to fancy guest to bathroom to kitchen to everyday use. If you’re someone like her who has a towel for every occasion, you’ll need a system to organize them.
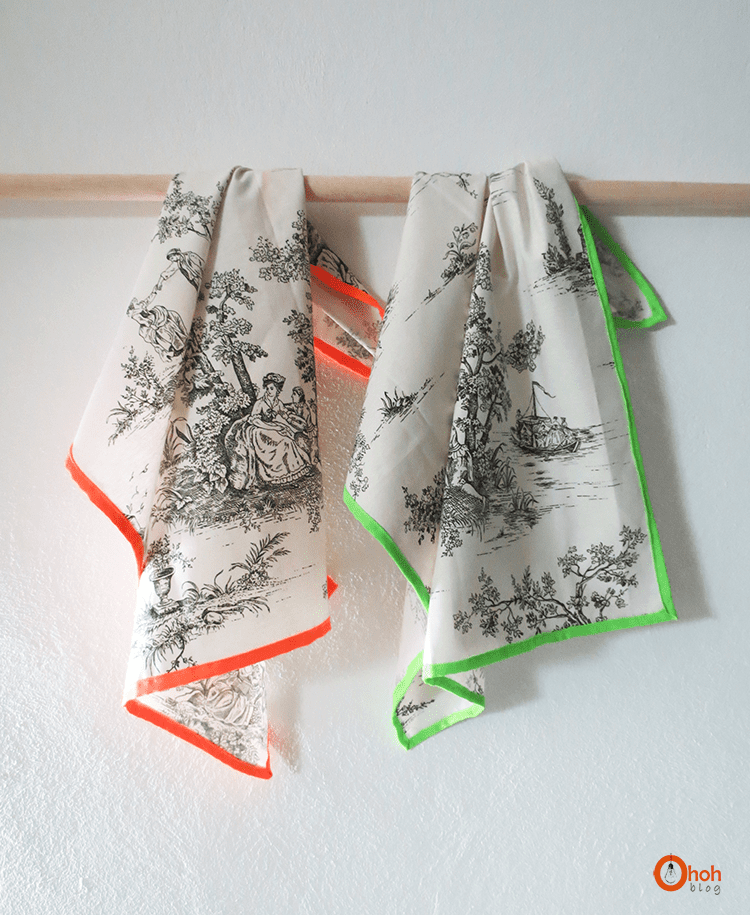
Simply use neon bias tape to cover the edges of the towels to categorize them, one color for one category. This way, you and your guests won’t have a hard time finding the right towel for the right occasion.
Neon Candles
Candles, whether they’re scented or not, make a great decoration. Scented ones fill the room up with your favorite fragrance, whereas unscented ones prove to be helpful during blackouts as well as candlelight dinners. However, ordinary candles aren’t festive enough, in our opinion.
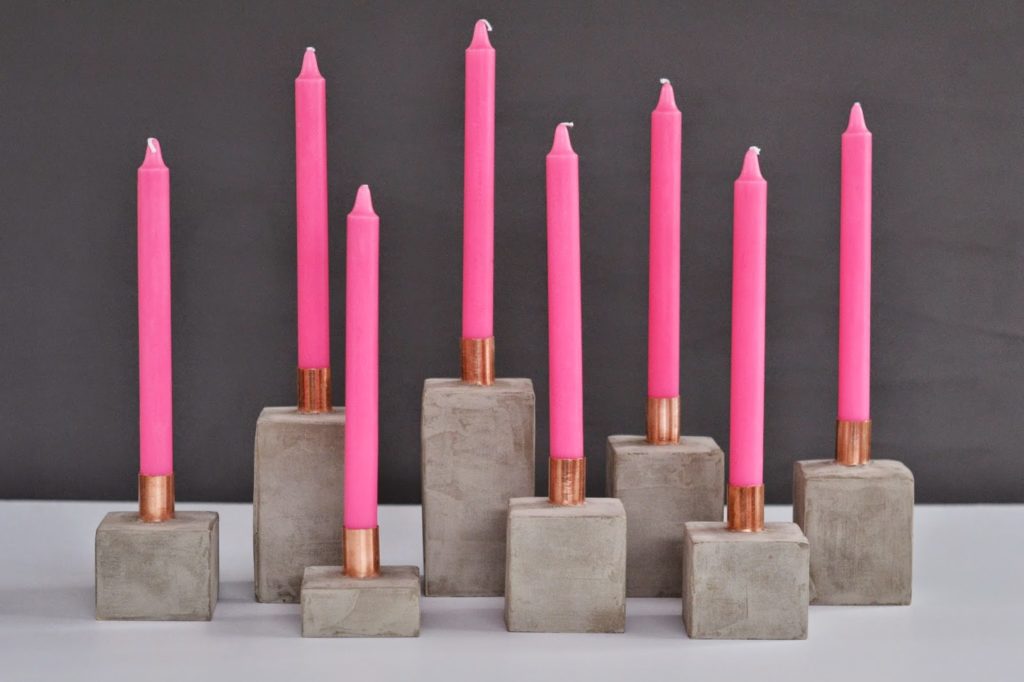
Therefore, you could make neon candles to make them look more festive and fun. To do this, search for a candle recipe online and add some neon paint. If you want scented candles, add a few drops of your favorite perfume.
Ombre Neon Candlesticks
Instead of a fully neon-colored candle, you could opt for an ombre neon effect if you’re not feeling particularly gutsy. By looking at the picture below, you would think that this is made by dipping the candle into paint, but they’re actually not made this way.
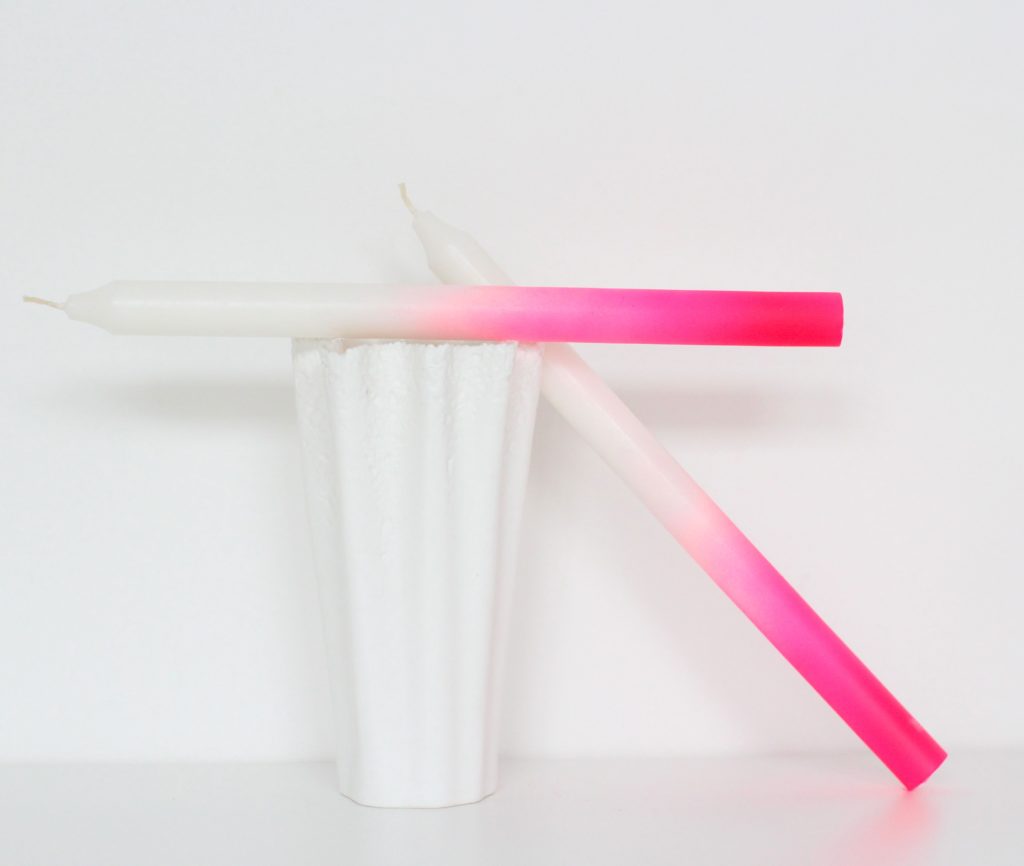
Using cotton balls, dip them in neon paint of your choice, and lightly print them onto plain white candlesticks; repeat this step until you get the desired ombre look. To successfully create an army of neon ombre candlesticks, repeat the same steps for the other candlesticks.
Neon Phone Stands
In this day and age, phones are something that we can’t live without. However, hunching over our smartphones and tablets is bad for our necks and posture. Therefore, to avoid this, we’ll need the help of phone and tablet stands.
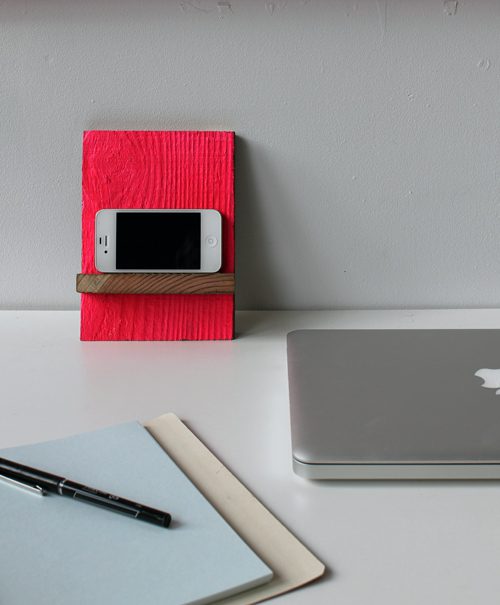
You can easily find phone and tablet stands in gadget stores; you can simply purchase them from the store and customize them with neon paint. Once you’ve customized it, you’ll have a one-of-a-kind phone stand that everyone else would be dying to have.
Neon Stripped Wooden Spoons
Wooden spoons aren’t strangers to most kitchens; they are indeed trusty kitchen helpers. However, they look kind of bland and boring, which would make cooking less interesting. Therefore, you could try and dress them up a bit with this next DIY idea.
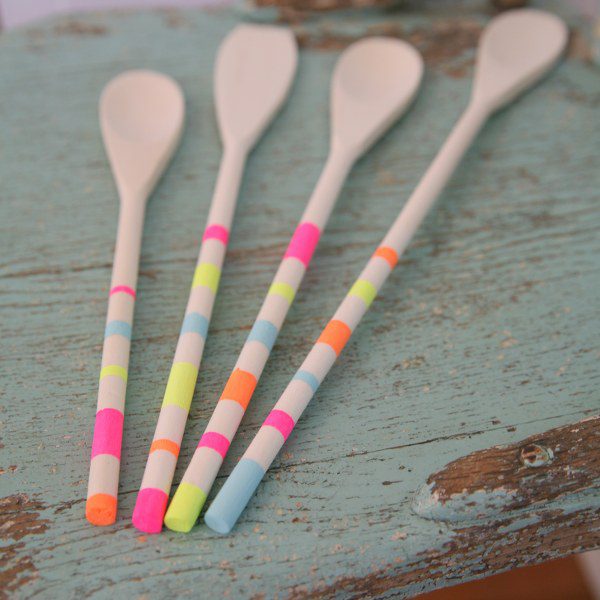
Use some painter’s tape to tape the spoon; you could leave even spaces between each piece of tape or vary them. Then, paint the untaped sections with neon paints of different colors. Finally, remove the tape when the paint has dried.
Neon Lace Bowls
Coffee tables and dining tables are often decorated with a centerpiece, and a common centerpiece is fruit baskets. These can be store-bought, but if you’re not looking to spend much on a centerpiece, try to make a neon one yourself.
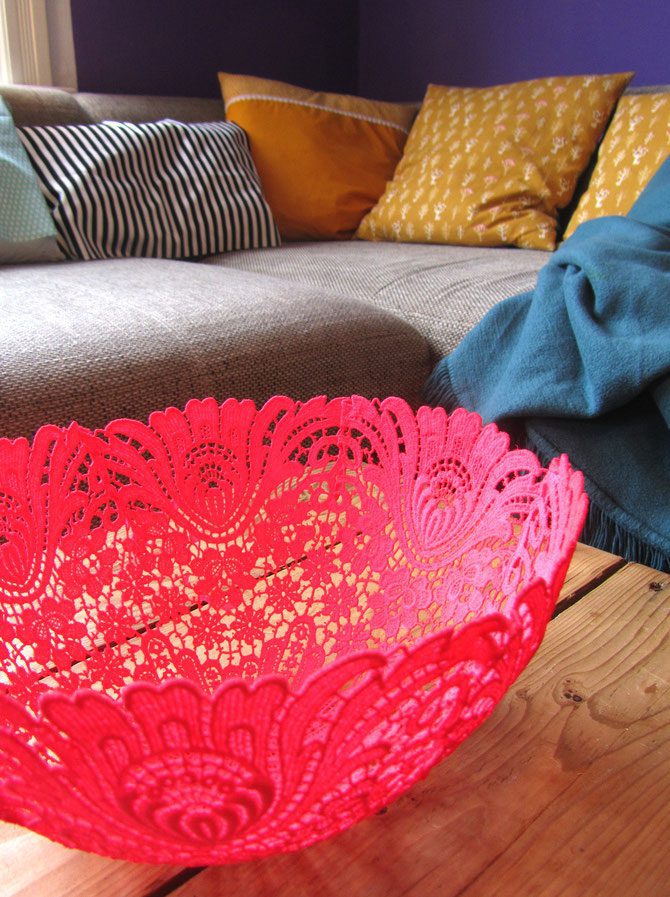
Blow up a balloon to approximately 25-30 cm in diameter. Then, put a lace fabric onto the balloon and lace and paste with wallpaper paste; be sure to paste it thickly. Pop the balloon and spray paint it with neon paint when the paste has dried thoroughly.
Embroidered Wall Art
Moving onto more extensive areas in your home where you could add neon elements: your walls. If your walls look a tad empty, wall art would fill them up and decorate them to solve this. Neon wall art adds a subtle pop of color to your walls.
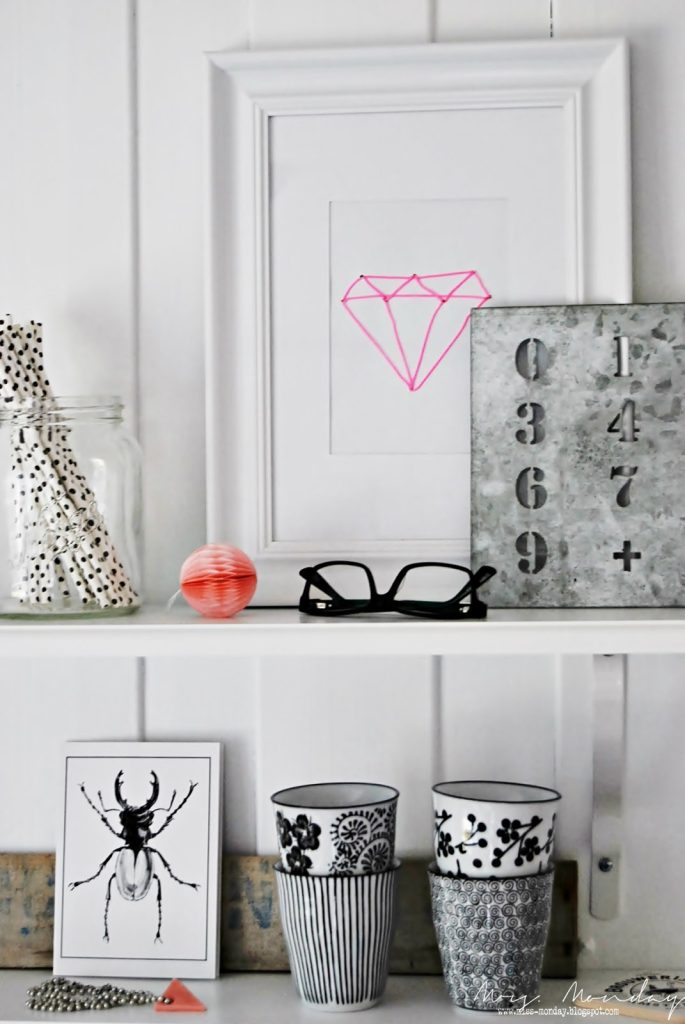
Using a thick piece of paper, place a template on top of it and poke holes through it. Then, start threading neon embroidery thread through the holes you’ve punched. Finally, pick out a suitable frame, place your art inside it, and hang it on your walls.
Neon Macrame Wall Art
Alternatively, give this neon macrame wall art DIY project a go. Macramé adds a bohemian vibe to your home, which is a rather trendy style nowadays. Paired with the neon craze, your home should be the most stylish in town!
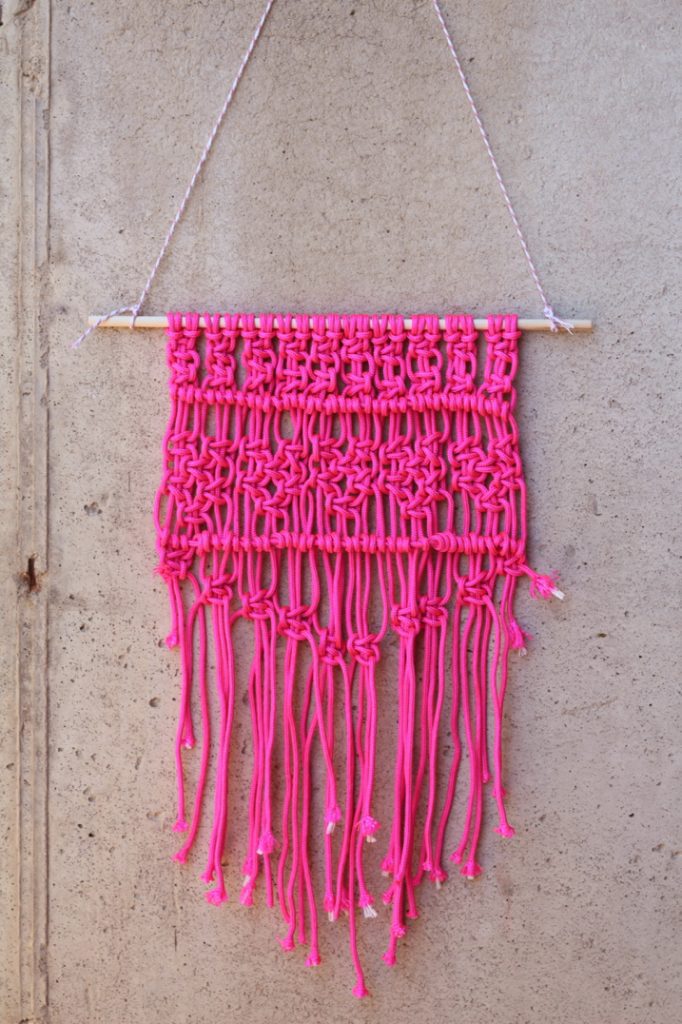
All you need is a wooden rod, some neon yarn, and macrame instructions. Follow the instructions and macrame away with the neon yarn you’ve prepared prior to this. When you’re done, hang it on any wall in your home, and it’ll instantly elevate it.
Washi Wall Art
Remember the washi tape hype a few years back? Many were involved in this hype; these “victims” must’ve bought thousands of washi tape back then and have leftovers today. If you have neon washi tape, here’s how you can put it to good use.
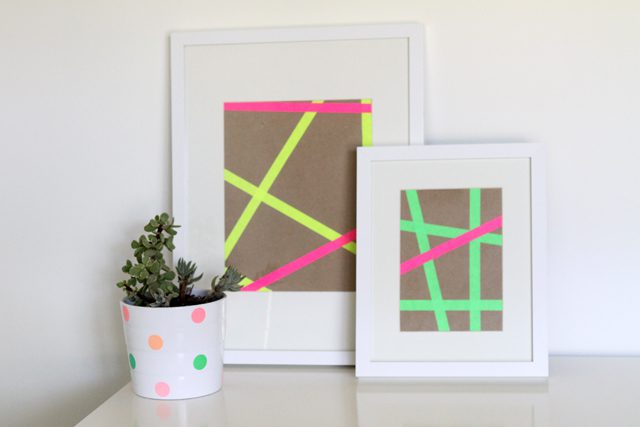
On a piece of brown kraft paper, use different colors of neon washi tape to create a pattern of overlapping lines. You could alternate between two colors to make it even more colorful. Find a plain picture frame to frame your artwork in when you’re done.
Heart String Art
Having a hard time coming up with the perfect wedding gift for your newlywed friends? Handmade gifts are known to be the best gifts ever to exist because they indeed show how much love and thought you put into them.
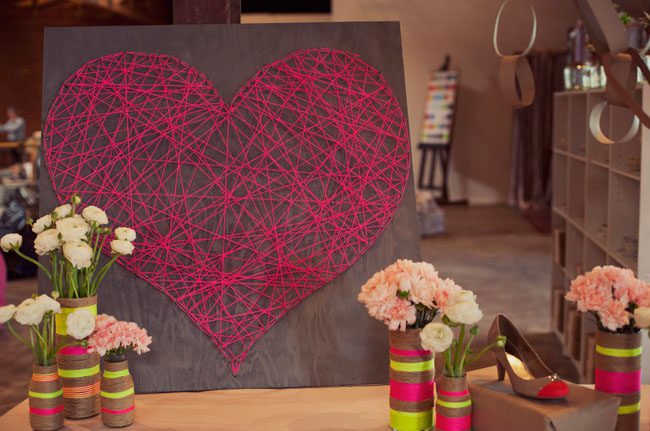
This neon heart string art is perfect as a gift or as a wall decoration in your own home. All you need to do is spray paint a piece of wood, nail a few nails on it in a heart shape, string a few neon strings or yarn around the nails, and you’re basically done!
Neon & Kraft Paper Banner
Speaking of gifts, what’s a party without banners, right? This vibrant party banner would be an excellent decoration for your walls; not to mention that it’ll be the perfect spot for you and your party guests to take pictures worthy of your Instagram.
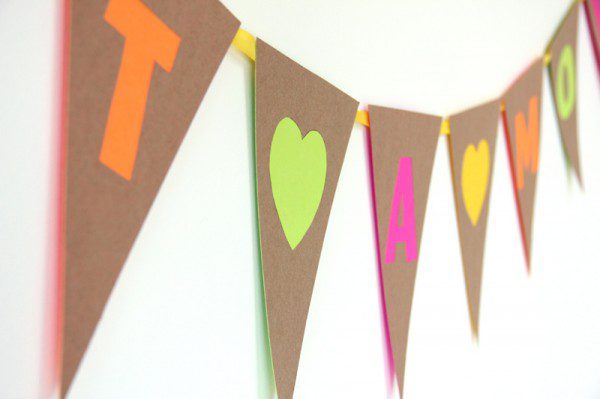
Using the leftover brown kraft paper from the washi wall art idea, cut them into triangles; do the same with your neon-colored papers. Then, cut out the letters and shapes from the brown kraft paper and glue them to the neon-colored papers. Finally, string them together and hang them on your wall.
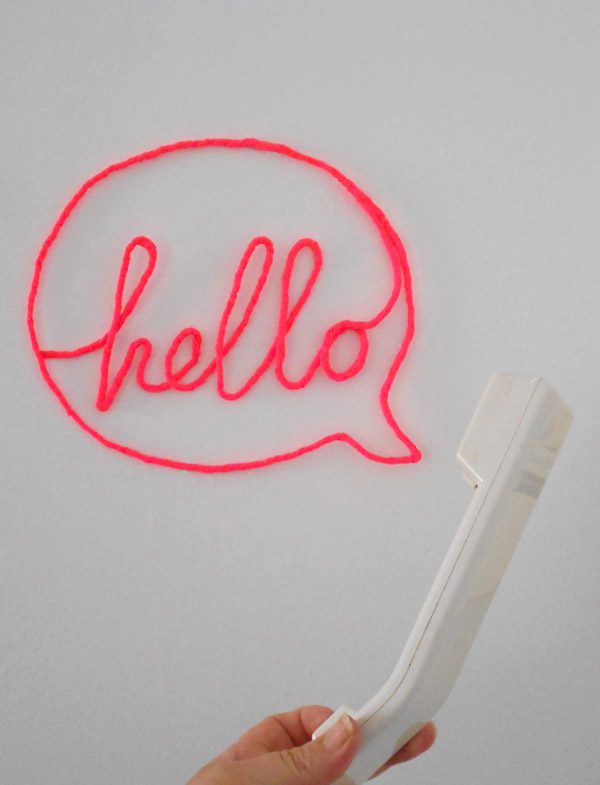
Neon Word Light
If wall art doesn’t suit your taste, you could substitute that for a neon word light that makes quite the statement. This is the perfect room decoration or room divider as you can twist the wire into names of who the room or part of the room belongs to.
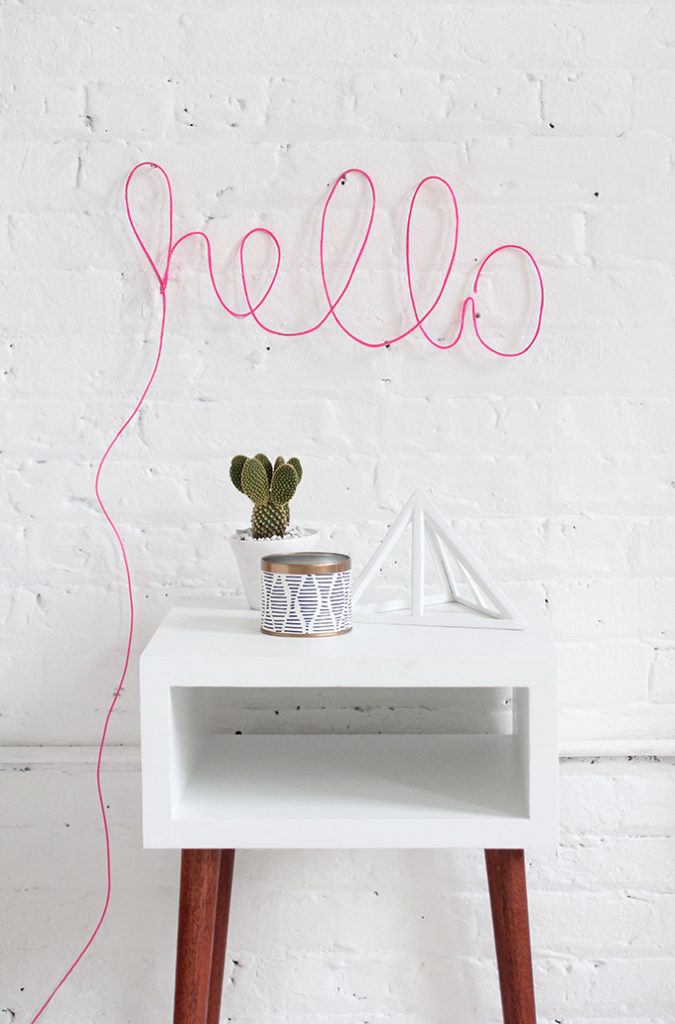
Firstly, write the wording on a piece of paper; calligraphy-style writing looks best for this. Then, bend a wire so that it traces the wording. When you’re done, glue a neon rope light to the wire, and you’ll have completed this easy DIY project.
Yarn Wrapped Wire Word
Instead of using a neon rope light to wrap the wire, use neon yarn as an alternative. Both materials give off roughly the same effect, but yarn-wrapped wording has a more subtle touch compared to the neon light rope.
Similar to the neon light sign above, write the wording on a piece of paper. Then, trace the wording on the paper with a wire. Finally, wind and glue some neon yarn or fabric to the wire. Make sure to cover all evidence of the wire.
Yarn Monogram
Apart from the walls, shelves and racks are other places that may look relatively empty, as though they’re missing a part of themselves if not decorated. Again, this is where you can incorporate neon elements if you only want to test the water.
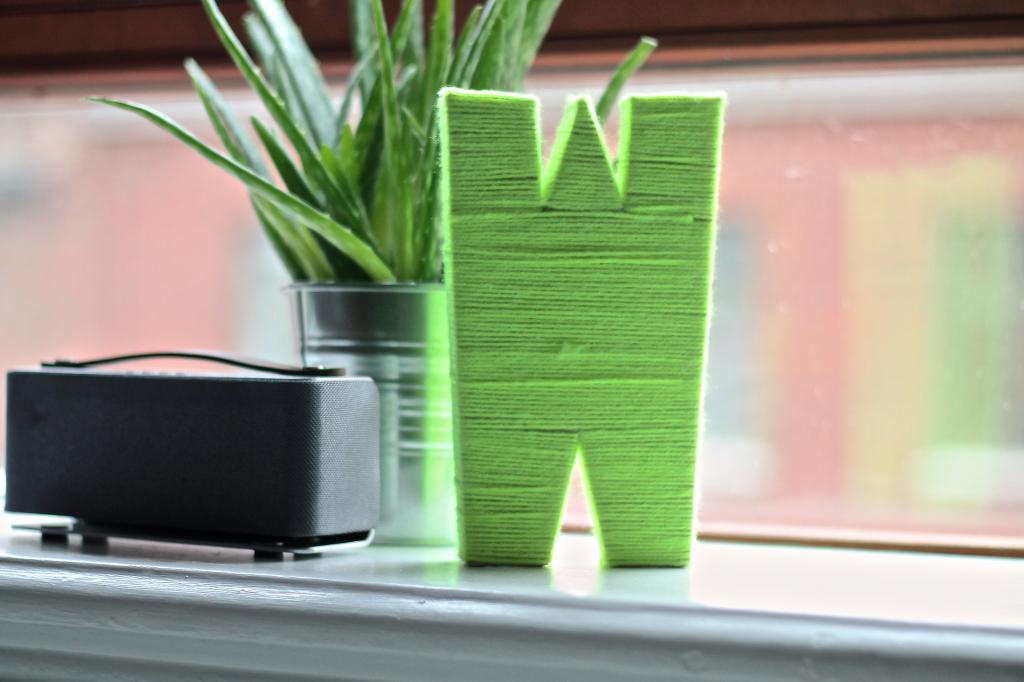
This is quite a simple DIY project. Begin by cutting out and assembling a 3D cardboard letter shape. Then, choose the neon yarn of your choice. Wrap and glue the yarn around the cardboard until all the cardboard has been covered up.
Neon Stools
Stools are standard household furniture. They can be used as decorations or hold succulents, books, and other things. Either way, you can neon-ize your stools to customize them. Your guests will definitely be drooling for stools like yours.
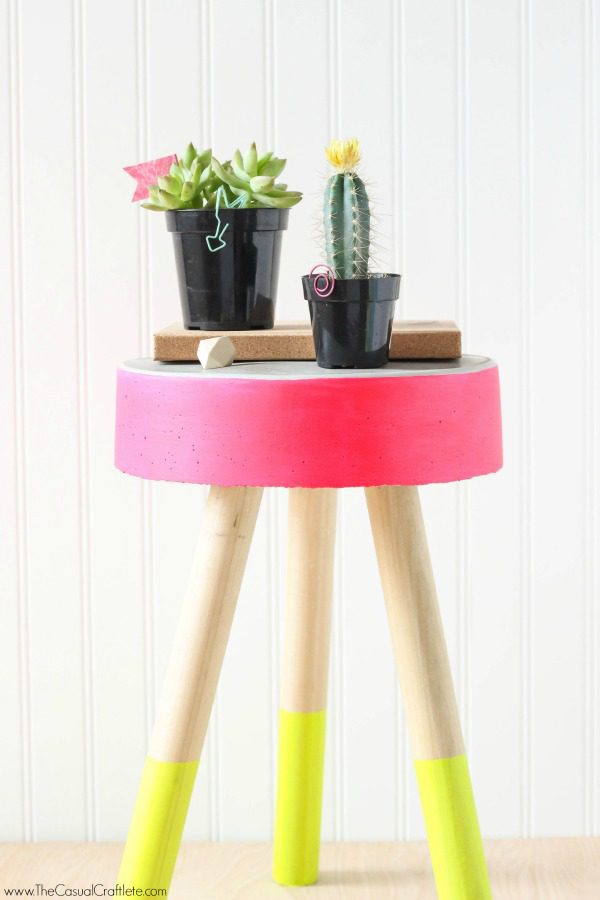
Simply pick out some of your favorite neon-colored paint and use them to paint your stools. You could paint the whole stool in one color or paint the top of it in one color and the bottom in another, or create unique patterns with the paint you have.
Neon Light Fixture
If you’re feeling gutsy, go bold with this neon light fixture made out of, you won’t believe this, ping pong balls! This is one of the boldest neon elements we’ve mentioned so far, so unless you’re absolutely sure that neon is indeed for you, don’t simply try this.
To create this, spray ping pong balls into different groups of colors. Then, drill a small hole with a needle into opposite ends of each ball. Using a nylon thread, make garlands with the balls by threading the thread through each ball. Next, tie the garland to the lampshade structure and repeat for the rest.
Neon Accented Wall
Another way you can go bold with neon is with neon-accented walls. Neon-accented walls like this one clearly display the power of color; it easily divides one room into two and give your guests something to talk about when they visit your home.
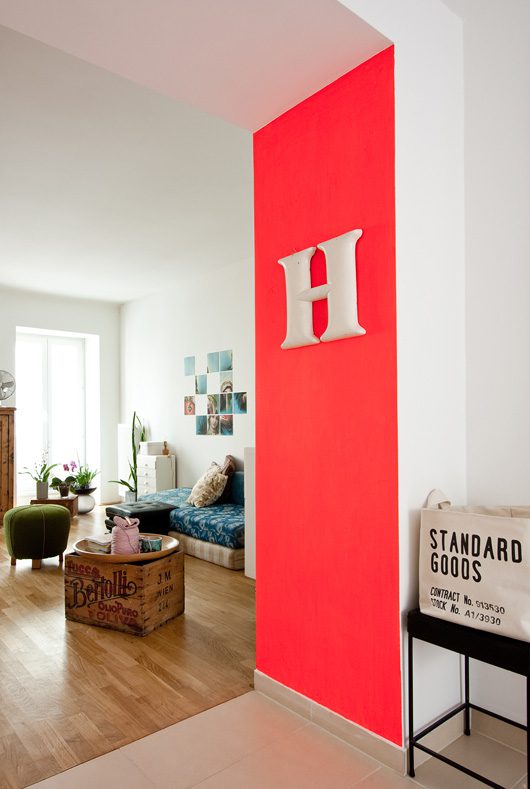
All you need to do is use some semi-matte latex paint to paint one of your walls; keep in mind to tape down the edges for a neater finish. You could add simple decorations to elevate the color when the paint has dried completely.
Neon Doors
Want your house to be easily recognized? Go with this very gutsy neon door that distinguishes your home from the rest of the houses on your street. Your guests will never have a hard time looking for your home with this neon door!
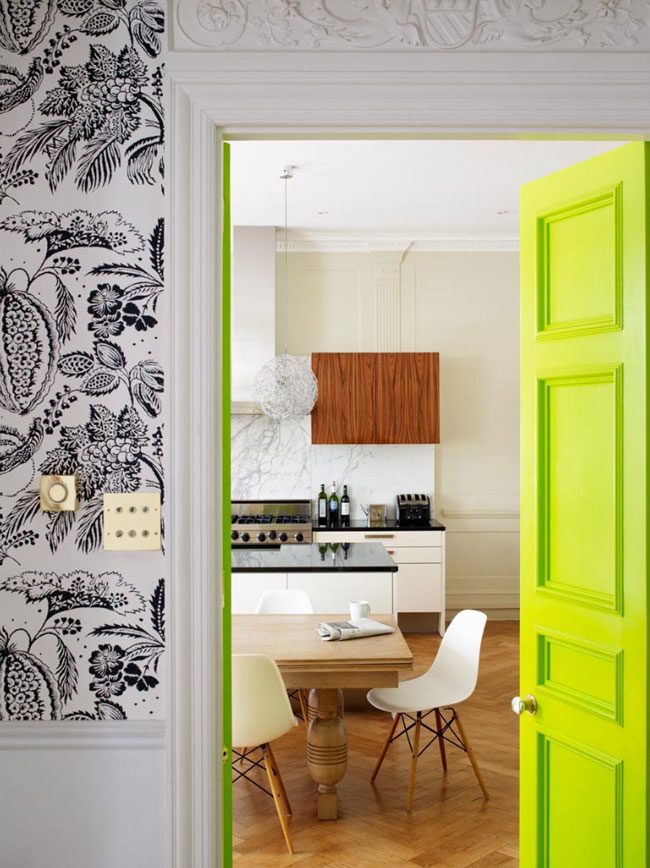
Go ahead and paint the entire door in a bold neon color. Apart from the color of the door, the bright side to this is that you can always paint over it if you are not satisfied with how it looks.
Neon Painted Heart Pillows
If you have ordinary pillow casings like the ones that most hotels use, here’s an idea on how you can elevate them and save some money on pretty pillow casings. With this DIY pillowcase, you can instantly add a pop of neon to your bed.
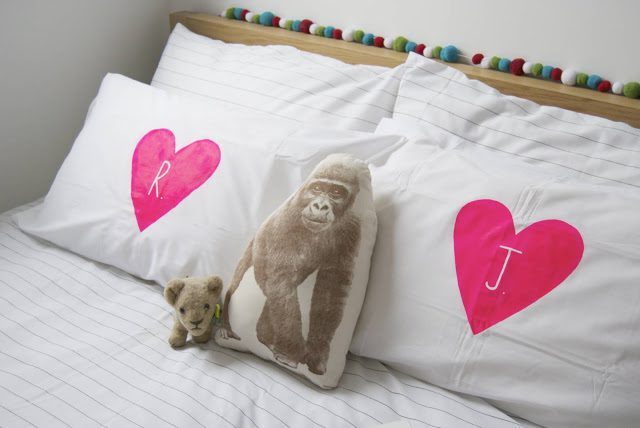
Simply grab a couple of white pillowcases, neon spray paint, a heart-shaped template, along with a lettering template. Place both the heart-shaped template and the letter template in the center and spray paint over it. When the paint has completely dried, insert the pillow in the case and place it on your bed.
Neon Dot Pillows
Alternatively, create neon dots instead of hearts on your pillows for a not-so-girlish style. You could even have a mixture of neon polka dot pillows as well as neon heart pillows. To be honest, neon pillows are highly customizable.
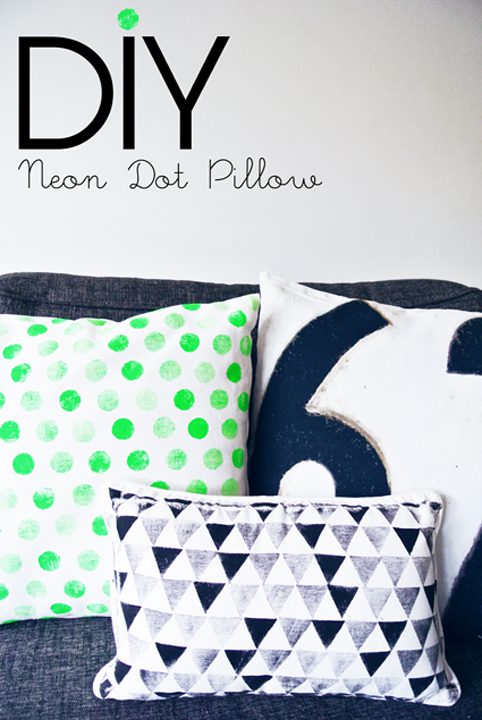
To create neon polka dot pillows, all you have to do is print neon fabric paint onto white pillowcases with a potato stamp; to customize it, use any stamp you like, paired with any neon fabric paint of your choice.
Pom Pom Throw Pillows
Next up is another DIY idea to neon-ize your pillows; we’ll be creating a neon pom pom throw pillow. Throw pillows, especially ones with neon elements, are great decorations for your sofas and beds as they instantly take simple couches and beds to another level.
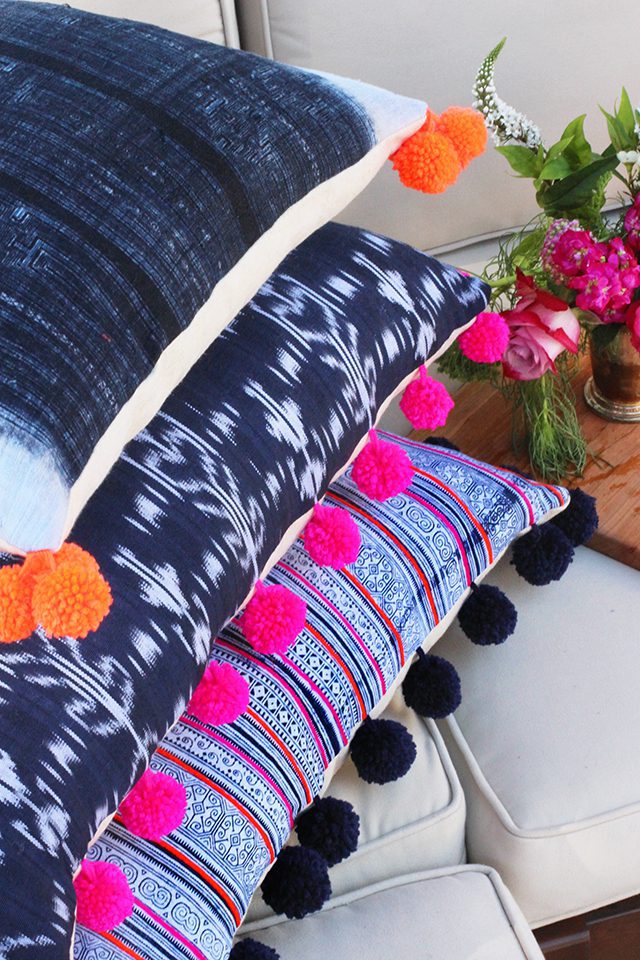
To make the pom-poms, wrap some neon yarn around your hand a few times. Then, take it out from your hand and tie yarn in the middle. Now, you’ll have a yarn that looks like a bow. Cut it in each end. Finally, attach your pom-poms to your throw pillows.
Neon Rope Coasters
If you’re a Monica Geller, the drink rings on your tables from not having coasters for your drinks will drive you nuts. So, you’ll definitely have numerous coasters ready for the drinks you and your friends may have. However, ordinary coasters seem pretty dull and are no fun to use.
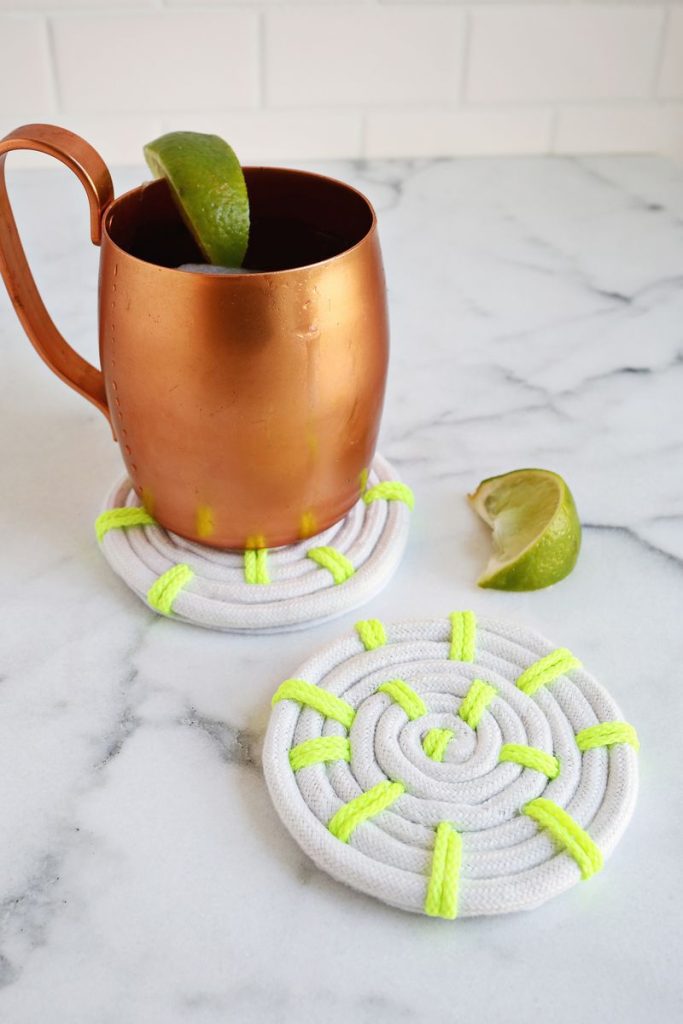
To add personality along with fun and cheerful vibes to ordinary coasters, you could incorporate neon elements. Simply begin gluing and coiling a drawstring cord that’s about 48’’ long. Then, thread a neon cord through a needle and sew side by side stitches scattered across the coaster.
Neon Edged Trivet
Since you already have cups as well as coasters, you’ll need trivets to set your teapots on if you’re going to have tea with your friends. Here’s how you can easily make one with recycled items while incorporating neon elements.
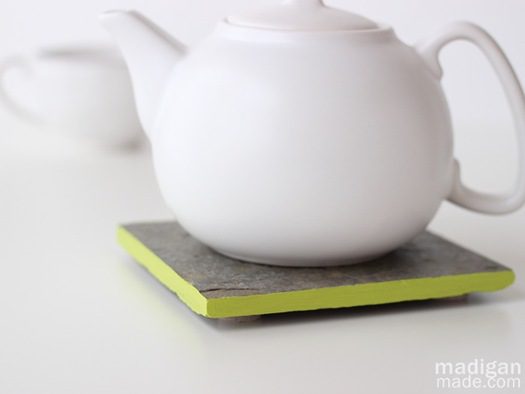
Using leftover tiles, paint the edges with neon paint in any color that suits you. Of course, you could choose colors that compliment the color of your tile, but for a more unconventional trivet, select colors that contrast with the color of your tile instead.
Neon Photo Holders
In the Friends episode “The One with All the Resolutions,” Monica’s goal for the year was to take more pictures. If you’ve set the same New Year’s resolution as Monica did, you’d probably need these charming neon photo holders to display all the pictures you’re going to take.
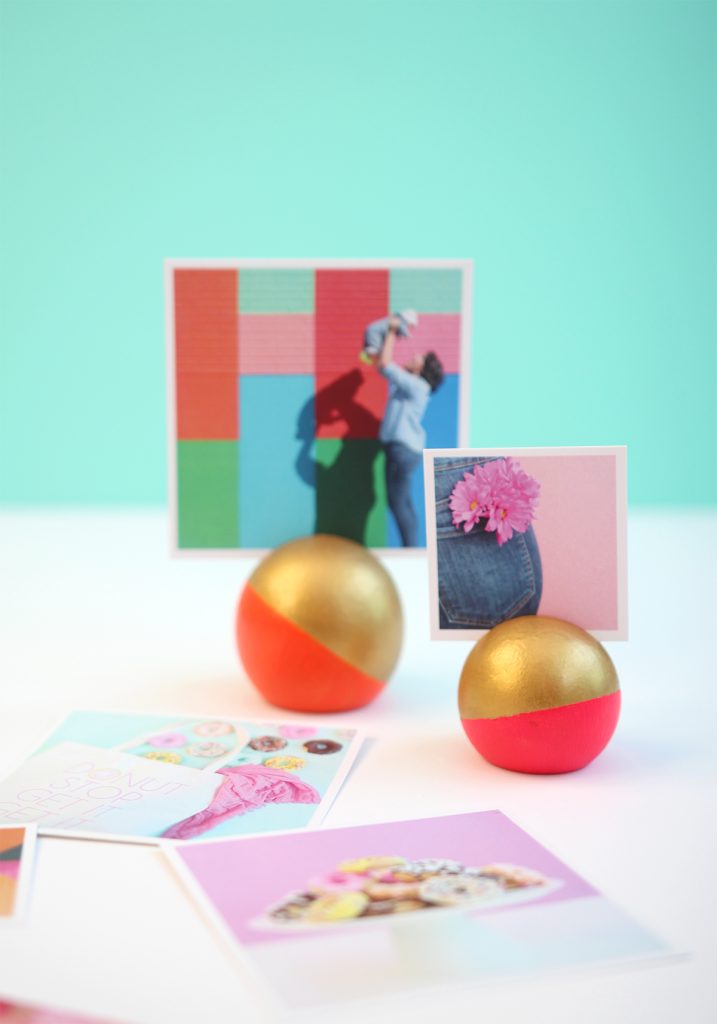
Start by creating a slit on top of a wooden knob that’s roughly ½ deep and color it in your favorite color. Then, create some patterns with neon paint in complimenting colors to the original colors. Finally, let the paint dry and slip a photo through the slit.
Neon Patterned Clothes Hanger
However, if you’re a Rachel Green, you’re bound to have many clothes in your wardrobe that you need to put away neatly. Hangers are great for this job, not to mention that it’s perfect for a subtle infusion of neon elements in your home.
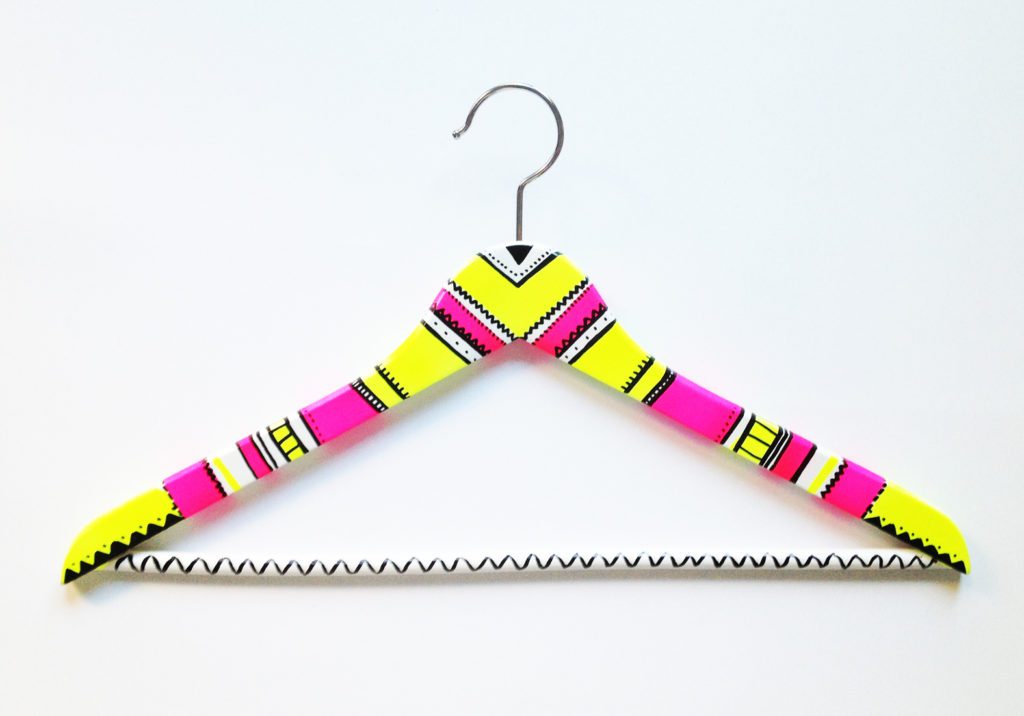
Prepare plain hangers, neon paints, and a black marker. Alternate between two different neon paints when painting the plain hanger; be sure to leave some space for you to draw some patterns on the hanger with the black marker.
Neon Animal Hooks
If you want to become the Rachel Green amongst your friends, you’ll need outerwear as well as hats to pair your amazing outfits with for a complete look. Apart from having these fashion items, you’ll need a place to store them; these neon animal hooks would be perfect for the job!
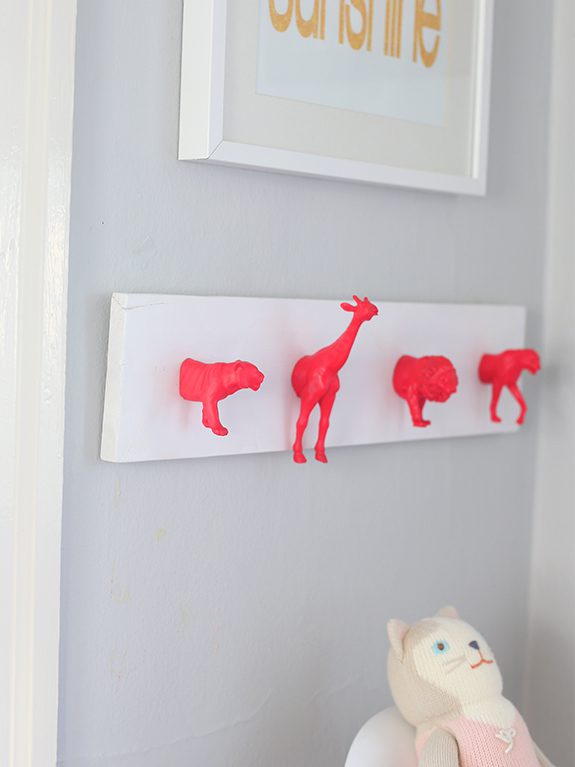
Simply purchase wall hooks for clothing and spray paint them in any neon color that you like; for a more unique clothing hook, you could buy wall hooks with unconventional hooks like an animal one that is shown in the picture above.
Fabric Coil Pots
To truly become a fashionista, you need to accessorize. As most women know, accessories are probably the hardest things to organize and store. Well, this fabric coil pot is here to save the day as it is perfect for storing small items such as accessories.
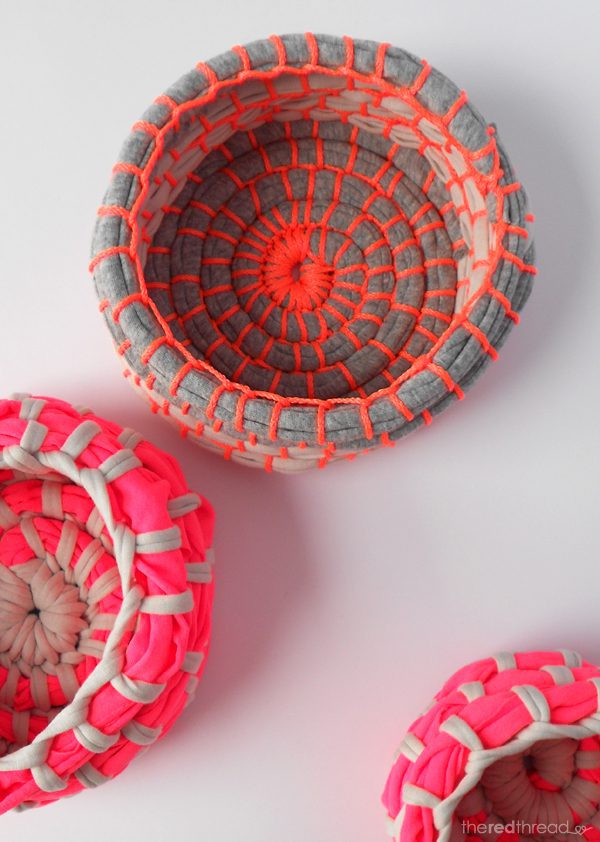
For this DIY project, you’ll need long strips of fabric, neon cords, a large yarn needle, and scissors. With the long strips of fabric, create a bowl or pot deep enough to keep your accessories in and add details with the neon cords.
Neon-Edged Boxes
Fabric coil pots may take up too much of your time, and maybe that’s why the idea doesn’t sound that appealing to you. Have no fear because you can still become a neatly organized fashionista with this neon-edged jewelry box.
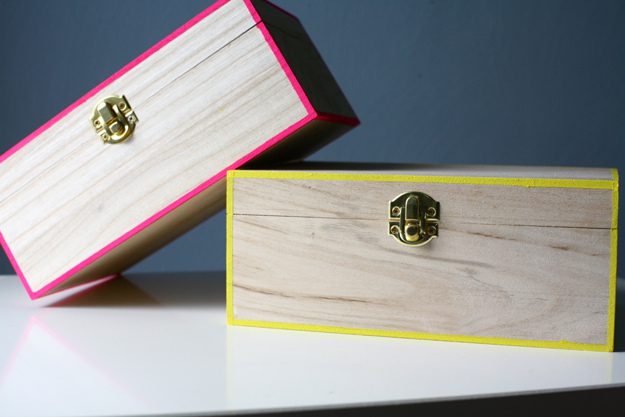
Simply purchase or make a wooden box; wooden boxes are beautiful but, sadly, are rather bland. Then, using neon paint, paint the edges of the boxes. The crisp edges are achieved with painter’s tape. This technique can be applied to plain boxes other than wooden ones as well.
Neon Baskets
Since you have organizers to store your clean clothes and accessories, why not create something to hold your dirty clothes as well? Neon baskets like these ones are perfect for this job! Instead of holding your dirty clothes, it could also hold other stuff.
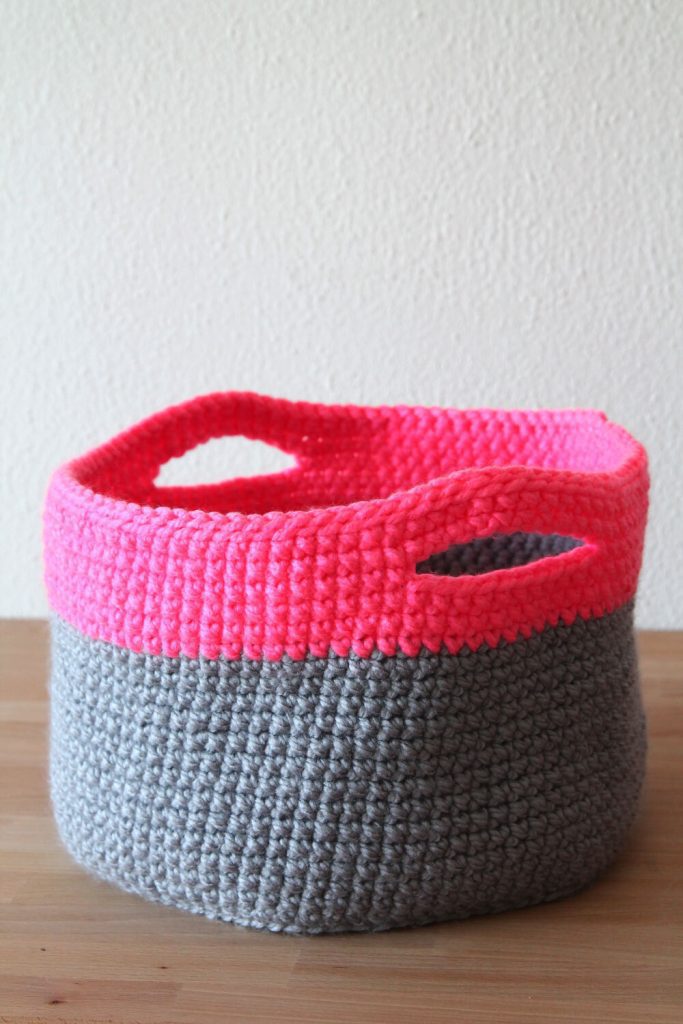
Of course, you’ll need to learn some crocheting basics for this. Once you know your basics, start crocheting the bottom of the basket, then move on to the sides. Finally, when you reach the top, use neon nylon string instead of the usual crocheting hemp.
Pot Scrubber
A pot scrubber is another neon element to add to your home that requires some crocheting basics. Pot scrubbers generally look the same in each and every household. However, this one would make yours stand out and motivate you to do the dishes more often.
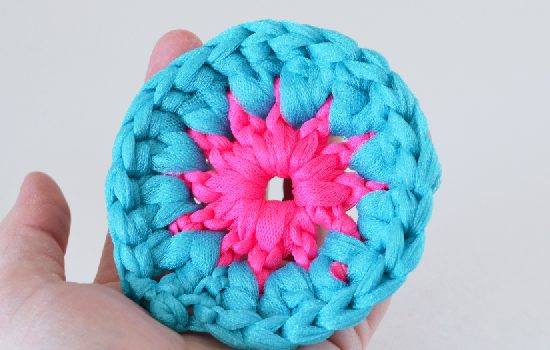
You’ll need a tulle, crochet hook, and strong fabric adhesive. Crocheting takes a large amount of patience and time but is super satisfying once you get the hang of it, not to mention that the end result looks gorgeous.
Neon Magazine Holder
Wizards of Waverly Place fans would know how much Alex Russo loves her magazines. If you’re like her, you’ll definitely need a place to store all your “babies,” and we believe this beautiful neon magazine holder would do your “loved ones” justice.
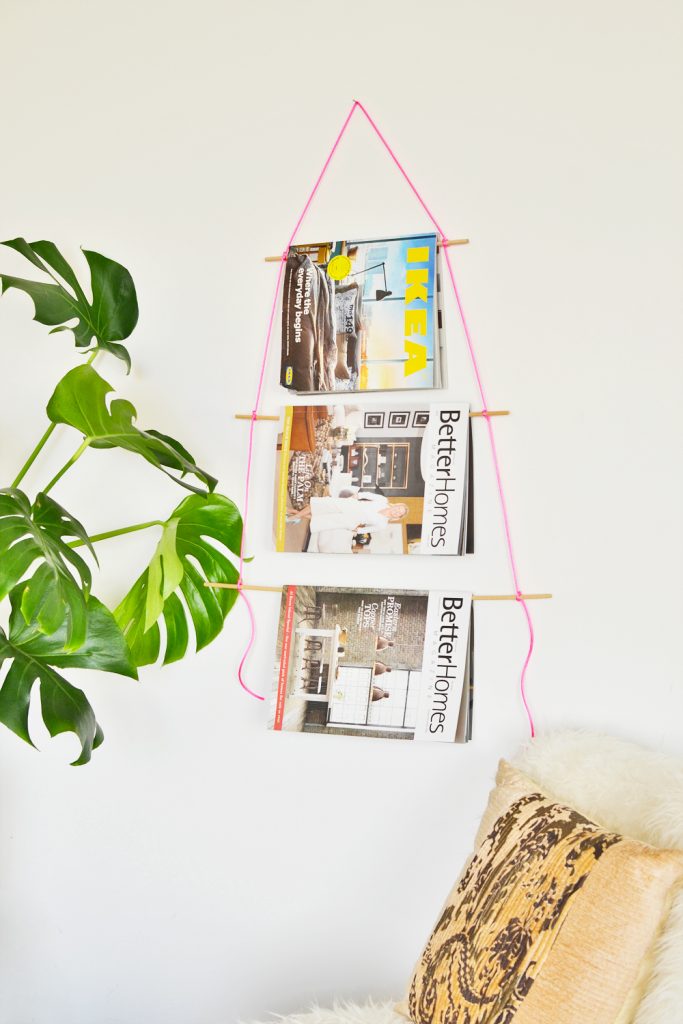
Cut a 23-foot long dowel stick into pieces of 12 inches, 16 inches, and 20 inches. Next, cut two yards of a neon cord in your choice of color. Now, part the neon cord in half and tape it down; evenly spread the dowel sticks out and secure it in place with the neon cord.
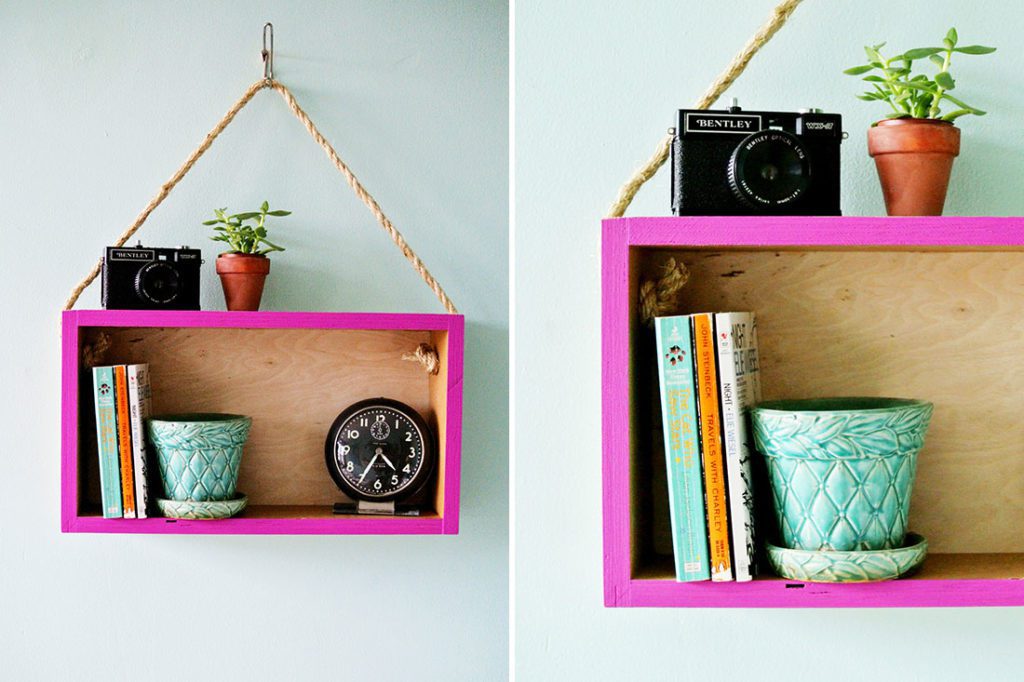
Neon Rack
In case you’ve been living under a rock, Ikea is a globally known furniture store where you can purchase affordable furniture from. Unfortunately, due to how affordable Ikea’s products are, practically everyone has the same furniture sitting in their homes.
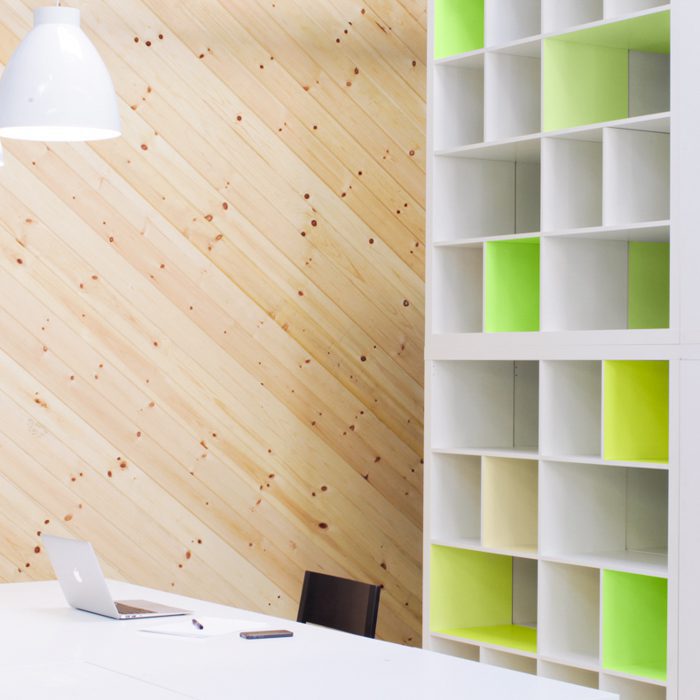
To help your Ikea furniture stand out from its brothers and sisters, try painting the insides of the shelves with neon-colored paint; just take a look at how this idea turned out on a Kallax bookshelf. This idea can be adapted to basically any furniture you have.
Neon Crates
Those who are concerned with the environment may prefer to recycle materials in their homes to create environmentally friendly furniture instead of spending money on them, despite how affordable Ikea is. Well, here’s an easy neon crate rack that you can make.
Start by painting your crates in neon paint. Wait for the paint to dry before drilling one hole in each side of the crate. Then, attach a rope through the holes. To hang the crate to a wall, attach a hook to your wall and hang the crate there.
Neon Rock Succulent Planter
Succulents are drought-resistant plants that are suitable for beginners in plants and those who have not-so-green fingers but still wish to accommodate plants in their humble homes. However, there is a downside to growing succulents; they look rather lifeless because they’re generally green in color.
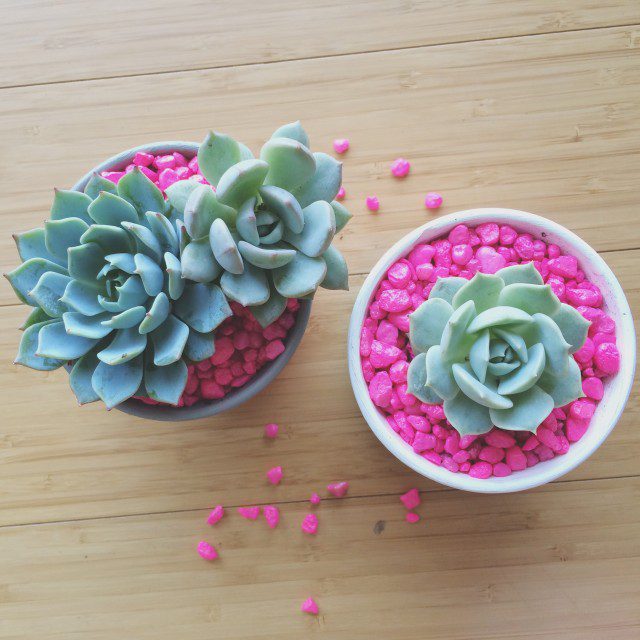
Fortunately, you could compensate for succulents’ lack of color with the help of neon-colored aquarium rocks. Go ahead and purchase some neon-colored aquarium rocks and fill your succulent planter with them; they’re such a great way to subtly infuse neon in your home!
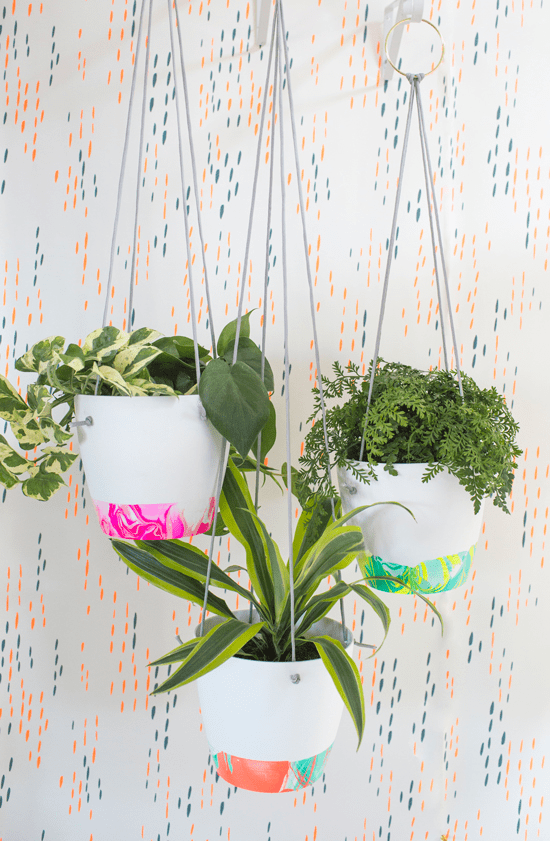
Paint Dipped Planter
As mentioned above, succulents seem rather lifeless due to how uncolorful they are compared to other plants; the solution above was to use neon rocks to add a little color. However, this next solution allows you to take a step further into the neon craze.
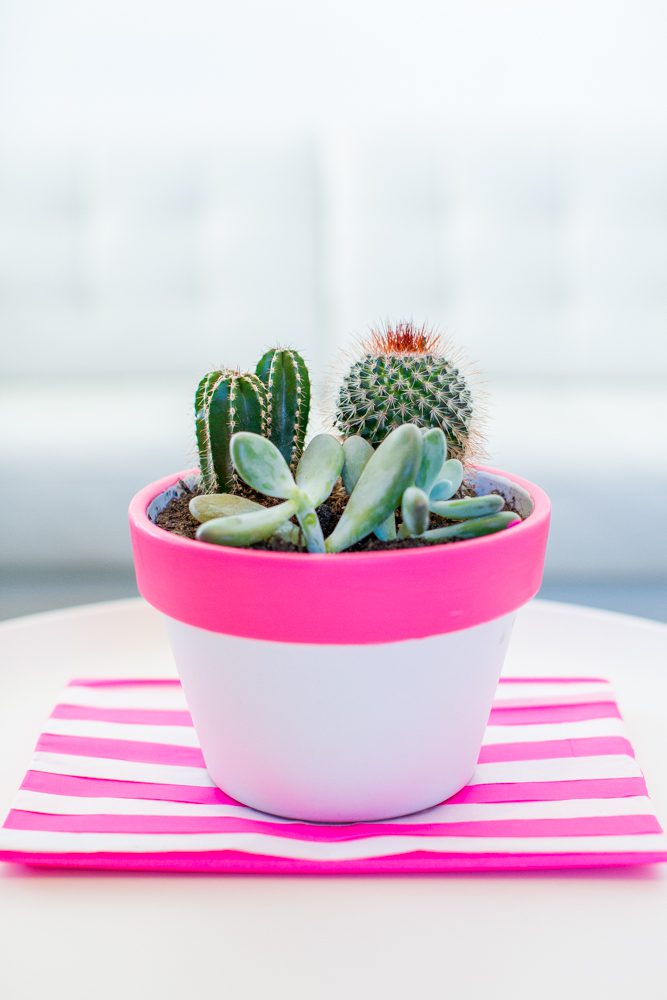
Using a plain succulent planter, you could paint the bottom half of it in any color you like. When the paint has dried, tape off the bottom section and use neon paint to paint the top section of the pot. Tear off the tape when the paint is dry and start planting!
Neon Cement Planters
Instead of succulent planters, you could add neon elements to a cement planter for plants other than succulents. It’s a great way to put the leftover cement bricks from previous construction to use and get started on developing gardening as a hobby.
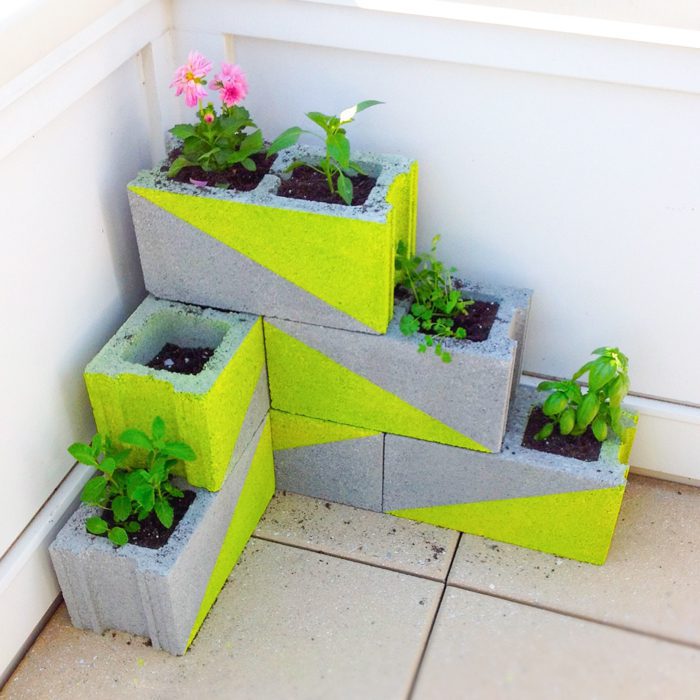
Prepare six cement blocks, some wire mesh, and neon paint. Start by spray painting the cement blocks; you could paint the entire block or create a pattern with the paint. Once the paint has dried, stack the bricks on top of one another with wire mesh at the bottom of each brick and start planting.
Neon Vases
Minimalist flower arrangements are pretty popular nowadays but could be slightly boring to look at, especially for an extended period. Therefore, you could place the minimalist flower arrangement in a neon vase which instantly elevates its look.
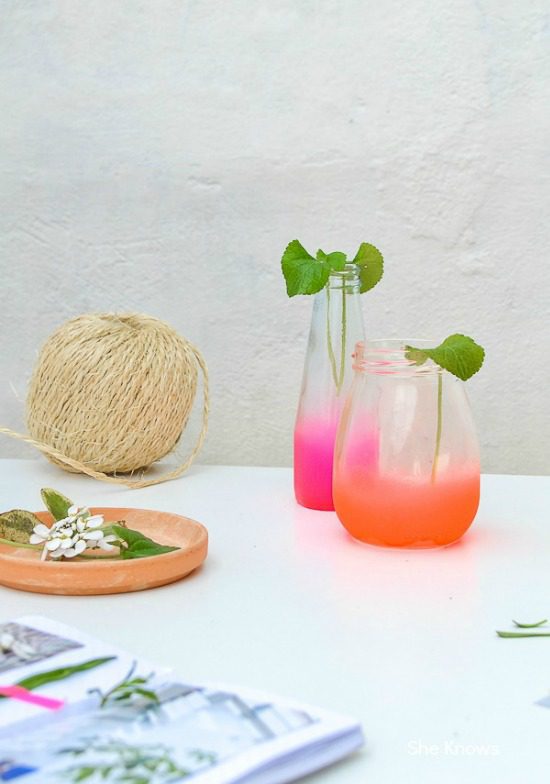
All you need to do is prepare a few clear glass jars. These could be jam jars that you’ve finished previously or mason jars. Then, after grabbing spray paint in any neon color of your choice, spray the insides of the glass jar. When the paint has dried completely, place the flowers in it.
Pineapple Air Plant Planter
Air plants are perfect to display in your bedroom if you want some plants in there because this type of plant photosynthesizes during nighttime. While it photosynthesizes, it releases fresh oxygen into the air, which helps reduce our stress levels, lower blood pressure, and improve focus.
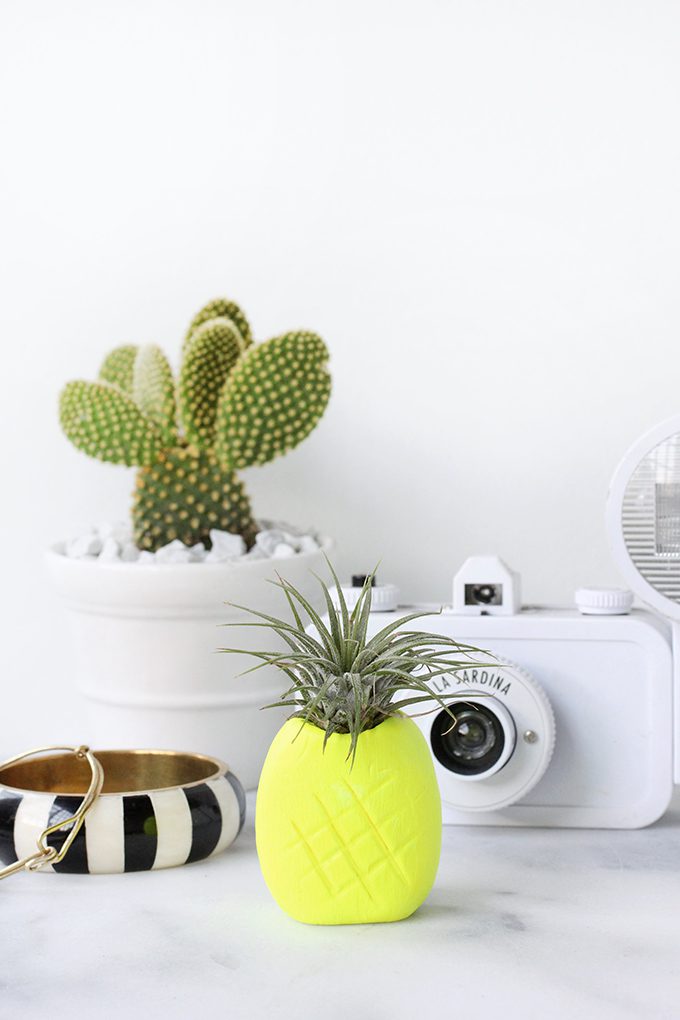
Create a beautiful air plant holder with merely air-dry clay and neon paint. Using the air-dry clay, create a planter in the shape of a pineapple; to make it look more realistic, draw lines diagonally on the body of the pineapple. When the clay has dried, paint it with neon paint.
Macrame Hanging Planter
If you’re someone who likes to hang your plants instead of placing them nicely somewhere in your home, you could create this beautiful hanging planter to add a touch of neon to your plants. What’s more, this planter doesn’t require any tools or needles.
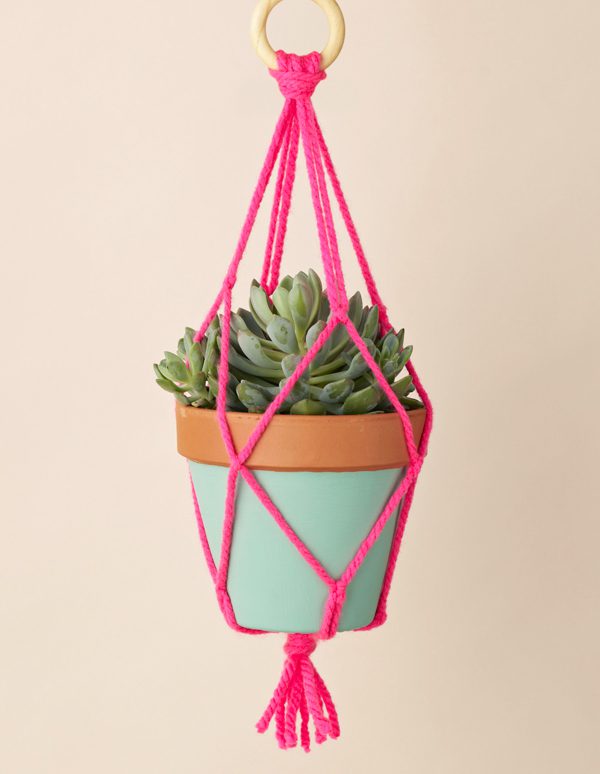
All the materials you need for this planter are some neon rope, scissors, and knowledge of macrame techniques. This is an unconventional yet stunning planter, even though it’s so easy to make. So, take some time to create this eye-catching hanging planter!
Marbled Hanging Planter
As impressive as macrame hanging planters sound, it may not be for everyone, especially those who aren’t that into bohemian styles. Additionally, it takes some time as well as patience. So, you could attempt to create a marbled hanging planter as an alternative.
Start by filling a large shallow disposable container with room temperature water and simply pour two different colors of neon nail polish into it; create some kind of design in the nail polish with a stick. Finally, submerge a plain plastic plant pot in the water, pull it out, and finish with a clear matte finishing spray.
Neon Birdhouses
If you’re someone who loves wildlife, you most probably have birdhouses in your backyard to attract the most beautiful birds to your home; birds too would be attracted by a beautiful home, and that’s why you need to build this neon birdhouse!
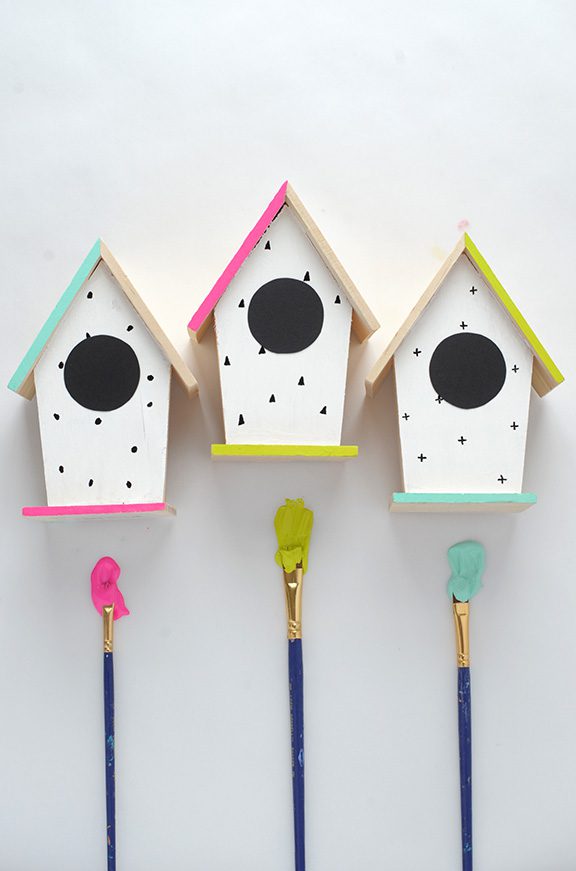
Building a birdhouse on your own may take up some time and patience, especially if it’s your first time. An alternative to building one yourself is purchasing plain wooden ones and hand painting them in bold and vibrant colors like neon colors.