
Spoonfuls Of Fun: 35+ Delightful Creations To Try With Plastic Spoons
Plastic spoon crafts are a fantastic way to repurpose everyday items and transform them into unique and creative projects. Plastic utensils are inexpensive, readily available, and come in various colors, making them ideal for multiple crafting pursuits. By recycling and reusing them, you can contribute to reducing waste and creating something beautiful at the same time. You get to help mother nature and save a few dollars.
Whether you are looking for an exciting activity with kids, want to express your creativity, or enjoy DIY projects, these crafts offer a range of possibilities. From decorative holiday items such as Christmas trees to practical objects like labels, the versatility of plastic spoons allows for endless design opportunities. Let your creative juices flow, and enjoy crafting!
1. Plastic spoon Christmas trees
Christmas is a time of fun, celebration, and creative decorations. Crafting plastic spoon Christmas trees is a unique and eco-friendly way to add holiday magic to your home. These charming and sustainable decorations can be made with little effort, allowing you to repurpose everyday items and reduce waste.
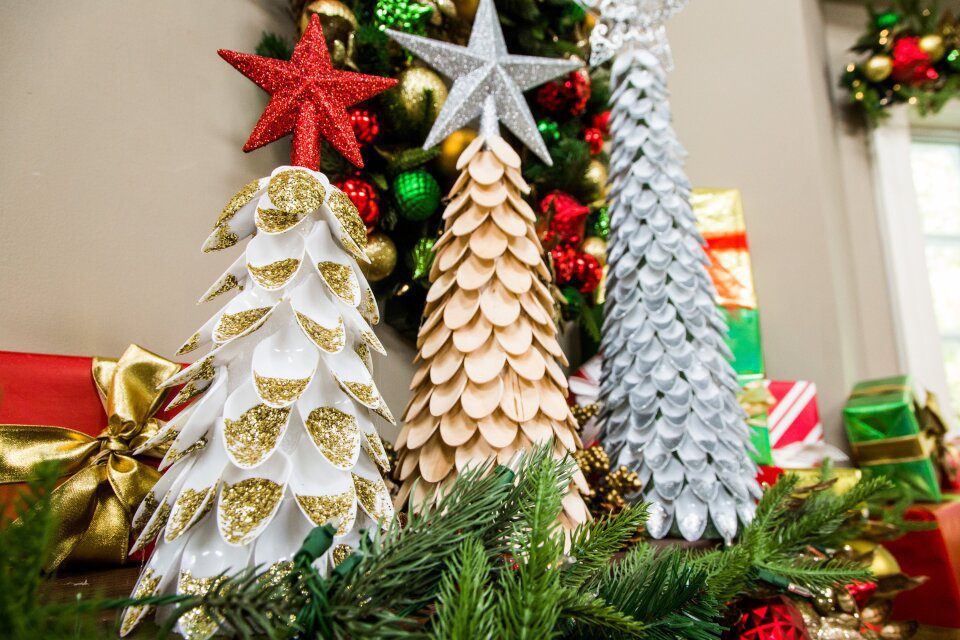
These DIY trees bring a festive atmosphere to your space, promote sustainability and serve as a fun project for the whole family to enjoy. By transforming these ordinary utensils into decorative trees, we give them a new lease on life.
2. DIY spoon roses
Plastic spoon roses are a fun and creative project that can be quickly done on a weekend. You can transform simple plastic spoons into beautiful floral accents that can be used in many ways, such as home decor, gift wrapping, or hair accessories.
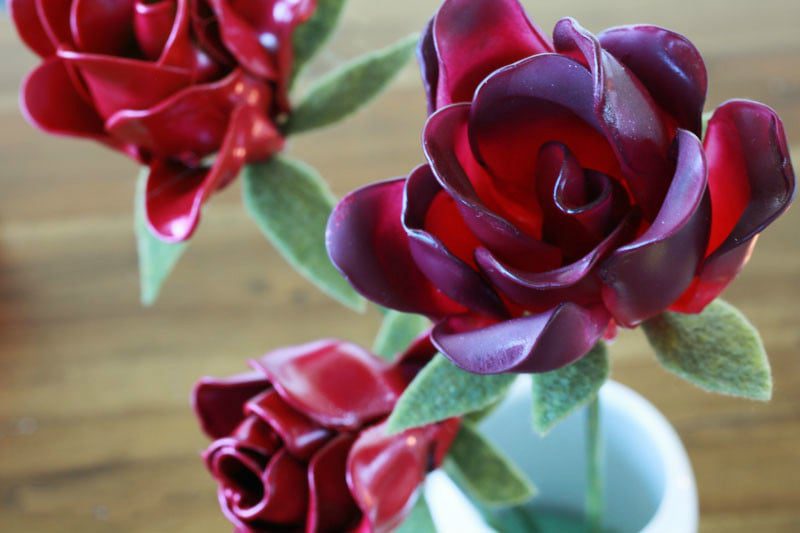
Glue spoons to a floral wire. Once all the petals are attached, wrap the wire with floral tape, starting from the base of the petals and going till the very end. This will give your plastic spoon rose a cohesive and finished look. Trim any excess wire or tape as needed.
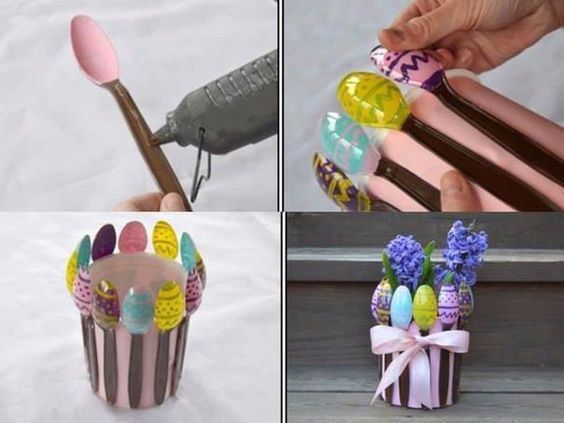
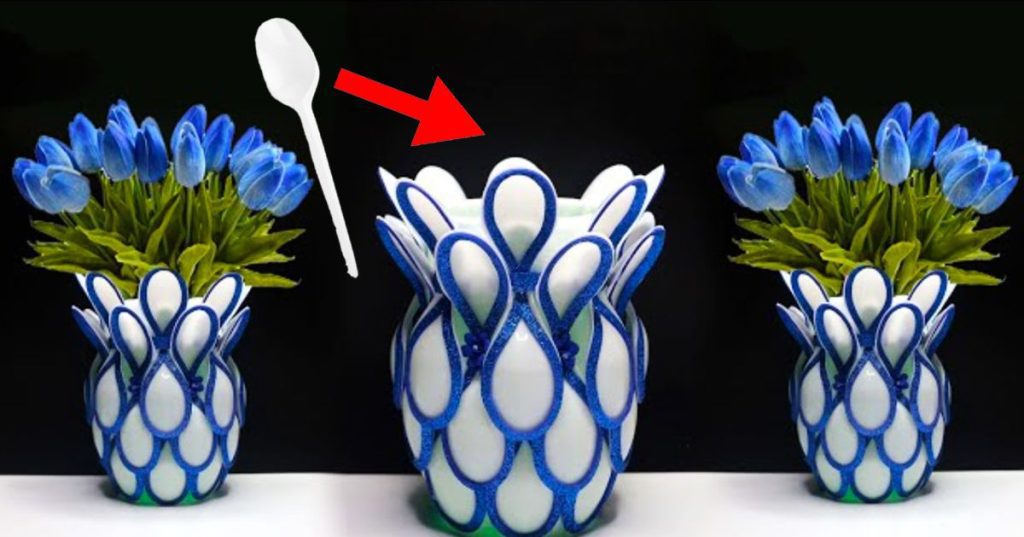
3. Plastic spoon vase
Start by cleaning and drying your cylindrical container. Remove any labels or residue from its surface. Ensure that the container is suitable for holding water, as this will be the base of your plastic spoon vase. Using scissors or wire cutters, trim off the handle portion of each plastic spoon, leaving only the bowl-shaped part.
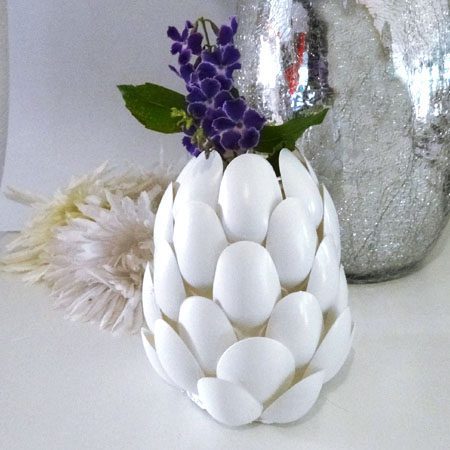
Attach the spoons with hot glue and continue until the whole container is covered. Once the plastic spoon vase is complete, you can embellish it with additional decorations if desired. Get creative and personalize it according to your home decor.
4. Plastic spoon puppets
This is an entertaining DIY project that allows you to create adorable characters. These puppets can be used for storytelling, imaginative play, or for decoration. We guarantee that the kids will love this. You need to decide on the character or theme for your puppet.
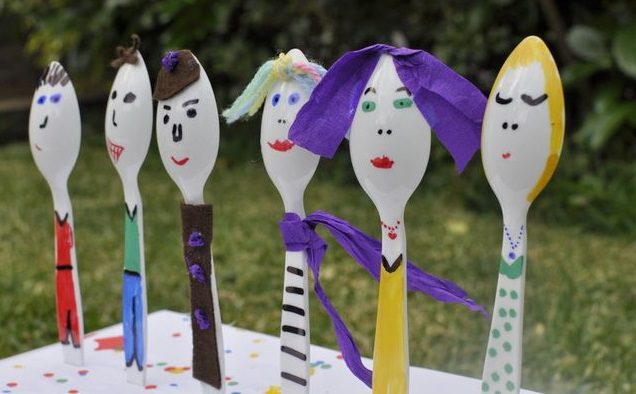
Cut out the different parts of your puppet design. Ensure that the sizes of the paper cutouts fit well with the size of the spoon. Attach each piece to the spoon with glue and decorate them with different accessories, as you see fit.
5. Lilac rose petals
Creating lilac rose petals using plastic spoons is an easy and cheap source to add elegance and authenticity to your house decor. With this project, you can transform simple plastic spoons into stunning and creative floral accents.
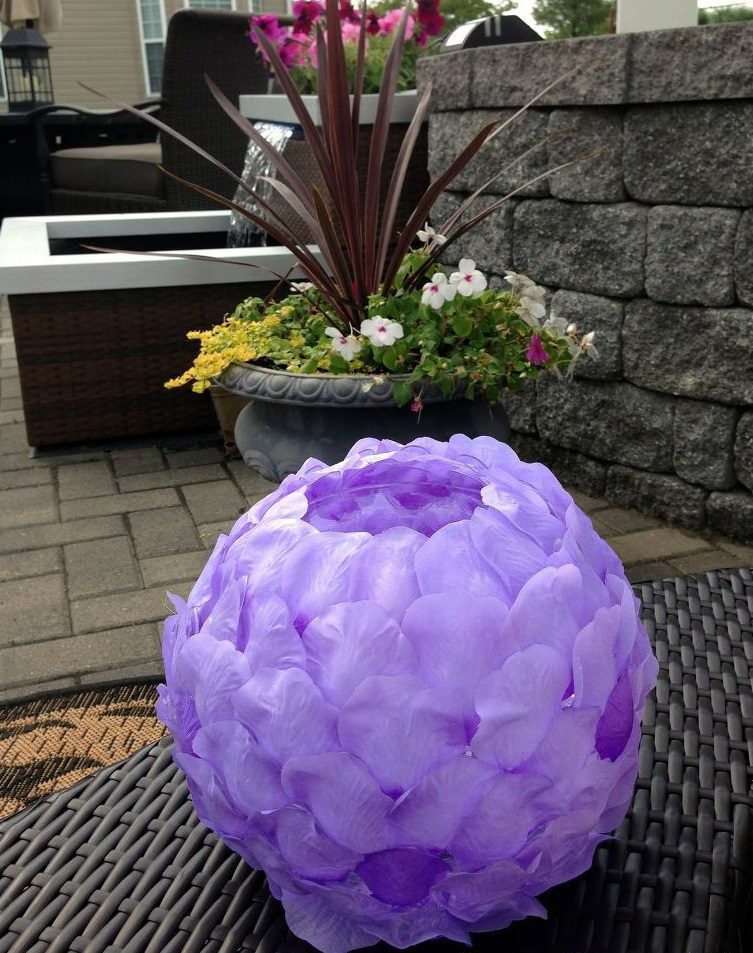
If you want to include a touch of color variation in your lilac rose petals, you can use acrylic paint. Dilute the paint with liquid to make a wash-like consistency. Apply the paint to the plastic spoon petals using a brush, focusing on the outer edges to create a gradient effect.
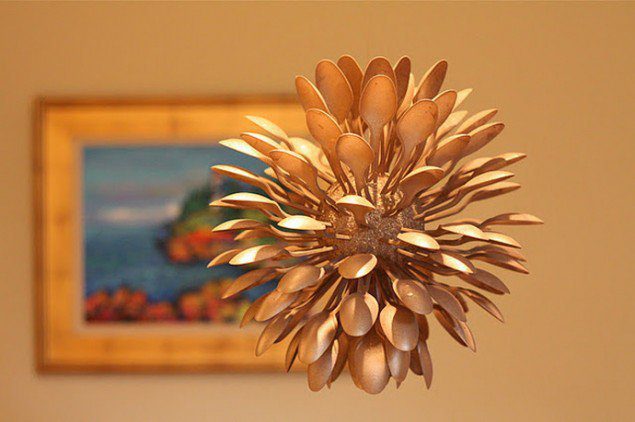
6. DIY chandelier
Cut a circular or desired shape from cardboard or foam board to serve as the chandelier’s base. This will provide support for attaching the plastic spoons. Apply glue to the backside of each spoon head and attach it to the chandelier base.
Begin from the outer edge and work inward, layering the spoon heads in a circular pattern. Ensure that each spoon head is attached securely. Create a cascading effect and add visual interest to the chandelier. Thread the cord or lights through the chandelier’s center and secure it in place.
7. Plastic spoon pumpkin craft
The number of spoons you’ll need will depend on the desired size of your pumpkin. You can use spoons of the same size or a mixture of different sizes for added visual interest. Using orange acrylic paint, paint the spoon bowls on both sides.
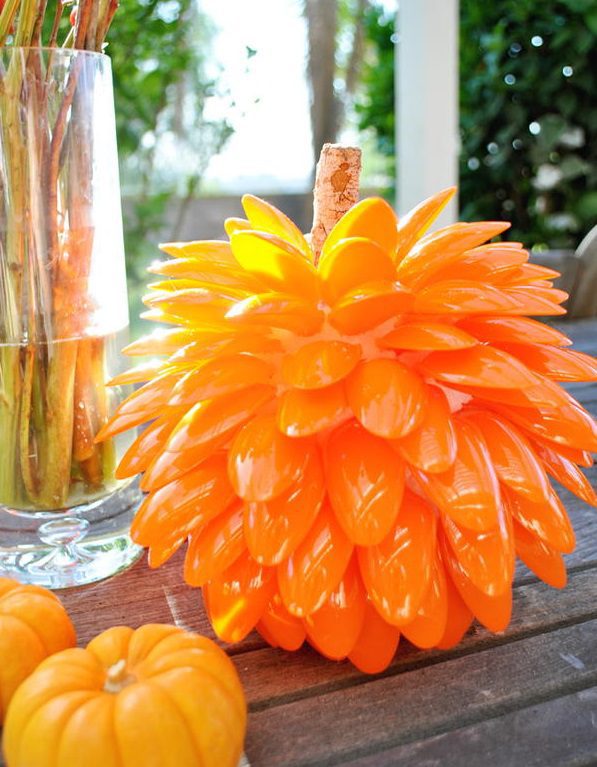
Cut a short piece of green pipe cleaner or craft wire for the pumpkin’s stem. Twist the pipe cleaner or wire into a curly shape to resemble a vine. Apply hot glue to the top center of the pumpkin and attach the stem. Hold it in one place until the glue sets.
8. Salt and sugar spoon heads
Start by selecting your preferred plastic spoons for your salt and sugar spoon heads. Print or write labels for salt and sugar. Adjust the labels’ size to fit the bowl part of the spoons. Cut the labels out and paste them onto the spoon heads.

Creating salt and sugar spoon heads gives you clear and easily identifiable labels for your kitchen essentials. Now no one will ask you where the salt or sugar is. It’s a simple and practical activity that adds a touch of creativity to your decor too.
9. Plastic spoon catapult
Explore the basic principles of physics with a plastic spoon catapult. Take two craft sticks and align them parallel to each other. Place a rubber band around one end of the craft sticks to hold them together. This will serve as the catapult’s base.
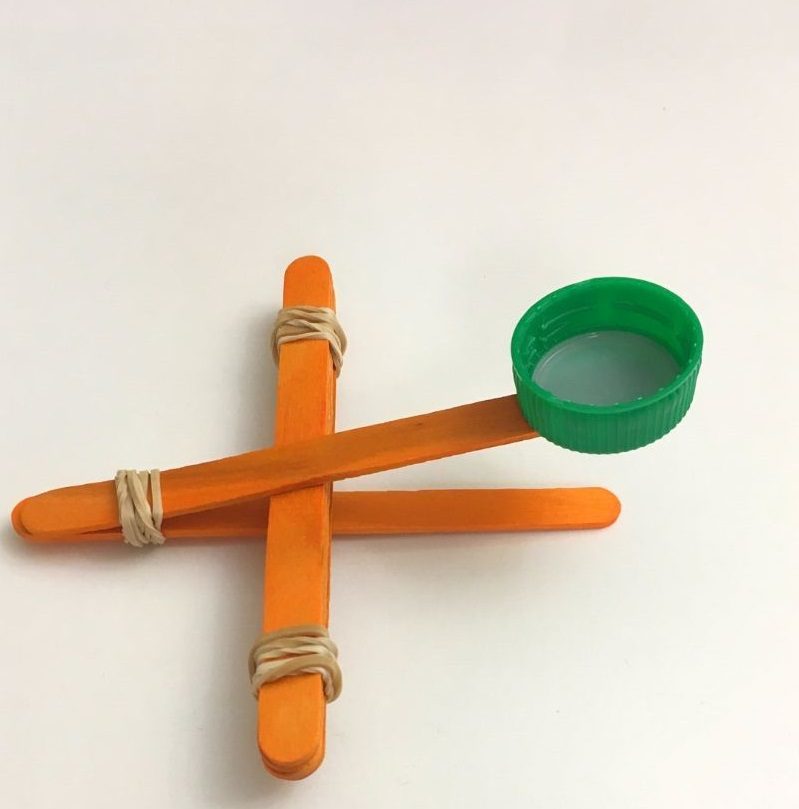
Place another craft stick across the top of the two parallel craft sticks, about halfway between the rubber band and the other ends of the sticks. This will create a crossbar for your catapult. Take two plastic spoons and attach them to the ends of the crossbar.
10. Plastic spoon wreath
Start by removing the handles from the plastic spoons. Take the Styrofoam wreath form and attach the spoon heads using a hot glue gun. Put a little hot glue on the back of each spoon head and press it firmly onto the wreath form.
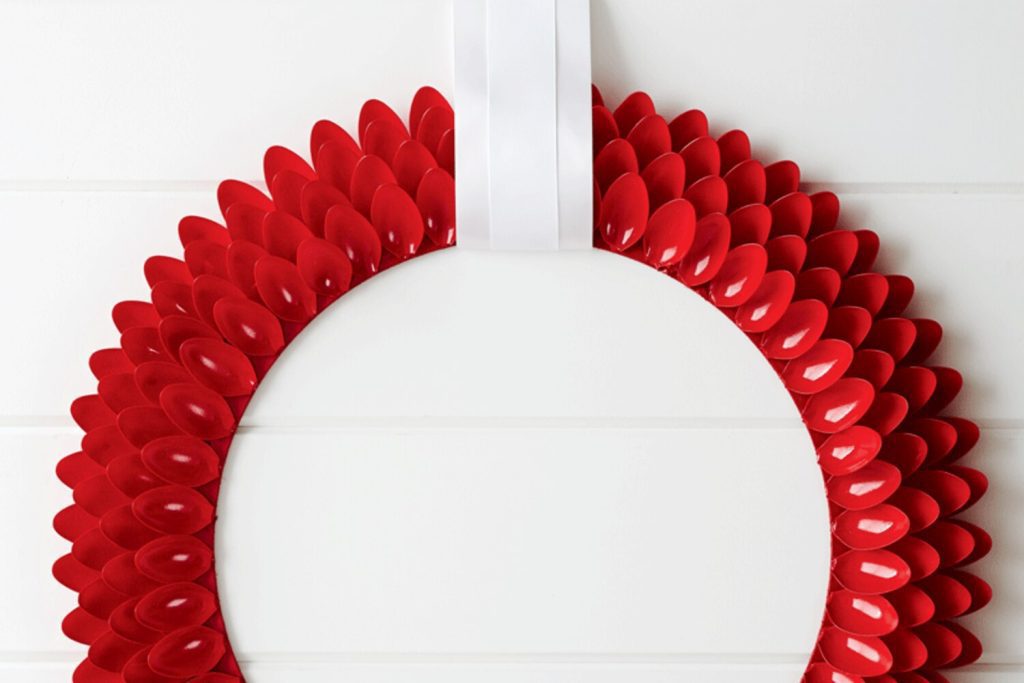
Once completed, hang the wreath on your front door or wall with a ribbon or twine for decoration. You can also use it as a centerpiece. It’s an eco-friendly and unique way to decorate your home and show everyone your talent.
11. Plastic spoon peacock
The vibrant colors and unique peacock shape make this a visually captivating DIY project. Draw and cut out the body and tail shapes of the peacock on a piece of cardboard or thick paper. Ensure that there is enough space on the tail for the spoons.
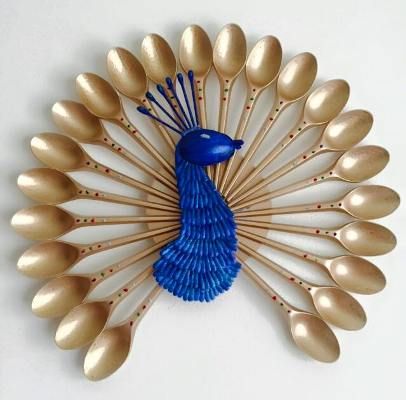
Starting from the bottom of the tail shape, apply some hot glue to the backside of a plastic spoon and stick it to the cardboard. Attach the oval-shaped body cutout to the top end of the tail and ensure it covers the spoon’s base to give the illusion of the peacock’s body.
12. Spoon toy doll
Select a spoon with a handle that is comfortable to hold. Cut a length of yarn to create the doll’s hair. Fold the yarn in half, creating a loop. Place the looped end of the string over the end of the spoon’s handle and pull the loose ends through the loop, securing it in place.
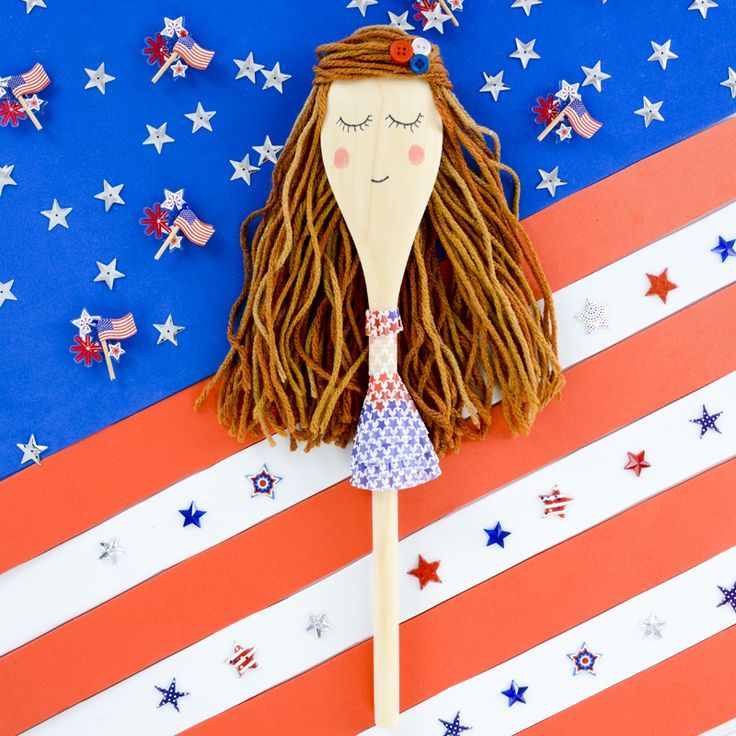
Cut out a small piece of craft paper or felt in a shape that will serve as the doll’s face. Attach it to the convex part of the spoon and add elements to decorate your spoon toy doll. Once your spoon toy doll is complete, it’s ready for play and imaginative storytelling.
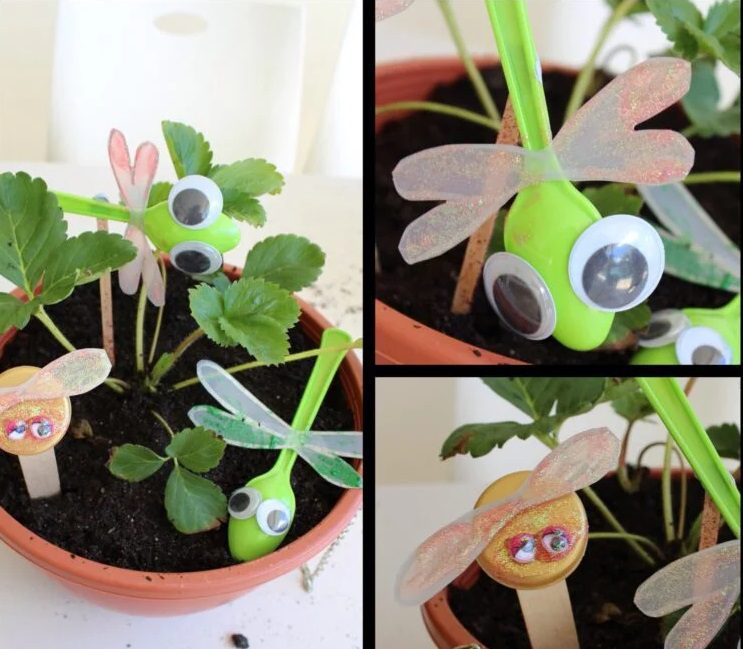
13. Vegetable garden spoon
You can use two ways to create your vegetable garden spoon markers painting or labeling. Then cut garden stakes or wooden skewers to a suitable length for your markers. They should be long enough to insert into the ground near each plant in your vegetable garden.
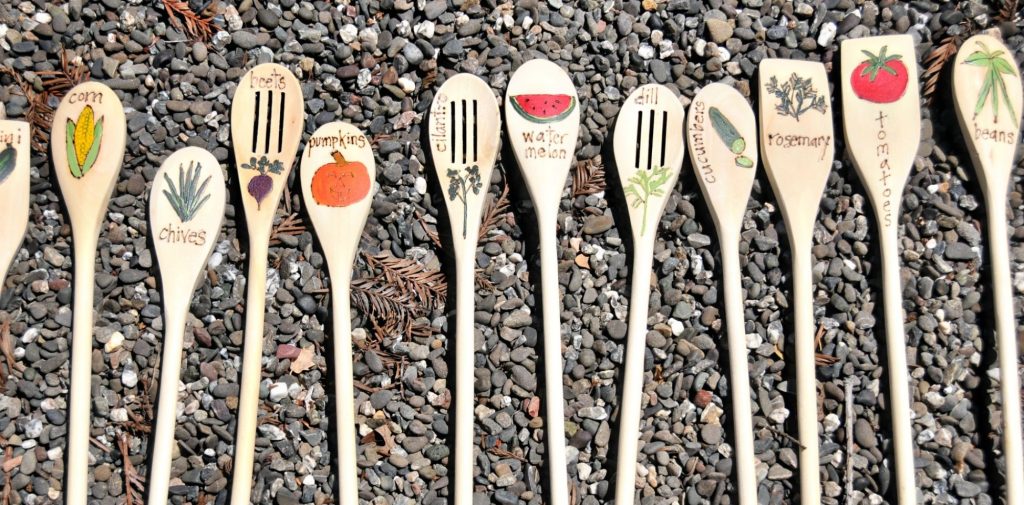
Insert the garden stakes or skewers with the spoon markers into the soil near the corresponding vegetable plants. Make sure they are visible and easily readable. Having vegetable garden spoons helps you keep track of the different vegetables you’ve planted. Plus, they add a whimsical touch to your garden.
14. Paper plate birds
Select paper plates for your bird crafts. Each bird will require two paper plates, so have enough on hand. Take one of the decorated paper plates and cut out a triangle from one side. This will be the bird’s beak.
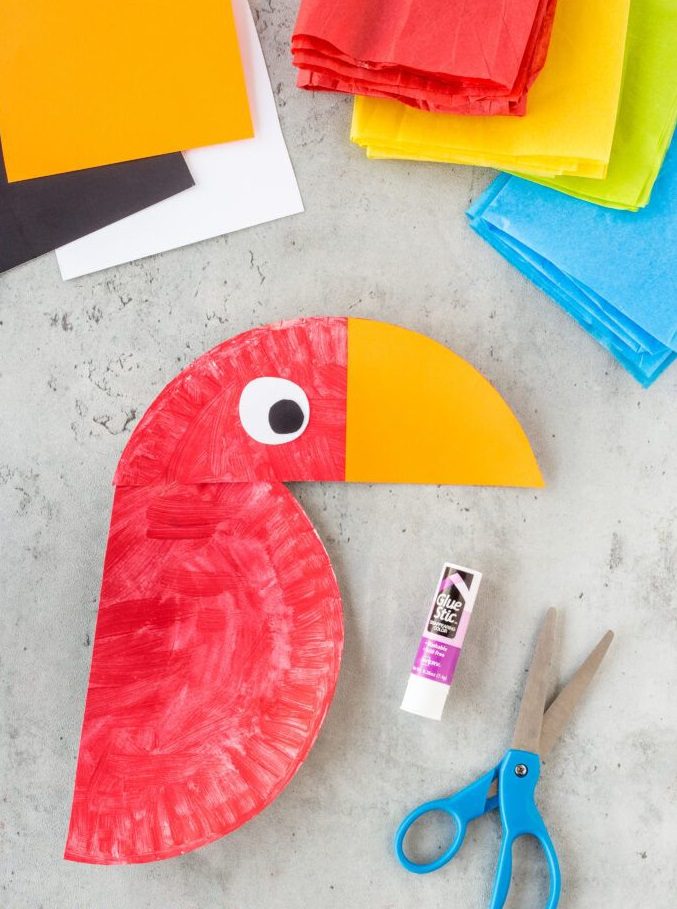
Take the second paper plate and leave it intact. This will be the body of the creature. To create the wings, cut out two smaller, curved shapes from the sides of the plate. Using glue, attach the wings to the sides of the paper plate body.
15. Plastic spoon ants
You can choose any size or color, but black spoons work best to resemble ants. Use black acrylic paint, and paint the bowl part of each spoon to resemble an ant’s body. You can add curves and lines to mimic the segmented body of an ant.
To create the legs, use scissors to cut small strips from the handles of other plastic spoons. Cut as many paper strips as you need to create six legs
16. Disney princess spoons
Decide on the Disney princesses you want to feature on your spoons. You can choose classic princesses like Cinderella, Snow White, or Ariel or go for newer additions like Elsa, Moana, or Rapunzel. Consider printing or drawing images of these princesses to use as references.
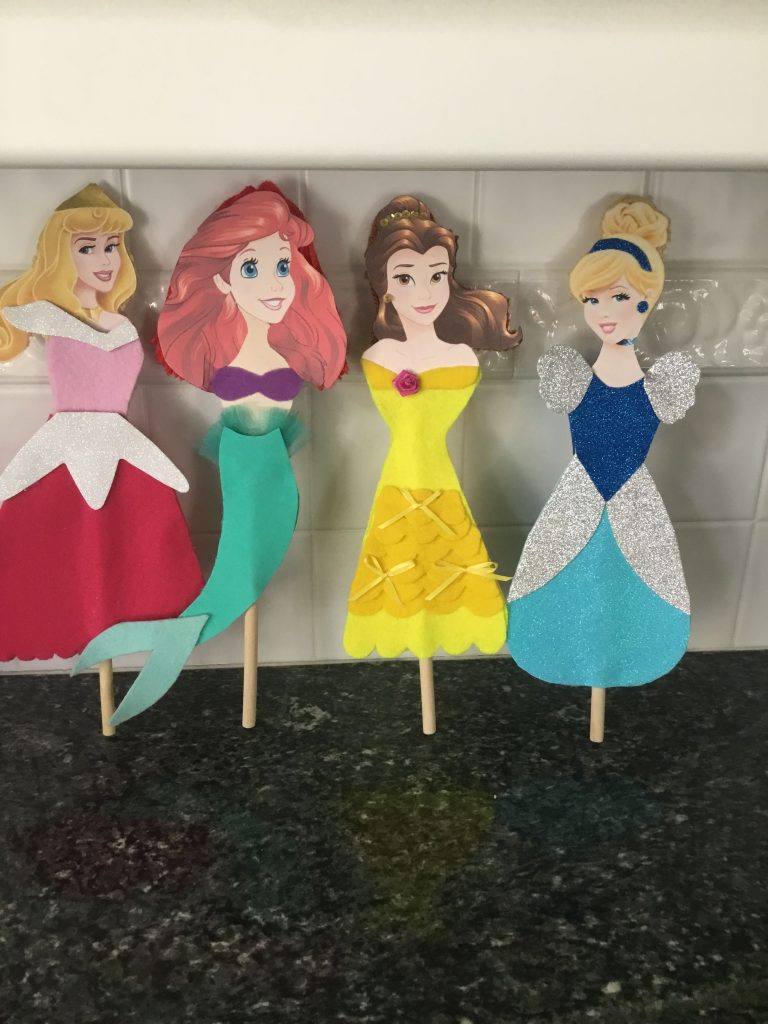
Using smaller paintbrushes, add details to the spoon heads to represent the features and accessories of each princess. Paint their hair, eyes, eyebrows, lips, and any distinct jewelry or headpiece they wear. Use reference images or your artistic interpretation to capture their unique appearances.
17. Lion spoon head craft
Transform a plastic spoon into a lion’s face with the help of your little one. Start by painting the rounded part of the spoon with yellow paint. This will be the lion’s face. Using brown acrylic paint, create the lion’s mane around the painted face of the spoon.
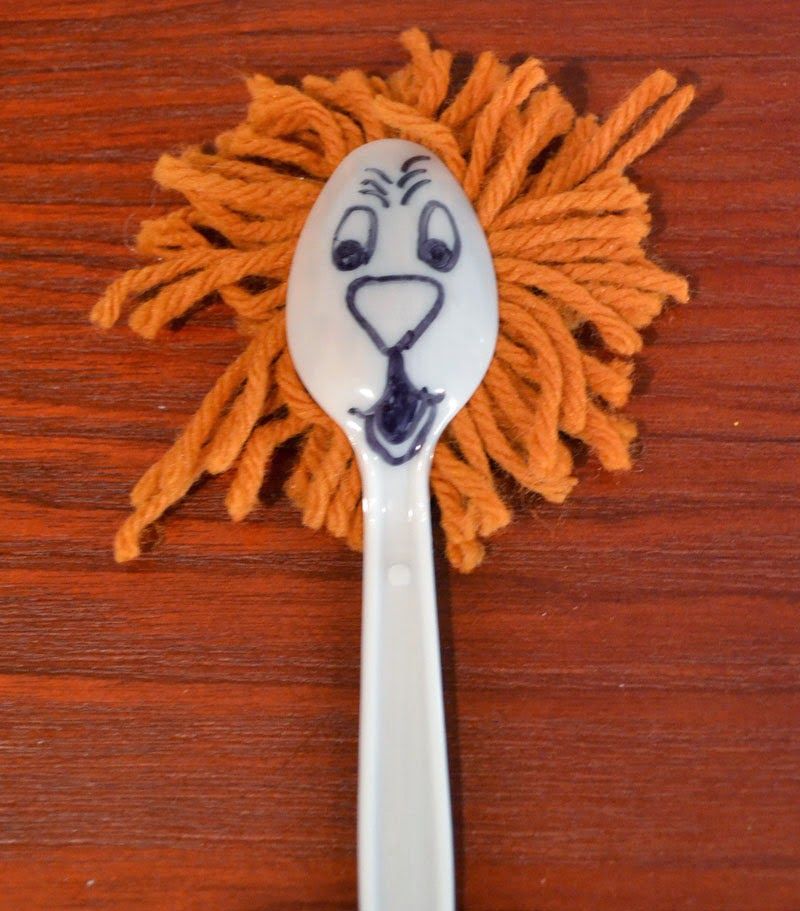
Cut out a small triangle shape for the lion’s nose from orange craft foam or construction paper. Glue it below the googly eyes in the center of the spoon’s face. Cut out a small rectangle for the lion’s mouth. Glue it below the nose, creating a smile or open-mouth expression.
18. Soda plastic bottle bird feeder
Thoroughly clean and dry the soda plastic bottle. Carefully cut two or three small holes near the bottom of the plastic bottle. The size of holes should be large enough for the birdseed to come out but not too big that it all spills out at once.
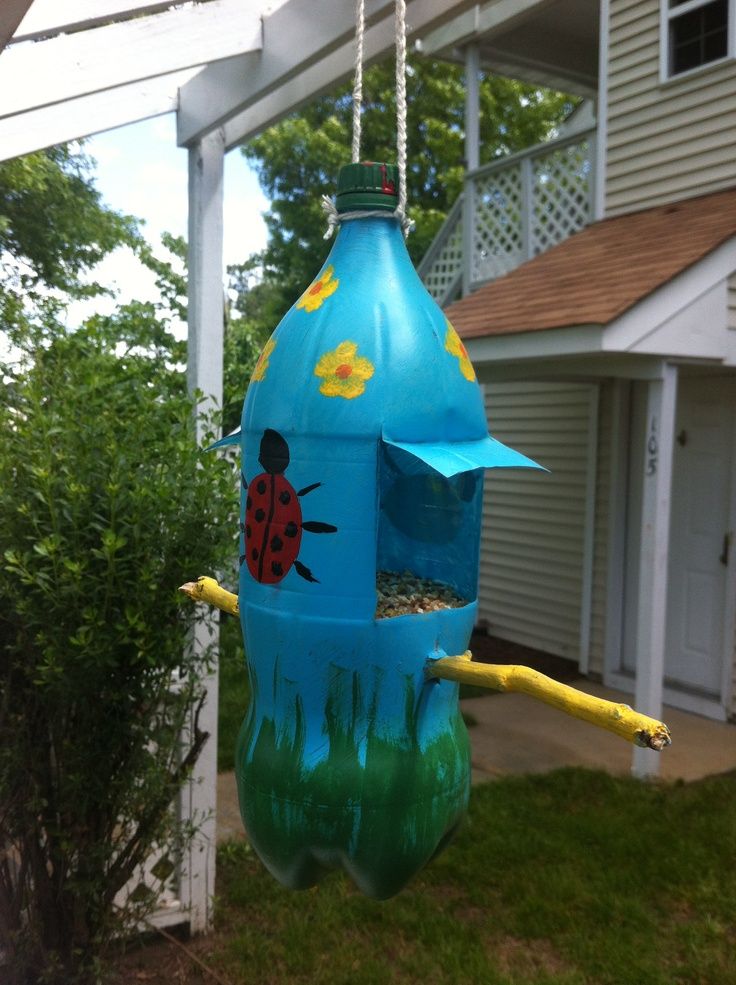
Create a small hole just below the bottle cap. Attach a string through the hole and tie it securely. This will be used to hang the bird feeder. Remove the bottle cap and fill the plastic bottle with birdseed through the top opening. Fill it enough to cover the holes.
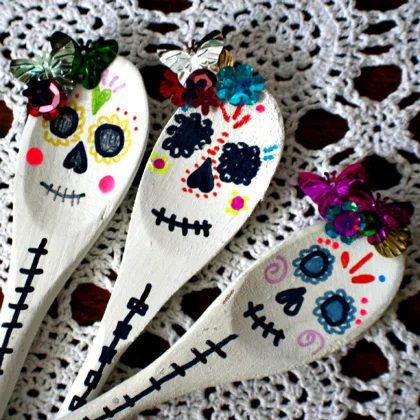
19. Holiday-painted spoon heads
You can paint Christmas-themed designs like snowflakes, ornaments, holly leaves, or Santa hats. For other holidays, consider painting hearts for Valentine’s Day, shamrocks for St. Patrick’s Day, or pumpkins for Halloween. Get creative and choose designs that reflect the holiday spirit.
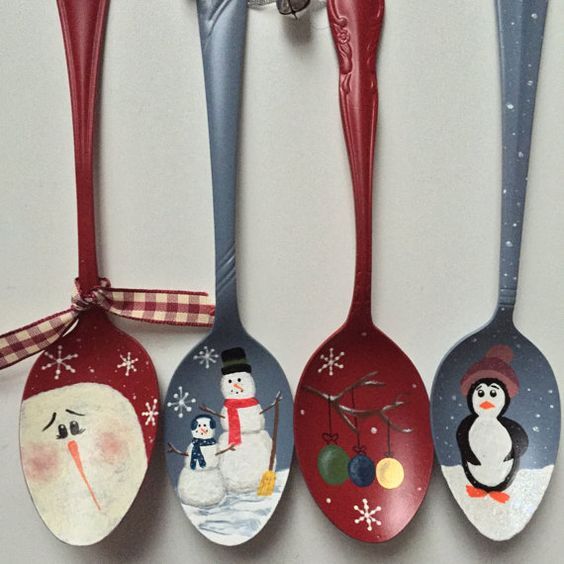
Start painting your chosen holiday designs on the spoon heads using acrylic paints. Use small brushes for detailed work and larger brushes for bigger areas. Let your creativity shine as you add colors and details to the spoon head. Add extra sparkle to your painted spoon heads or apply glitter or small decorative stickers.
20. Plastic spoon centerpiece
This craft project is not only budget-friendly but straightforward. Starting at the bottom edge of the foam block, apply hot glue to the back of a plastic spoon and press it firmly onto the foam. Angle the spoon slightly outward to create a layered effect.
Enhance the centerpiece by adding decorative elements such as flowers, ribbons, beads, or greenery. Cut or faux flowers can be inserted between the spoons and secured with hot glue if necessary. You can also wrap ribbon or twine around the centerpiece’s base for an added touch.
21. Spoonflower napkin ring
Add a touch of elegance to your table setting with this spoonflower napkin ring. Cut a length of craft wire or floral wire, approximately 6-8 inches long, using wire cutters. This will serve as the stem for your spoonflower ring.
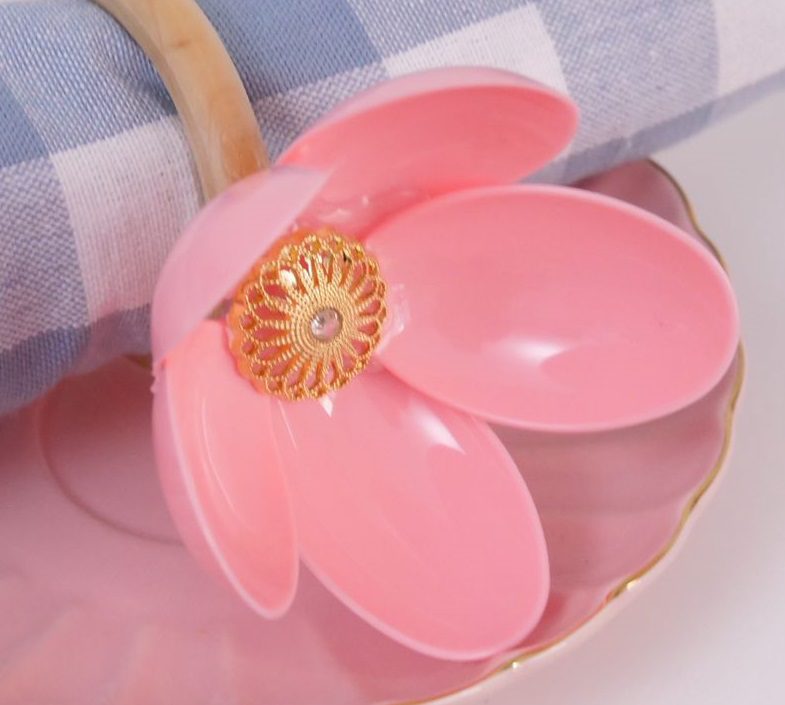
Take a painted spoon and use your fingers to gently bend the bowl of the spoon inward, creating a petal shape. Repeat this step with as many spoons as you need to make the required number of petals for the flower.
22. Small flower pots
Start by ensuring your plastic flower pots are clean and ready for decorating. Separate the handles from the spoon heads. Put a little amount of glue to the back of a plastic spoon head and firmly press it onto the surface of the flower pot.
Fill the decorated flower pots with potting soil, leaving enough space for your small plants or flowers to be planted. Carefully place the plants into the pots, gently patting the soil around the roots. Find a suitable place to display your unique small flower pots.
23. Thanksgiving chalkboard wreath
If you’re using a wooden wreath form, ensure it’s clean and free of rough edges. If you’re using a foam wreath form, leave it as is. The size of the wreath form is up to you, depending on the desired size of your chalkboard area.
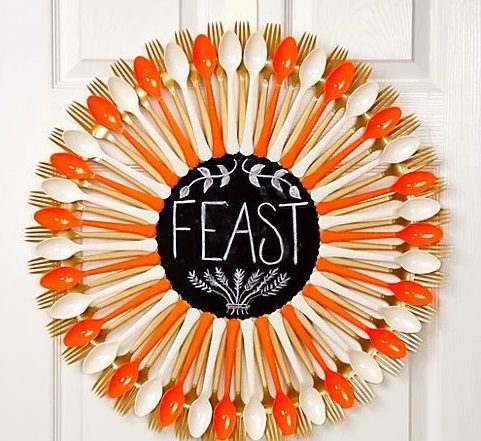
Using a hot glue gun, carefully attach faux fall foliage to the wreath around the chalkboard area. This can include leaves, berries, pinecones, or any other elements representing autumn and Thanksgiving. Arrange them in a visually pleasing way, ensuring they are securely attached.
24. DIY rose accessory
Using your chosen fabric or paper, cut out several oval-shaped pieces to serve as the petals of your rose. The number of petals you need depends on the size and fullness of the rose you want to create. To create a natural curve, take one petal and curl it slightly inward from the bottom.
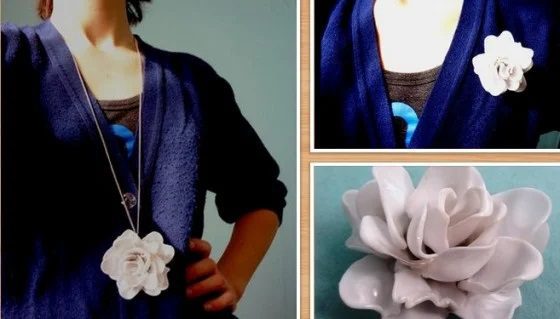
Take one petal and apply some hot glue along the bottom edge. Once all the petals are attached, insert a floral wire through the base of the rose before gluing it to create a stem. If desired, you can decorate your rose accessory by adding various embellishments.
25. Thanksgiving turkey spoon crafts
Paint the spoon handles with brown acrylic paint and let them dry. Cut out turkey feathers from craft foam or construction paper in various colors. Paste the feathers onto the back of the spoon, fanning them out to create a tail. Cut out a small triangle shape for the turkey’s beak.

Cut a small teardrop shape for the turkey’s wattle from red craft foam or construction paper. Glue the wattle onto the spoon’s bowl, just below the beak. Wrap the spoon handle around a rolled-up napkin, with the turkey spoon facing outwards, and secure it with a bit of gum or tape.
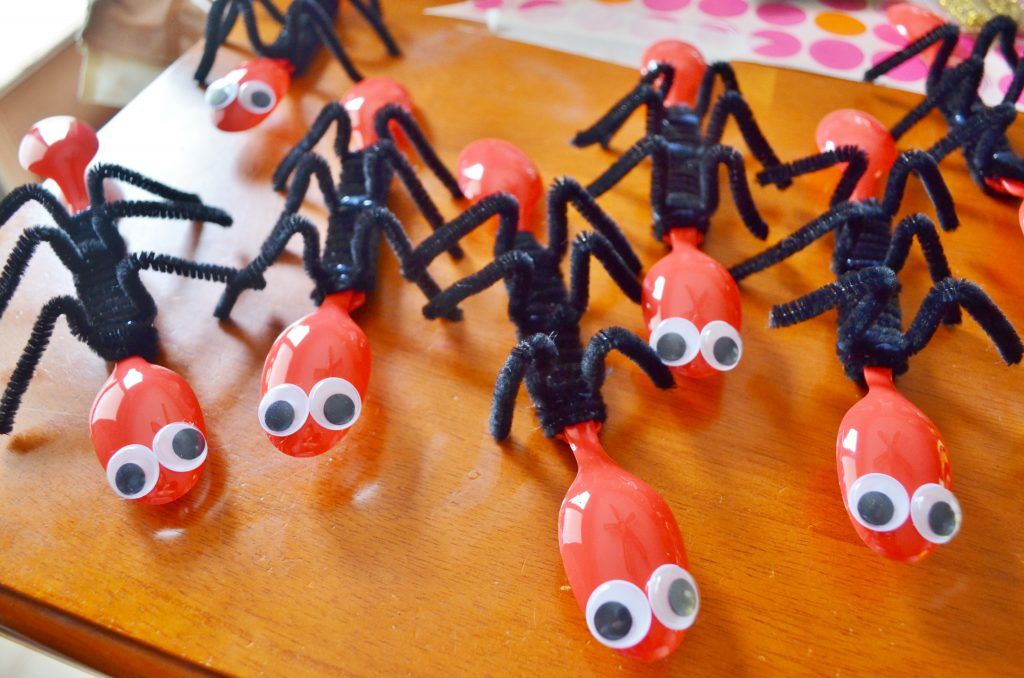
26. Plastic spoon bugs
Cut two small pieces of pipe cleaner, approximately 2-3 inches in length. Fold every piece in half to make a V-shape. Apply a small amount of craft glue or utilize a hot glue gun to attach the folded ends of the pipe cleaners to the top end of the spoon handle, just behind the bowl.
You can embellish your spoon bugs if desired by adding decorative materials. Glue pom-poms, feathers, or glitter onto the spoon heads or around the eyes to create unique features or textures. Get creative and customize your bugs to your liking.
27. Neon plastic spoon bangles
Start by selecting neon-colored plastic spoons for your bangles. Use scissors to trim the handles of the spoons. It’s best to calculate and cut them to fit comfortably around your wrist. Hold the handle end of a plastic spoon over a heat source with the convex side facing up.
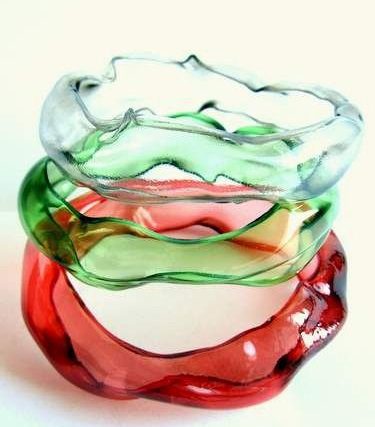
Immediately after removing the spoon from the heat, carefully bend it into a circular shape to form the bangle. Hold the ends together firmly for a few seconds until the plastic cools and sets in the desired shape. Decorate them with glitter, sequins, or other embellishments.
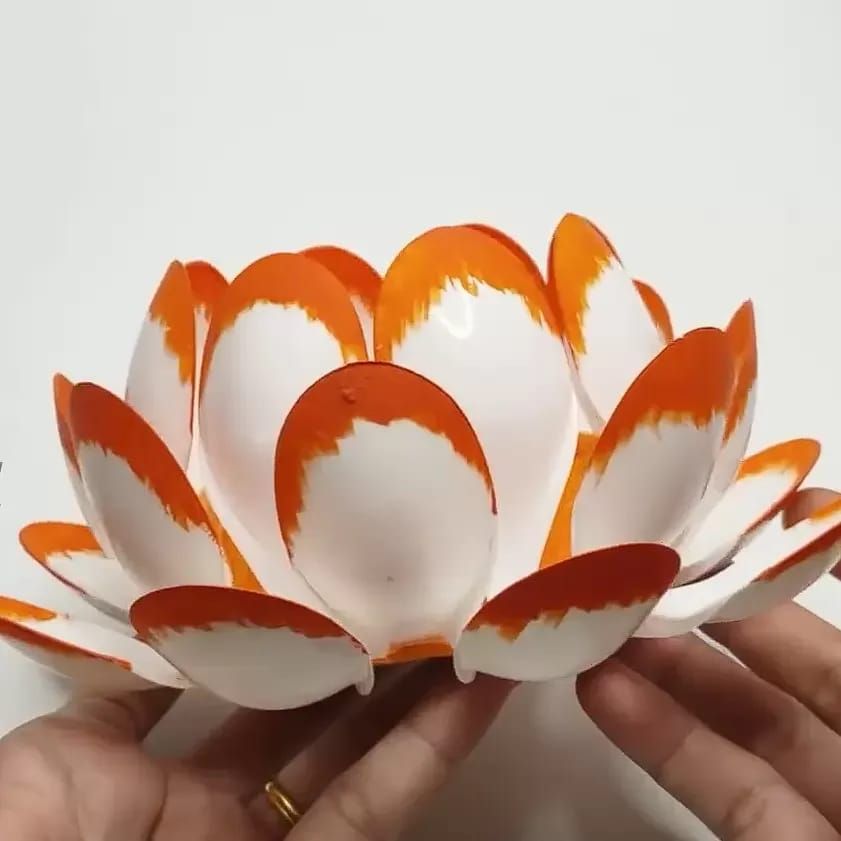
28. Water lilies spoon crafts
Using craft paper or cardstock in various colors, draw and cut out flower shapes. Water lilies have round or oval-shaped flowers with several petals. Cut out multiple flower shapes of the same color. Take a spoon head and gently bend the sides of the spoon inward to create a cup shape.
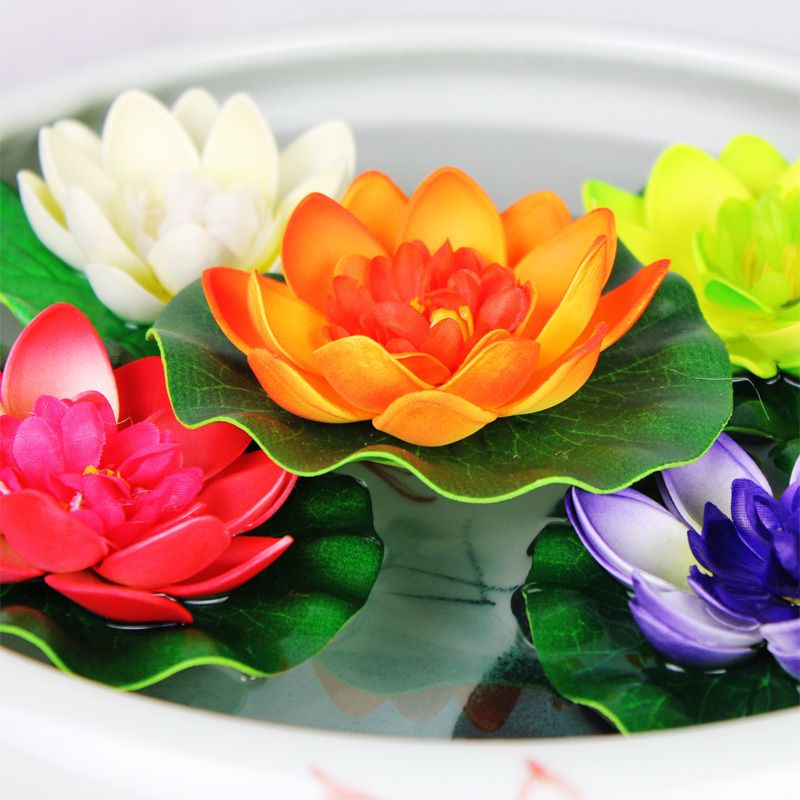
Carefully attach them to the center of the flower shapes. Arrange the spoon petals evenly around the center of the flower, overlapping them slightly. Draw and cut out lily pad shapes using acrylic paints. Attach them carefully. Add patterns, lines, or other designs to enhance the visual appeal of your water lilies.
29. Plastic spoon watch decorations
You will only be using the spoon heads for this project. Use scissors to carefully cut or snap off the handles. Take the spoon heads and arrange them on the watch band in a design that you find appealing. Press them firmly onto the band to ensure a secure attachment.

Take your time during the procedure to ensure a neat and secure decoration. Now that your watch is decorated with plastic spoon accents, wear it proudly and watch as people admire and give you compliments for your unique and quirky style.
30. Plastic spoon ladybugs
Start by painting the convex side of the plastic spoon with red acrylic paint. This will be the body of the ladybug. Using black acrylic paint, paint a small section at the back of the spoon’s handle. This will be the ladybug’s head. Create black spots on the red body of the spoon.
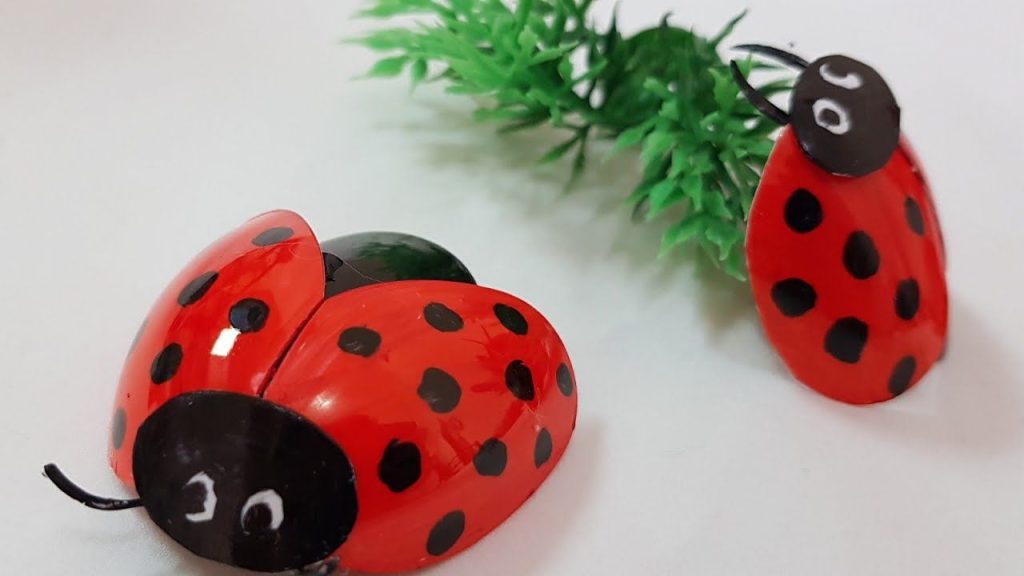
Cut two small blocks of black pipe cleaner to serve as antennas for the ladybug. Bend the top end of each pipe cleaner piece to create a small loop. Fix the antennas to the back of the ladybug’s head using craft glue. Allow the ladybug to dry completely.
31. Frosty the Snow spoon
Start by painting the spoon heads with white acrylic paint. Once the paint is dry, arrange five painted spoons in a fan shape, with the spoon heads facing outward and the handles overlapping slightly at the center. Secure the spoons together with craft glue or a hot glue gun.
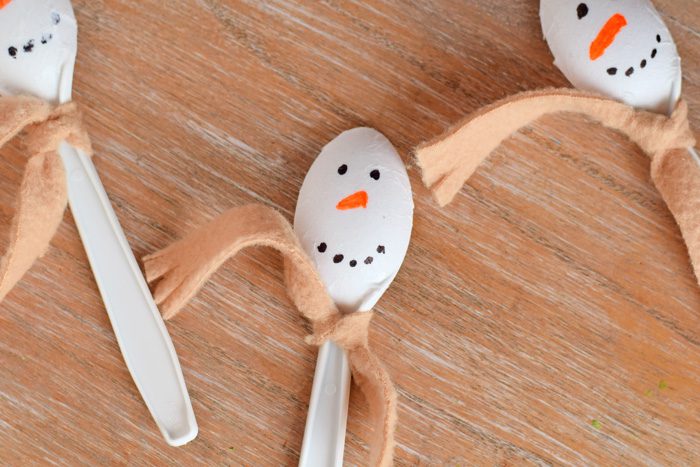
Use black and orange markers or paint to draw Frosty’s face on one of the spoon heads. Draw two eyes, a carrot-shaped nose, and a smiling mouth. Be creative with the facial expression to give Frosty his cheerful personality. Cut a small strip of colorful fabric or ribbon to create Frosty’s hat.
32. Colorful tulip flowers
Start by selecting the colors for your tulip flowers. Use acrylic paint to coat the rounded part of each plastic spoon in your chosen colors. You can paint each spoon a different color or create an ombre effect by blending colors. Draw and cut out tulip petal shapes on green craft paper or cardstock.
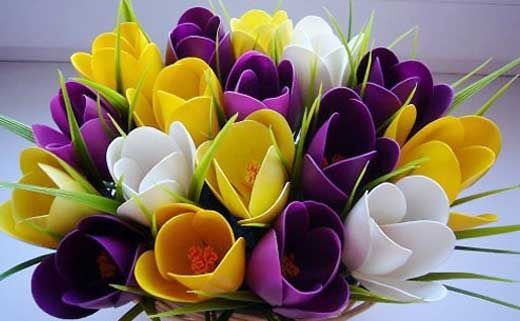
Apply glue to the backside of each tulip petal and carefully attach them to the reat of the painted spoons. Cut a long, thin strip from the green craft paper or cardstock to serve as the tulip stem. Arrange the spoons so they fan out slightly, resembling the opening of a tulip flower.
33. Bunny spoon crafts
Cut out bunny ears from craft foam or construction paper. You’ll need two ears for each spoon. Fix the ears to the back of the spoon near the head. Paint the heads with acrylic paint to color them in bunny-inspired designs. You can create patterns to give them a festive touch.
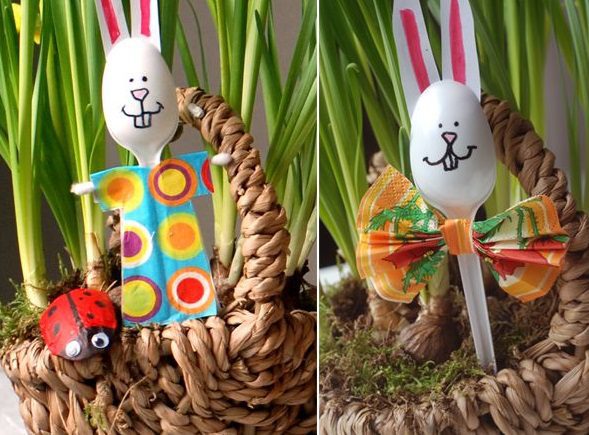
Use craft glue to attach the painted heads to popsicle sticks or bamboo skewers. Ensure they are firmly attached and allow the glue to dry completely. Use the bunny spoon markers to label your plants or flowers in the garden or indoor pots.
34. Monster spoon heads
Start by cleaning and drying the plastic spoons to get a smooth surface for painting or drawing. Use acrylic paint or markers to paint the spoon heads in vibrant monster colors. Get creative with different patterns, stripes, spots, or scales. Cut out mouths from craft foam or construction paper.
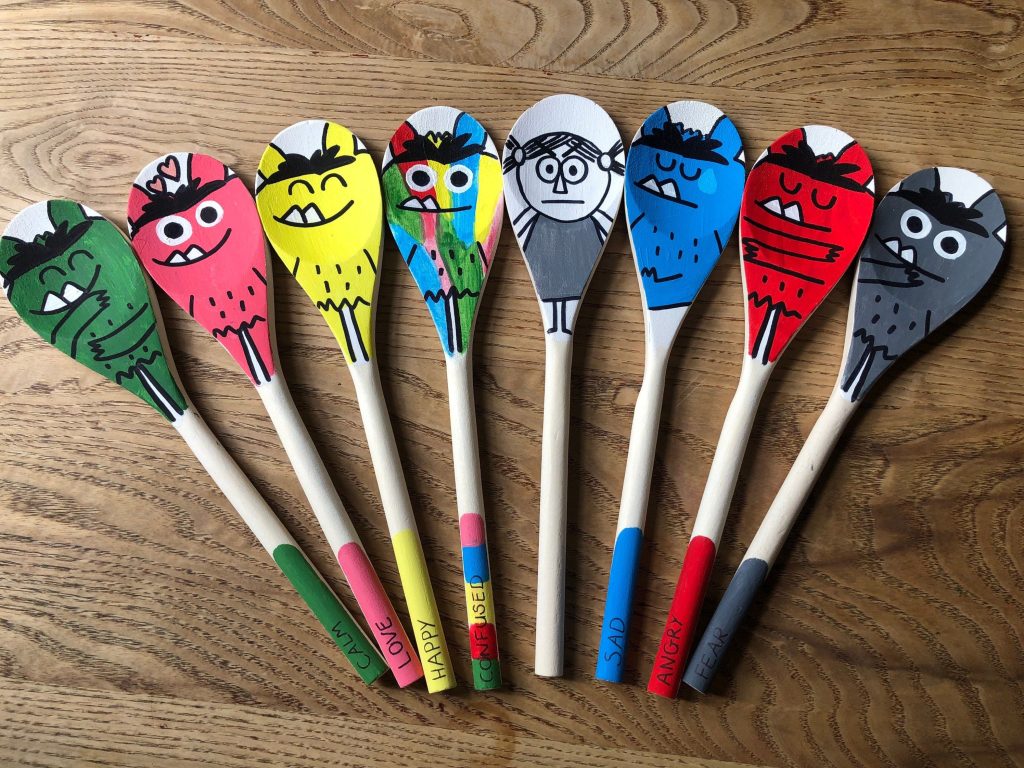
You can make them wide and grinning, with sharp teeth or silly tongues. Glue the mouths onto the spoon heads below the googly eyes. Cut out shapes from craft foam or construction paper to create other features like horns, ears, spikes, or antennae. Glue them onto the spoon heads to give your monsters unique characteristics.
35. Tea light candle holders
Arrange the plastic spoon heads around the light tea candle, facing outward. The convex part of the spoon heads should be facing away from the candle, creating a decorative pattern. Play around with the structure until you are satisfied with the design.
Apply glue to the backside of each spoon head and press it onto the surface around the tea light candle. Ensure the spoon heads are securely attached to each other and the base. Ensure the spoon heads are firmly attached, and the candle holder stable.
36. Colorful maracas
Using colorful tape or paint, decorate the handles of the spoons. You can have the tape around the handles or paint them with different colors and patterns. This step adds a playful and artistic touch to your maracas. Pour the filling material, such as rice, dried beans, or small beads, into one of the cups.
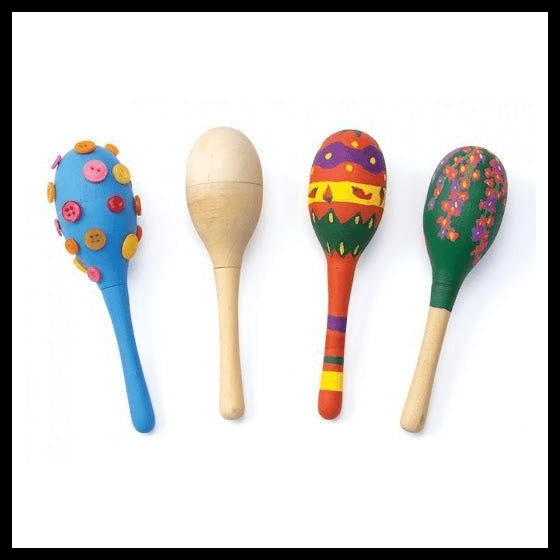
The amount of filling will determine the sound of the maracas. Place one end of a spoon handle into the cup with the filling. Apply craft glue or use a hot glue gun to secure the spoon handle. Get creative and make them colorful.
37. Clear vase with spoon flowers
Separate the spoon heads from the handles asthey will be used to create the flower petals. Paint the spoon heads with acrylic paints to give them the desired color. Take a painted spoon head and gently bend the edges of the spoon inward to create a curved petal shape.
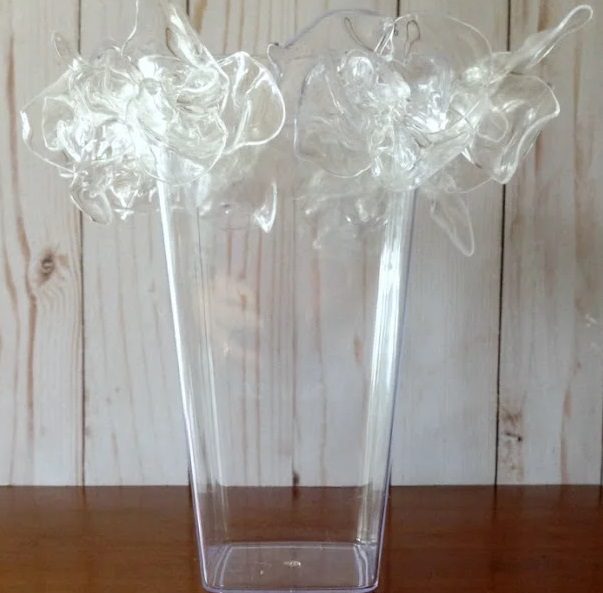
Take a floral wire or pipe cleaner and insert it through the hole at the base of the spoon head. Use floral tape to secure the spoon head to the wire or pipe cleaner. Fill a clear vase with water, leaving enough space at the top for the spoon flowers to be inserted.
38. Wooden spoon bug craft
Start by painting the wooden spoons with acrylic paint to add color to the spoon heads. You can choose bright and vibrant colors or create patterns and designs. Let the paint dry completely before moving further on to the next step. Glue googly eyes onto the head to give your bug its face.
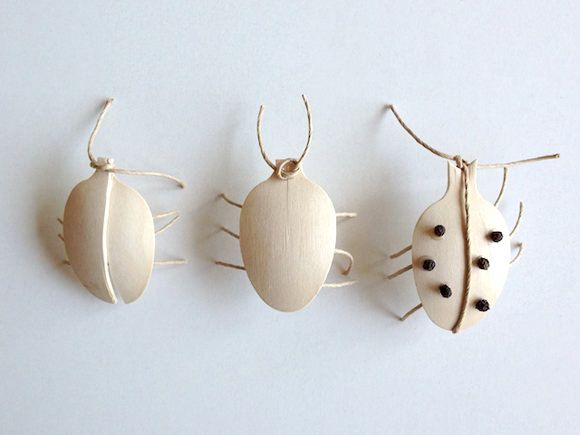
Cut two pieces of pipe cleaner and twist them around each other in the middle to create the bug’s antennae. Trace and cut out wing shapes from craft foam or construction paper. Use craft gum or a hot glue gun to fix the wings to the back of the spoon.
39. DIY spoon mirror
You can choose a single color for a monochromatic look or use multiple colors for a more vibrant and eclectic effect. Using scissors, carefully cut off the handles of the painted spoons, leaving only the bowl-shaped part. Trim any rough edges if necessary.
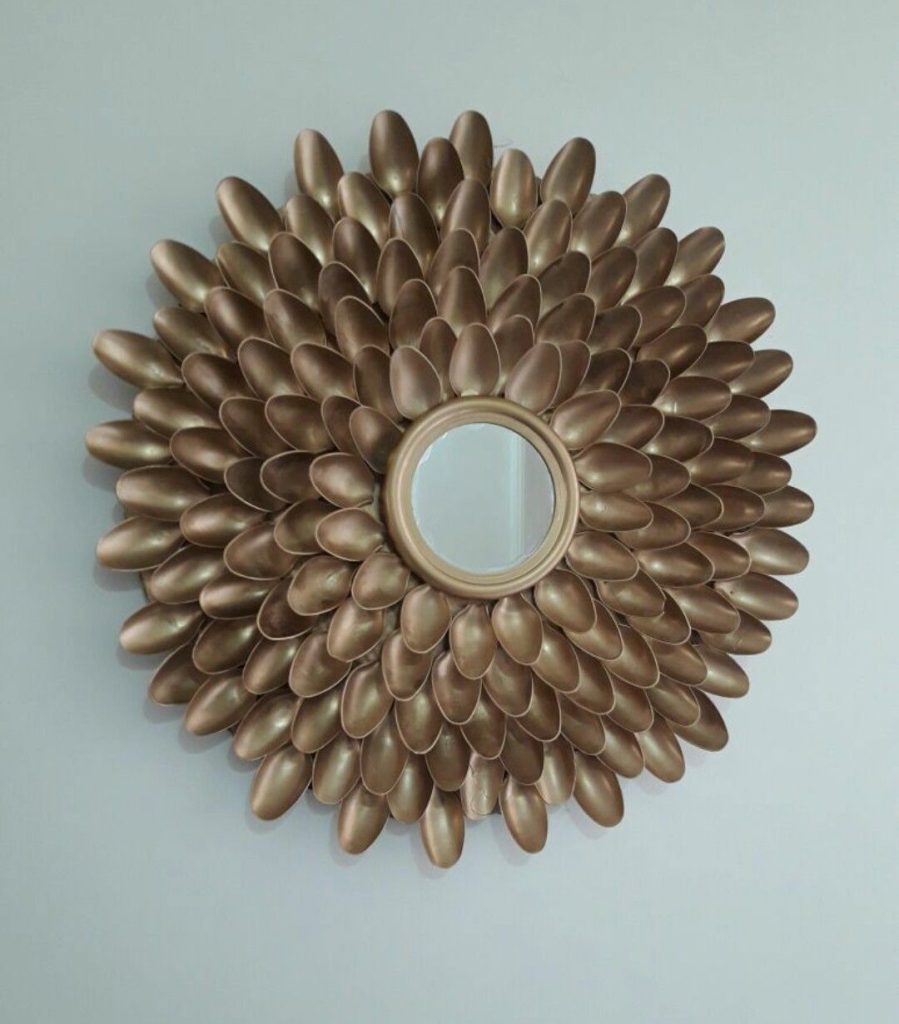
Begin from the outer edge and work your way in, slightly overlapping the spoons for a layered effect. Put a small amount of gum on the back of each spoon and press it firmly onto the mirror frame. Hold it in one place until the glue sets and the spoon is securely attached.
40. Family wooden spoons
Creating family wooden spoons can be a sentimental and personalized craft project that celebrates your loved ones. These custom wooden spoons can be used for cooking, used as kitchen decor, or even gifted to family members. Gently sand the surface of the spoons using sandpaper and remove rough patches or splinters.
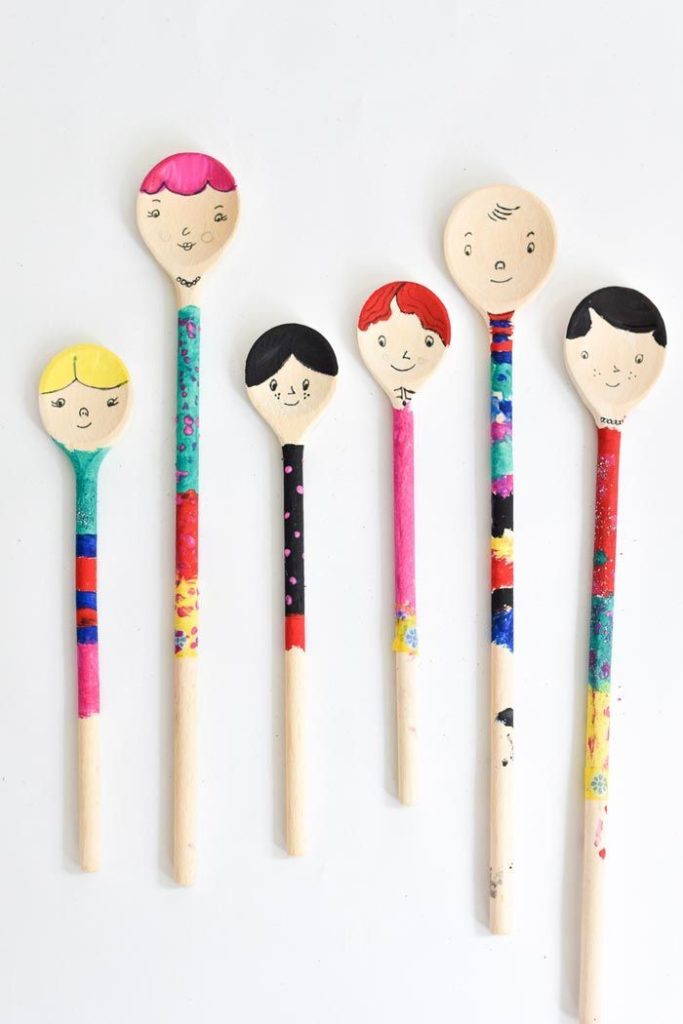
Consider how you want to personalize your family wooden spoons. You can choose to paint them with a different color or design, or you can create a cohesive theme that represents your family. Another option is to include images or drawings of family members on the spoon handles.
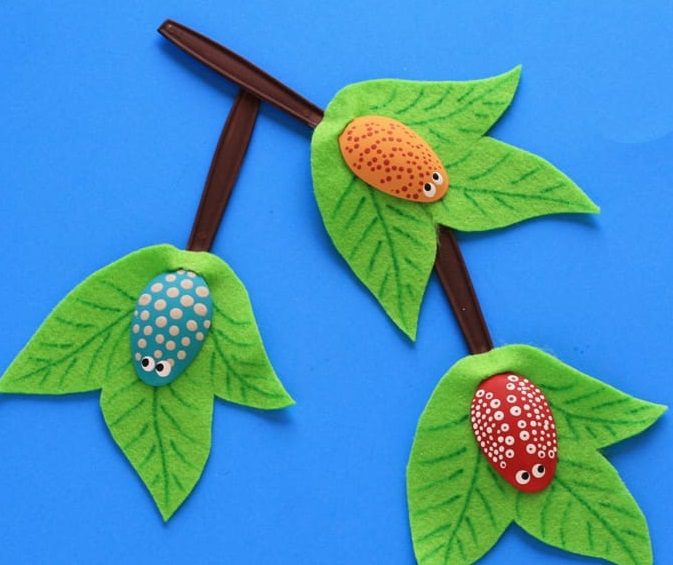
41. Plastic spoon bugs and branches
Start by painting the plastic spoons’ concave side (back) with acrylic paint or decorate them with markers. Choose vibrant colors to make your bugs stand out. Let the paint dry completely before moving further on to the next step. Attach googly eyes to the spoons’ rounded side (front) near the bowl.
Cut two small pieces of pipe cleaner, approximately 2-3 inches in length. Fold every piece in half to make a V-shape. Apply a small amount of craft glue or a hot glue gun to fix the folded ends of the pipe cleaners to the top end of the spoon handle, just behind the bowl.
42. Chrysanthemum mirror
Using acrylic paint in chrysanthemum colors, paint the concave side (back). Chrysanthemums come in various colors, so choose colors that reflect your desired look. Let the paint dry completely. Using scissors, carefully cut off the handles of the painted spoons, leaving only the bowl-shaped part.
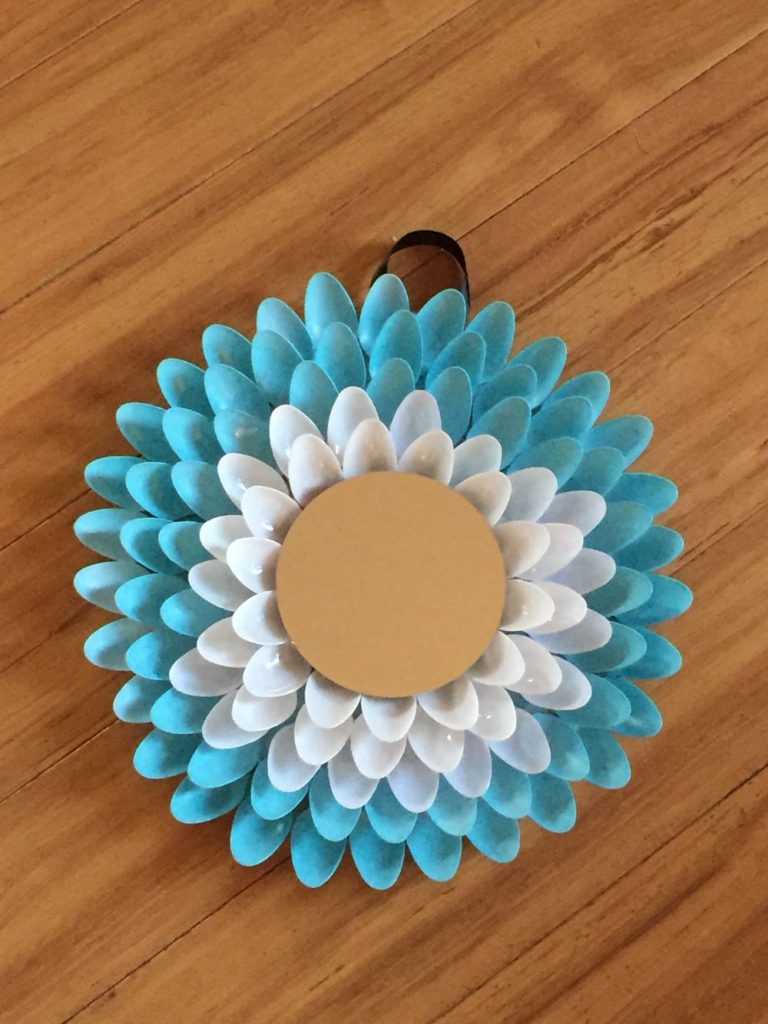
To create the chrysanthemum petals, use the scissors to cut slits along the outer edge of the spoon heads. Lay out the round mirror on a flat surface. Begin arranging the spoon petals around the mirror frame, starting from the outer edge and working your way in.
43. Spoon skeleton craft
Plan out the structure of your skeleton before gluing the spoons together. Lay the spoons on a flat surface to visualize the skeleton’s body shape. For example, you can use one for the head, several for the ribcage and spine, and a few for the arms and legs.
You can use Q-tips or small pieces of cotton to mimic joints and connectors between the bones. Cut the Q-tips or cotton into small segments and glue them between the spoons to represent joints. This will give your spoon skeleton a more realistic appearance.
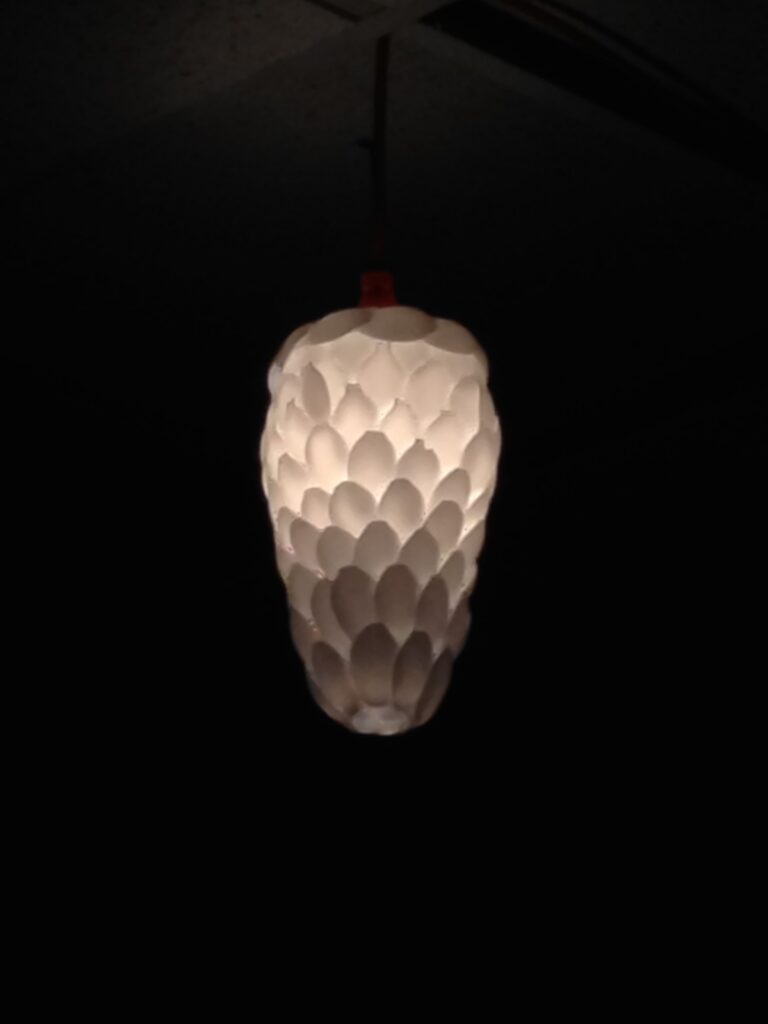
44. Pineapple lamp
If you don’t have a pineapple-shaped object, you can create a pineapple shape using a foam ball. Using a craft knife or scissors, cut off the handles of the plastic spoons, leaving only the bowl-shaped part. Paint the concave side of the spoon bowls with acrylic paint in a yellow or gold.
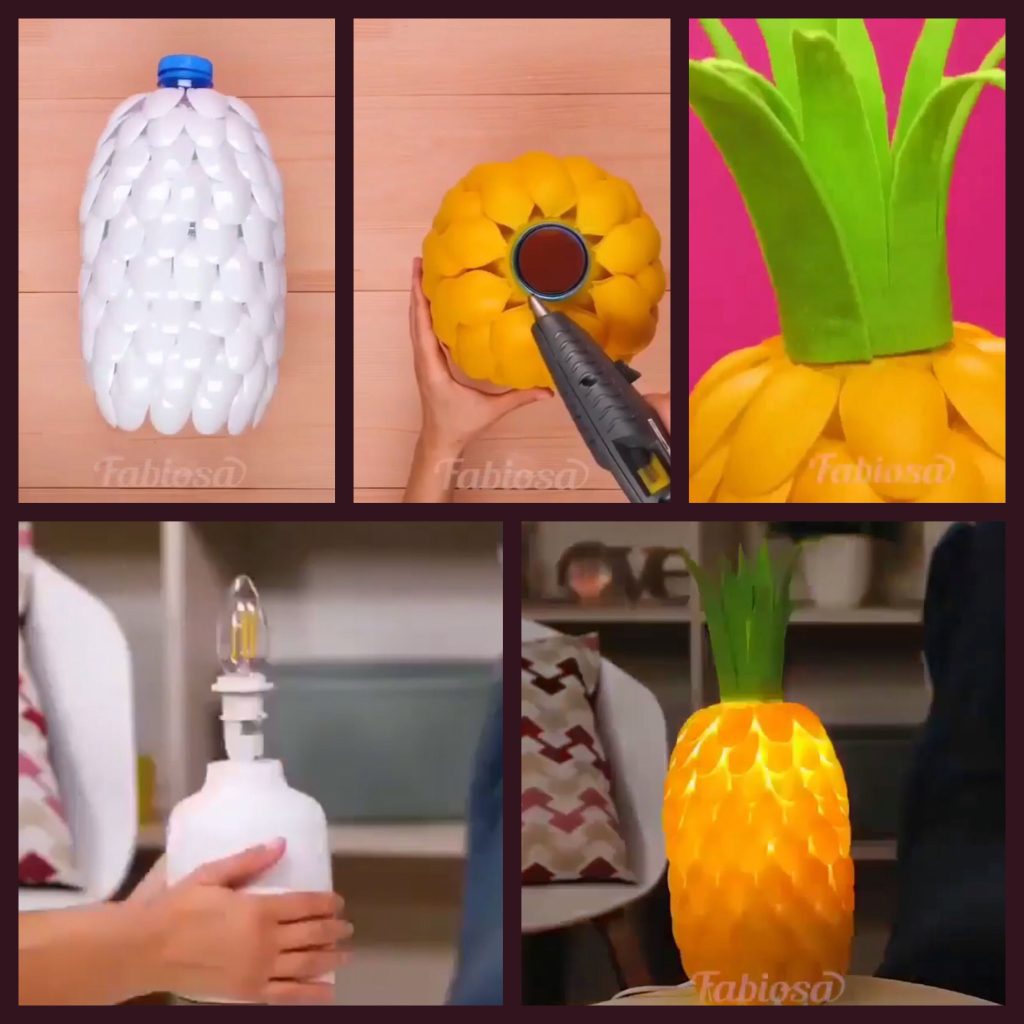
Place the spoons close together, slightly overlapping, to cover the entire pineapple shape. Attach the pineapple shape to the top of the lamp base. Ensure that it is centered and securely attached. Hold it in place until the gum sets.
45. Plastic spoon pot decoration
Choose colors that complement your spoon decorations or match your existing decor. Allow the paint to dry before moving the next step. Take the spoon heads and arrange them around the top rim of the pot. Ensure that the convex part of the spoon heads is facing outward.
Apply craft glue or use a hot glue gun to attach the spoon heads to the top rim of the pot. Once the glue and paint have dried, your decorated pot is ready to be displayed. Place your favorite plant or flowers inside the pot and position it in your desired location.