
40 Festive DIY Advent Calendars To Celebrate The Season With A Flurry Of Fun
The holidays are a time for family, friends, and fun. It’s a time for making or keeping traditions and being together with the ones you love. For some, an Advent calendar is a must each December. But, instead of buying one from the store, why not add some extra fun this year with a DIY Advent calendar?
There are plenty of great ideas out there that will get everyone in the spirit of the season. In this article, we’ll go through some of the creative ideas people have shared online. From using family photos to small treats, there are endless possibilities for a customized Advent calendar.
So keep reading to learn about some DIY Advent calendar crafts that are sure to please the whole family.
1. Envelopes for each day
Grab some brown envelopes — one for each day of December — and some small treats or gifts to put inside. To start, just set up the 24 envelopes in a grid. Before you put anything inside the bags, label them 1 through 24, and add stamps for some flair.
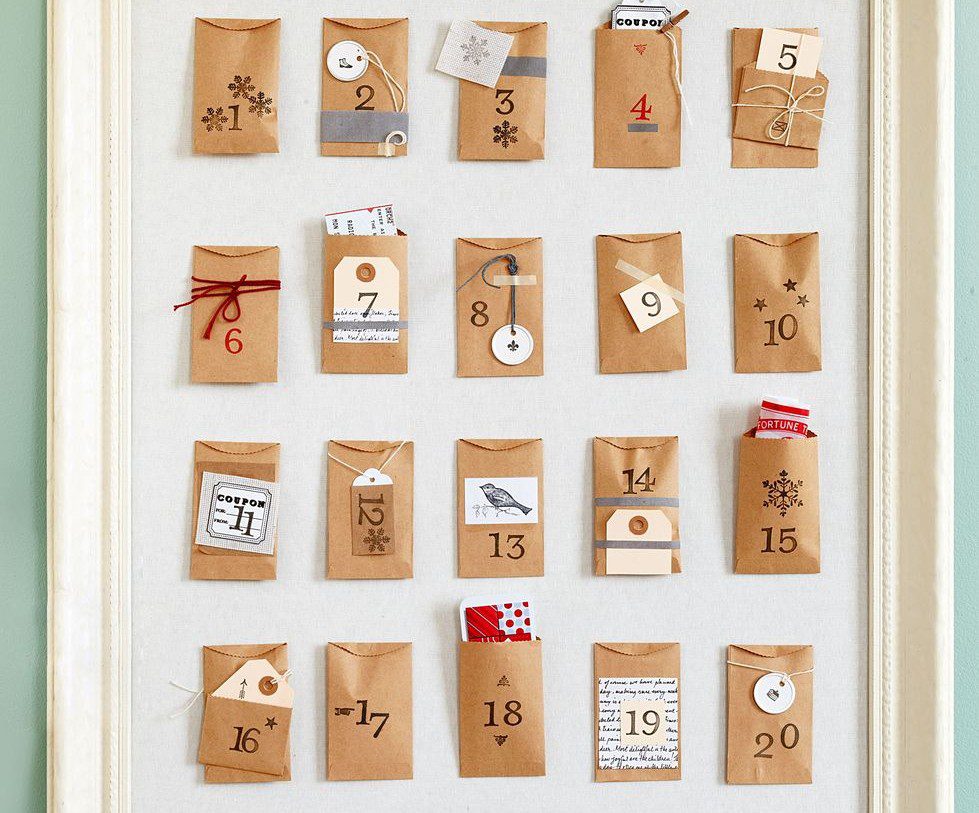
Put a small treat or gift in each brown envelope. To make the most out of this style, use gifts that can fit inside the envelope. That way, no one knows what’s inside until the day arrives. You can even color code the envelopes according to different family members.
2. Mini boxes
What could be more festive than opening a little door daily to reveal a tiny chocolate treat or an adorable present? This Advent calendar is perfect for Christmas! The mini boxes are just the right size for a sweet treat and are easy to set up anywhere in your house.

There’s something for everyone with 24 different flavors of chocolates or small Christmas gifts to choose from. And the best part? You can use simple white boxes or make them Christmas-themed with red, green, and gold paint. Needless to say, your kids will enjoy opening each box.
3. Mini trinkets
Why not get fancy this holiday season with your DIY Advent calendar? All you need are colorful mini trinkets, a sturdy piece of cardboard, and a hole punch. Simply use the hole punch to make 24 evenly spaced holes in your cardboard.
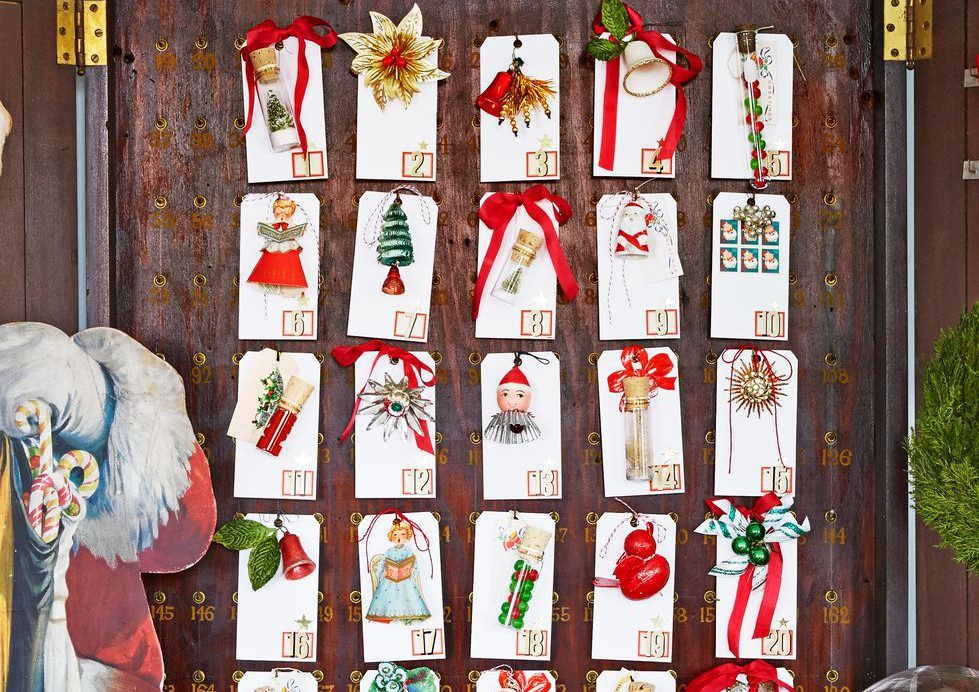
Then string the mini trinkets onto a piece of ribbon or twine. Hang the Advent calendar on your door or in a window, and start counting down to Christmas! Using trinkets from yesteryear will make your decor look more festive and authentic.
4. Fabric Advent calendar
Choose a festive fabric that will make your Advent calendar stand out. Think about colors and patterns that will match your Christmas decor. Decide on the overall design for your calendar, first. Will it be a traditional tree shape or something more unique?

Additionally, use tape or ribbon to create loops on the top of each pocket. It’ll allow you to hang your Advent calendar on the wall or door. Make sure to include a number for each day of December on the front of each pocket.
5. Vibrant paper bag advent calendar
This is a great idea for a Christmas Advent calendar! Instead of just counting down the days until Christmas, you can also have a little fun with it by opening up a new paper bag each day. Best of all, you can create custom bag designs. To start, get 24 paper bags.
You can use different colors and patterns for each bag or even add little decorations like stickers or washi tape. Or, you can make the bags yourself. Just print the calendar template on colored paper to stick to the smaller paper bags.
6. DIY felt truck
This Advent calendar is an exciting way to count down to Christmas with your little ones! It doesn’t just look adorable, but it’s also practical. The pockets are made of felt, so your child can play with them safely. Plus, they’re big enough to store small toys or treats inside.
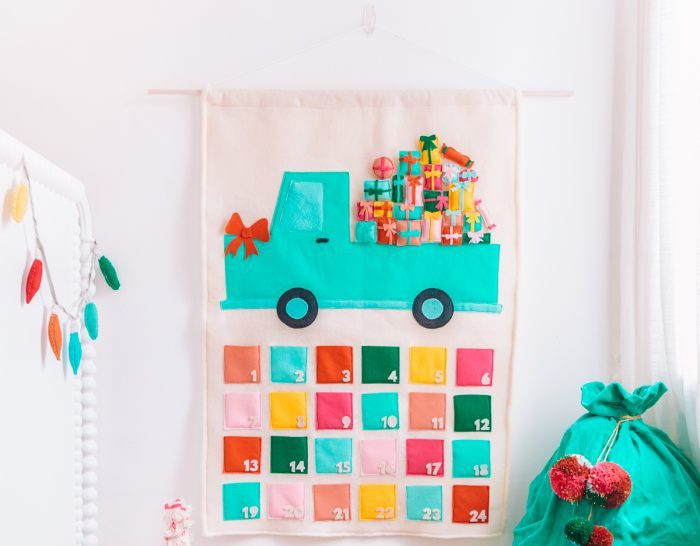
To make this Advent calendar, you’ll need 24 pieces of felt in different colors, scissors, a hot glue gun, glue sticks, and pins. Glue three sides of each square onto a larger piece of fabric. And, you can leave room on top for a unique design your kids will love.
7. Hanging fabric bags
You can get creative with the fabric bags and use different prints or colors to represent each day of Advent. If you’re looking for something simple, you can just use a plain fabric bag and tie a little ribbon or bow with a number tag around it to indicate which day it is.

If you like this idea but want a little more flair, you can try one of these ideas. You can add a small ornament or Christmas decoration to each bag. Or, cut out some simple Christmas shapes from different fabrics. Alternatively, you can write a different message or Christmas-themed activity on each bag.
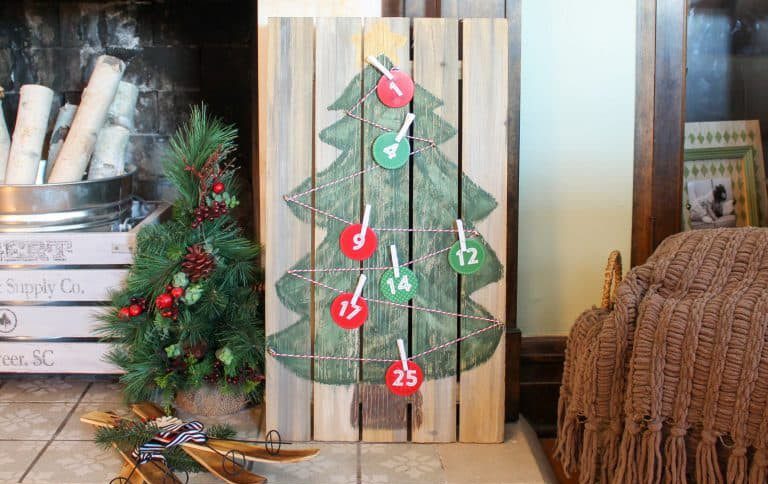
8. Wooden wall tree
Feeling rustic? This unique wooden wall tree Advent calendar features 24 individual bags, each one large enough to fit a small gift or candy. The slots are arranged in the shape of a Christmas tree, making it a perfect fit in any home.

You may make it from high-quality wood with a natural finish to complement any home décor. Best of all, it’s easy to assemble — simply nail each slot into place, and you’re ready to go! Add this beautiful Advent calendar to your holiday decorations and enjoy counting the days until Christmas.
9. Christmas tree Advent calendar
Staying on the theme of wooden crafts, you can use small blocks of wood to stand up your Advent cards. You’ll need some paper, a printer, something to cut the shapes out with scissors and a glue stick. Cut out the shapes on the colored pages.
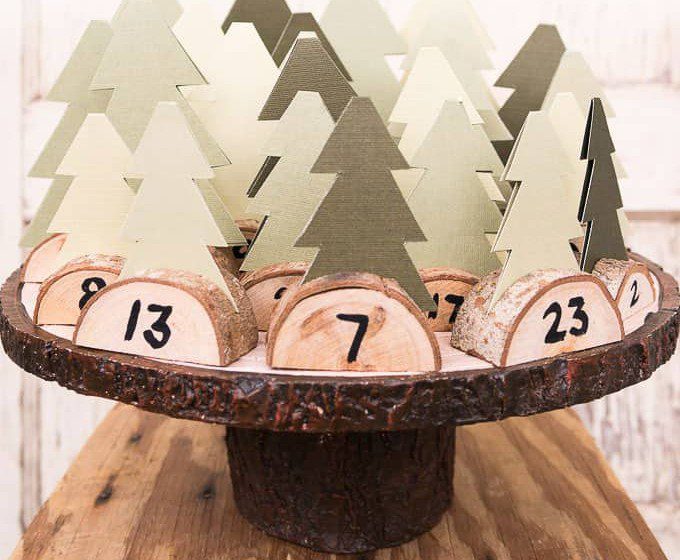
We recommend that you fold the page in half first so you can cut both sides at once. Inside each card, write a fun Christmas activity. When you’re ready, create a small slot in the wood blocks where you can nestle the cards.
10. Christmas village calendar
Why not forgo the usual chocolate Advent calendar this Christmas and make a festive village instead? It’s easy to do — just gather some small cardboard boxes (you can find these at most craft stores) and cut out windows in each one. Then, decorate the boxes with scrapbooking supplies or festive stickers.
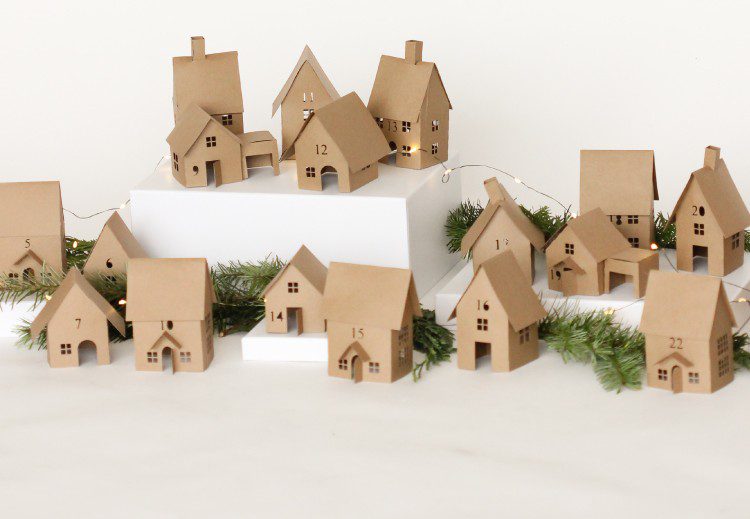
Use hot glue to attach a small LED light strand inside each window. Now your Advent calendar is ready to hang on the wall! Behind each window, you can include scenes of winter landscapes, families gathering around the tree, and Santa delivering presents.
11. Embroidery hoop calendar
All you need is an embroidery hoop, festive fabric, 24 little pouches, clothespins, and some ribbon. First, number each of the bags. You can use glitter glue to make them stand out more. Then, attach a few strands of ribbon across the hoop.

When you’ve got the backdrop fabric and ribbon set up, clip on your bags using the clothespins. Oh, and don’t forget to fill them with a little treat! For some extra fun, you can decorate the clothespins with festive colors.
12. Mason jar countdown
Mason jars are a staple of most craft stores, so it’s easy to source the materials for this DIY calendar. Start by painting the top half of 24 mason jars with numbers. While that’s drying, use some scrap wrapping paper to line the inside of the jar and fill the jar with a little surprise.
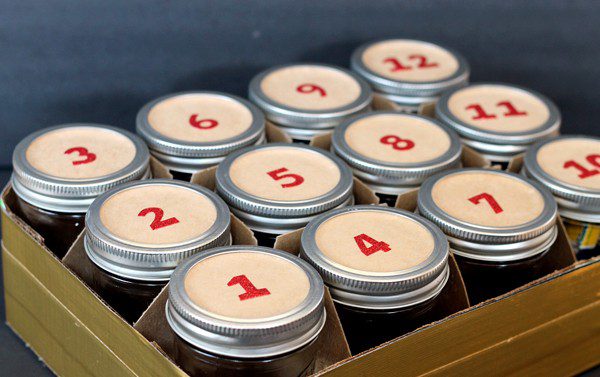
Tie a piece of jute or ribbon around the jar and use a hot glue gun to secure it in place. Now your jars are ready to be hung on your Christmas tree, over the fireplace, or anywhere around your home.
13. Recycled tin can calendar
If you like the idea of the mason jars but don’t want to spend any money, you can try the recycled tin can calendar. Not only is it super eco-friendly, but it’s also a lot of fun. Gather up some empty cans — make sure they’re clean and dry — and some festive stickers.
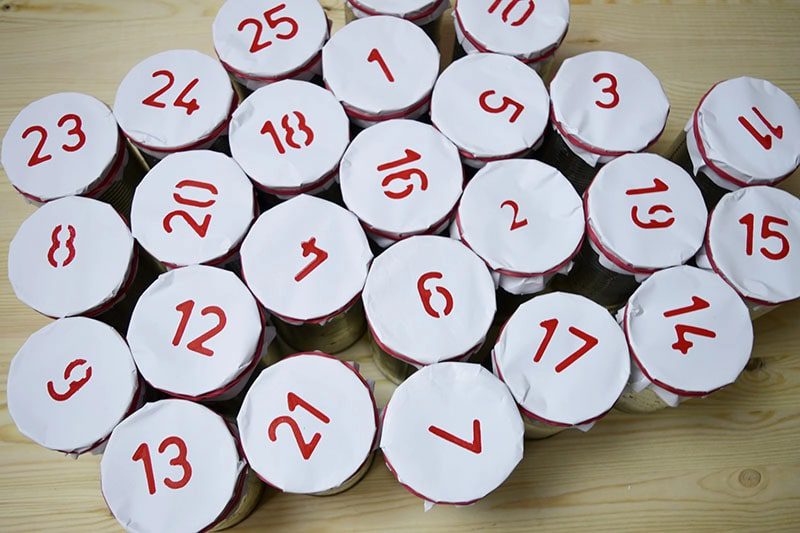
To make your calendar, start decorating each can with stickers or wrapping paper. You can use different patterns or colors for each day or keep it simple with one design for all 24 cans. Once they’re decorated, number the cans from 1-24 using a slightly oversized piece of paper that can be wrapped over the top of the cans.
14. Educational Advent calendar
Christmas is a family affair, so if you have nieces and nephews, we’re sure you want to do something special with them. Why not make an Advent calendar with them? For a kid-safe calendar, gather up some old magazines, some plain paper, stickers, paints, yarn, and a clothes hanger.
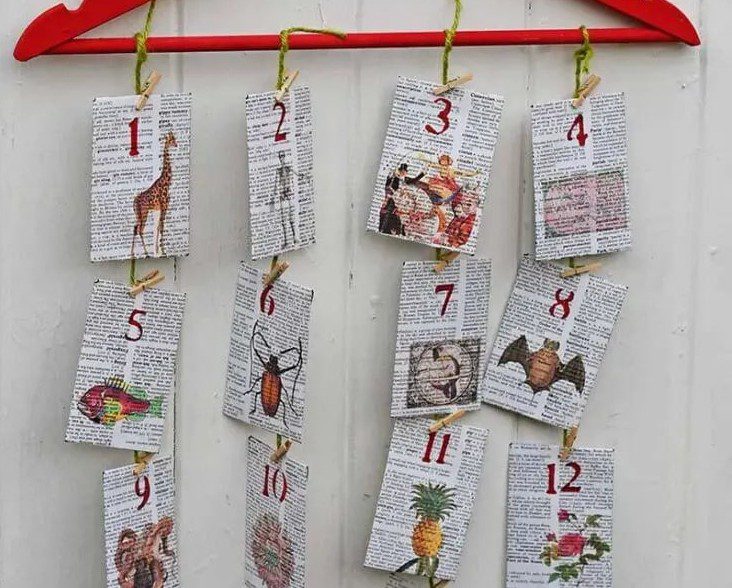
Cut 24 pieces from the magazines. You can use simple shapes or a funky Christmas tree shape. Then, let young ones decorate the paper — make sure they leave enough room to write the numbers. When they’re done, glue some plain paper with a fun activity to the back of the decorated magazines.
15. Scratch-off hunt
This year, for Christmas, why not try a new twist on the Advent calendar? Instead of a simple sheet of paper containing an activity, why not hide the instructions in plain sight? To make your own scratchcard Advent calendar, you’ll need a sheet of scratch-off stickers that’s available at office supply stores.

First, write out the activity on a sheet of paper and glue that to a wooden cut-out. Add a layer of clear tape to protect the activity. Then, cover it with a DIY scratch-off paint made with two parts acrylic paint and one part dish soap. When they’re dry, number them using a permanent marker.
16. Hanging paper bags
There are a few different options for making an Advent calendar using all sorts of materials. Some people like to use a wooden stick and hanging paper bags, while others prefer to use a fabric bag and pin it to a curtain or door.
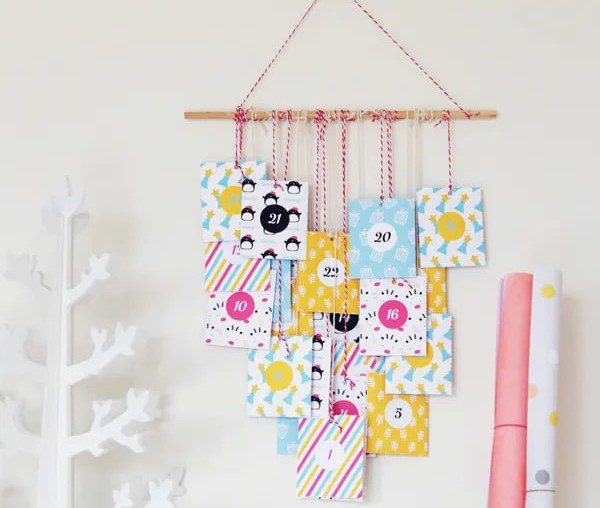
Hang paper bags (or any other lightweight material) in sequence from top to bottom on a string or ribbon. Write the days until Christmas on each bag, then hang them up. Every day, take down one bag and enjoy the festive surprise inside!
17. Bottle cap tree
Who would have thought of making an Advent calendar with recycled bottle caps? It’s a great way to use up all those bottle caps you’ve been collecting, and make a unique and eye-catching decoration for your home during the holidays. To make your bottle cap tree, choose a sturdy base.
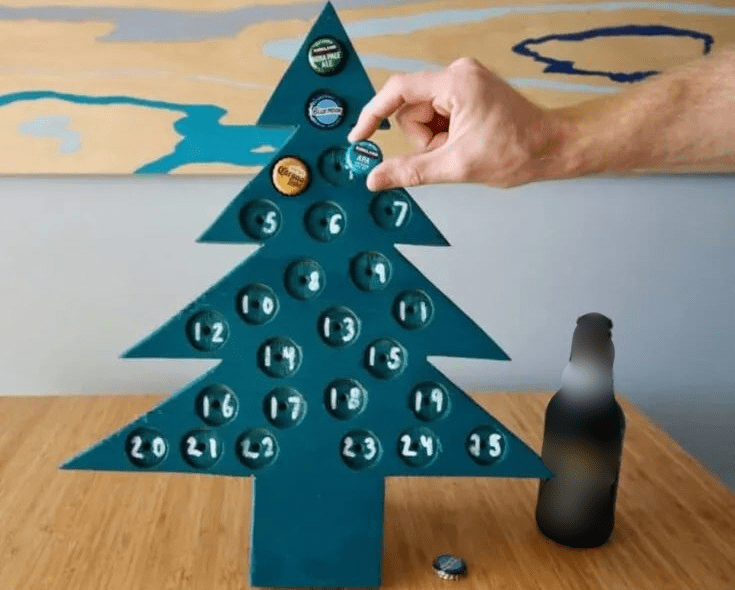
Grab enough bottle caps for the 24 days of the Advent calendar. Begin by drilling holes in the side of your mini tree to fit in the bottle caps. You may also add holiday decorations like bells, stars, ornaments, etc.
18. Nifty shoe organizer
Instead of using a traditional calendar with chocolate squares or little presents behind each door, why not use a shoe organizer instead? Hang the shoe organizer on the wall and fill each pocket with a small surprise or activity for each day of Advent.
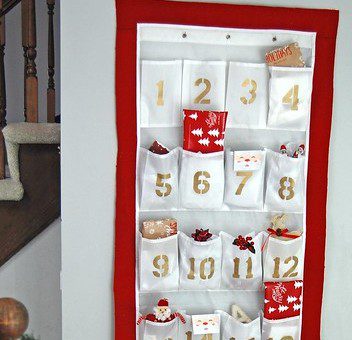
This could be something as simple as writing a Christmas-themed letter to Santa, baking gingerbread cookies, or watching one of your favorite holiday movies. With this fun and unique way to countdown to Christmas, you’re sure to have a festive and enjoyable season that too on a budget.
19. Chalkboard rustic calendar
We love the idea of creating a rustic chalkboard Advent calendar. To start, choose a magnetic board that’s at least 1/2 inch thick. Make sure the magnetism is strong enough to safely hold the magnets. Next up, get some magnetic boxes!
You can use pre-made magnetic boxes, or use hot glue to attach sturdy magnets to the back of DIY boxes. Using the chalkboard, write out the 24 days leading up to Christmas. Now all that’s left is to fill the boxes with surprises!
20. Brown paper bags
You need some brown paper bags, markers, and some tasty treats for this simple DIY. To make your calendar, start by drawing 24 numbers on the front of each bag. To make this craft really pop, you can use different designs for each day of Advent.

Next, fill each bag with a different treat or small gift. Brown paper bags are perfect for this because they’re sturdy and can hold a lot of weight. Finally, punch a hole in the top of each bag and tie it closed with a festive ribbon.
21. Wood pallet
It wouldn’t be a DIY list without at least one wooden pallet project. This recycled wooden pallet Advent calendar is a fun and easy way to get into the Christmas spirit. You can easily find reusable materials that would have otherwise gone to waste.
This is ideal if you need a last-minute Christmas calendar. Paint and markers easily adhere to wood, making it easy to decorate. As for the calendar, you can nail some string and clip your activities, or you can use glue and attach baubles containing treats.
22. Modern Advent calendar
This simple and sleek Christmas tree Advent calendar can be customized to your liking. Rather than struggling to draw the perfect fake tree, just use cutouts of a giant triangle and a small rectangle for the tree. We recommend that you use green, so it truly gives the impression of a tree.
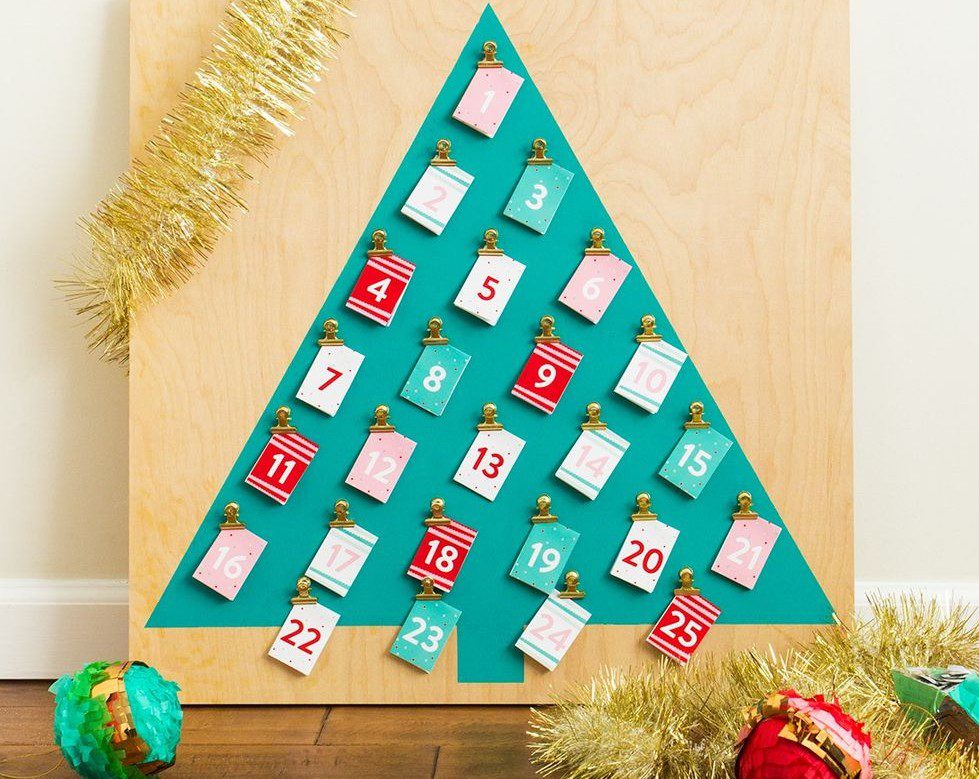
Paste the cut-outs on a poster board. Last but not least, glue 24 small clips throughout the “tree.” You can use binder clips or alligator clips. Once the glue has set, attach small cards containing activities or “redeemable vouchers” for a small gift.
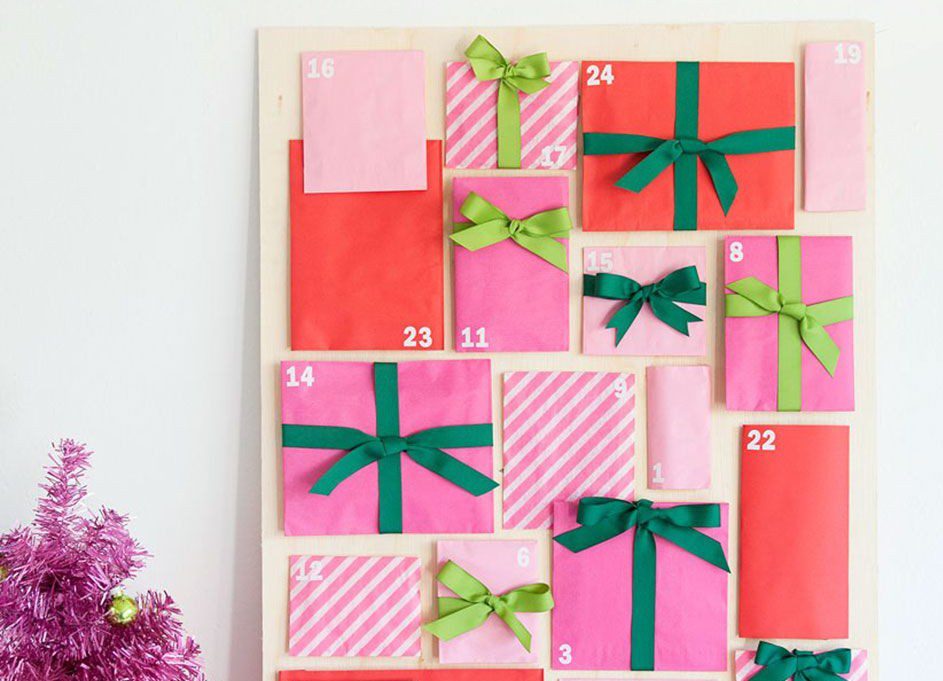
23. Monochromatic Advent calendar
This trendy monochromatic Advent calendar will be a chic addition to your Christmas decor! It’s perfect for those who love minimalist style. Plus, it’s easy to make — just use black, white, and gold paper tag cutouts. You can make or buy these.

Just print out the activities, cut them out, and tape them to the tags. Then, use a paper clip to hang the tag on a string. You can go with a theme and use black and white tags for activities and add golden and silver tags for fun gifts and treats.
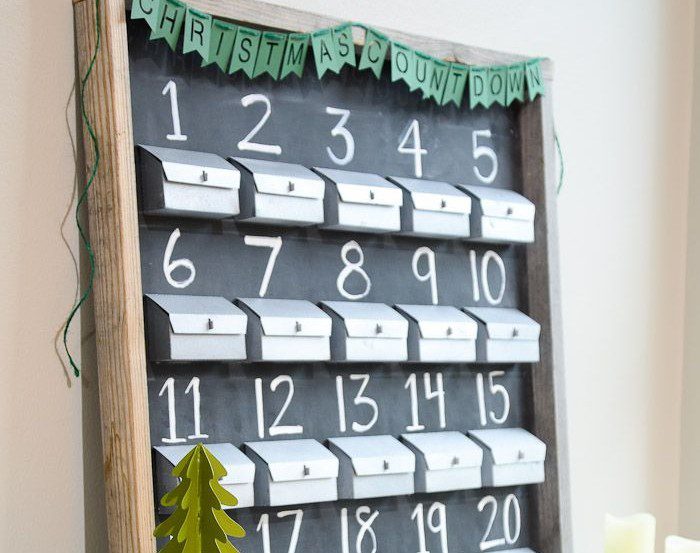
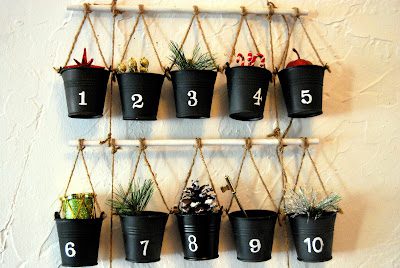
24. Galvanized garland
Get into the festive spirit with this creative Advent calendar idea. Hang a small galvanized garland of buckets on your wall and fill them up with goodies to open each day in December until Christmas. This easy DIY project is perfect for the whole family to get involved in.

Use same-size buckets or mix and match them as per the size of the gift and treat. Open them randomly to have more thrill leading up to the Christmas festivities. You may decorate this with red berries, fairy lights, and pine leaves.
25. Mini muffin tray calendar
Instead of a traditional Advent calendar where you open a little window or lift a flap each day to reveal something, you could use a mini muffin tray to create a festive display of 24 mini gifts, activities, or chocolates.
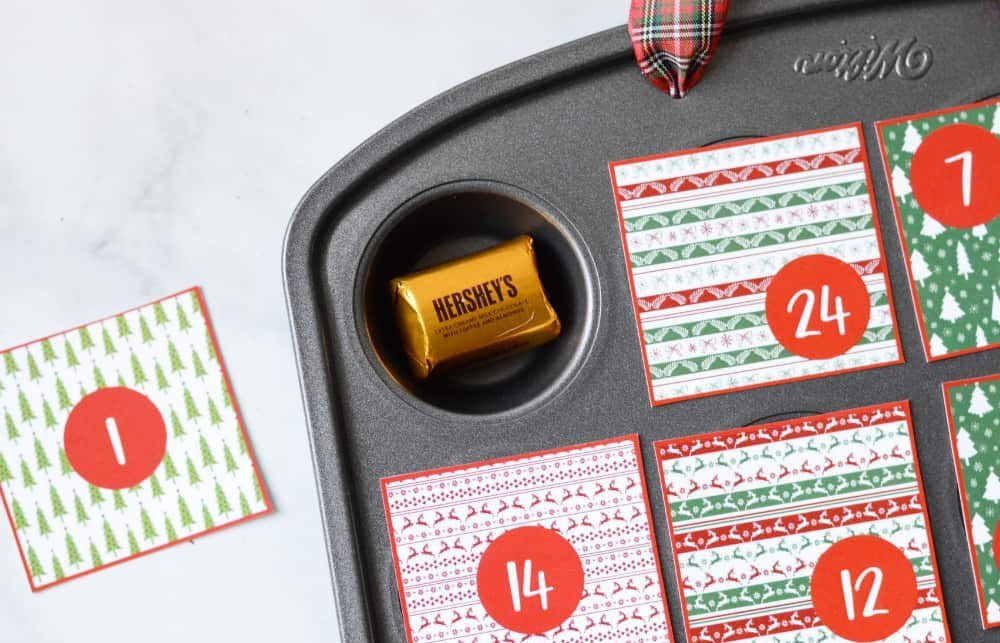
To make this Advent calendar, just make 24 mini treats in different colors and flavors. Sprinkle holiday spices like cinnamon, ginger, and nutmeg in each tin to give it a Christmas aroma. Finally, stack the surprises in numerical order and place them in the tray. Voilà – your very own Advent calendar!
26. Calendar over the fireplace
Out of all places in your home, hanging your holiday Advent calendar over the fireplace will give your home the perfect Christmas aesthetic. Skip the garland of beads and berries this season, and use this calendar for decor. You can also add some green leaves and a wreath over it.
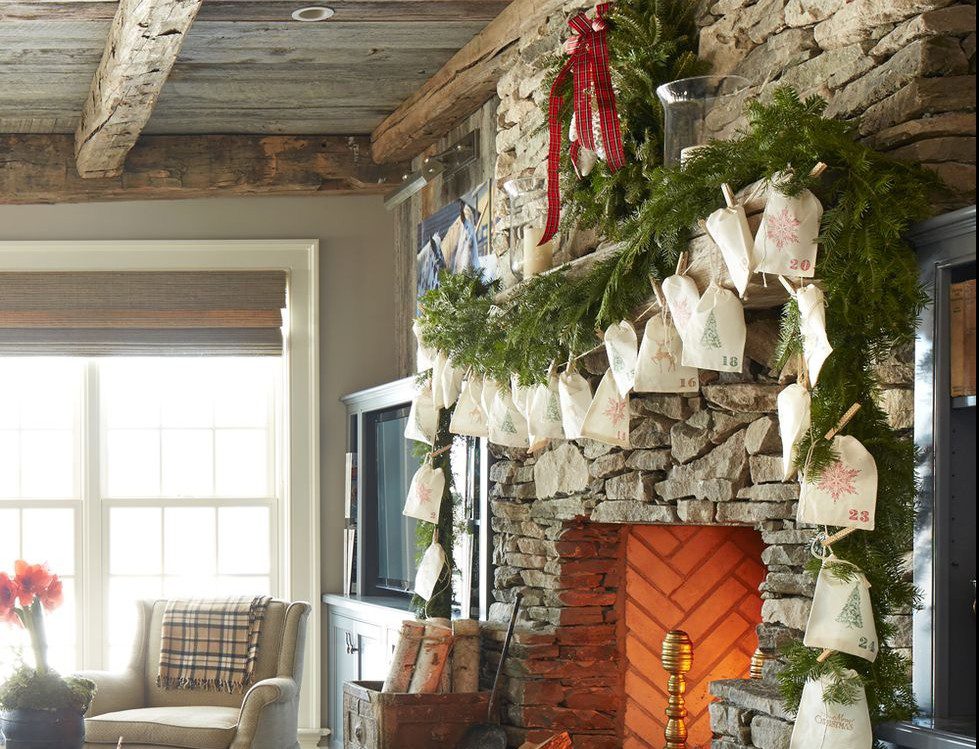
Make sure to use a fireproof material for the calendar. When attaching the hooks, ensure they are spaced evenly apart, so the pockets hang evenly. If you’re using a fabric calendar, be sure to use a warm iron to help set the fabric paint. Consider using holiday-themed ribbon or fabric for the pockets instead of construction paper.
27. Add ornaments
If you’re looking for some extra excitement, why not use a fillable ornament? You can find these at the store. Just crack them open, fill them with treats, and close them back up. You can even make a game out of it…

You can hide these among the “real” ornaments (the important family ones saved from the previous years) if your tree is already set up. Or, you can have them easily on display, and inside each bauble will have a card saying which ornament to hang up next.
28. Christmas lights garland
It’s super-easy to make your own Christmas lights Advent calendar! Just follow these simple steps. First, cut a piece of cardboard or poster board to the desired size. Trace 24 circles onto the cardboard, and then cut them out. Paint or color each circle in any pattern you like.
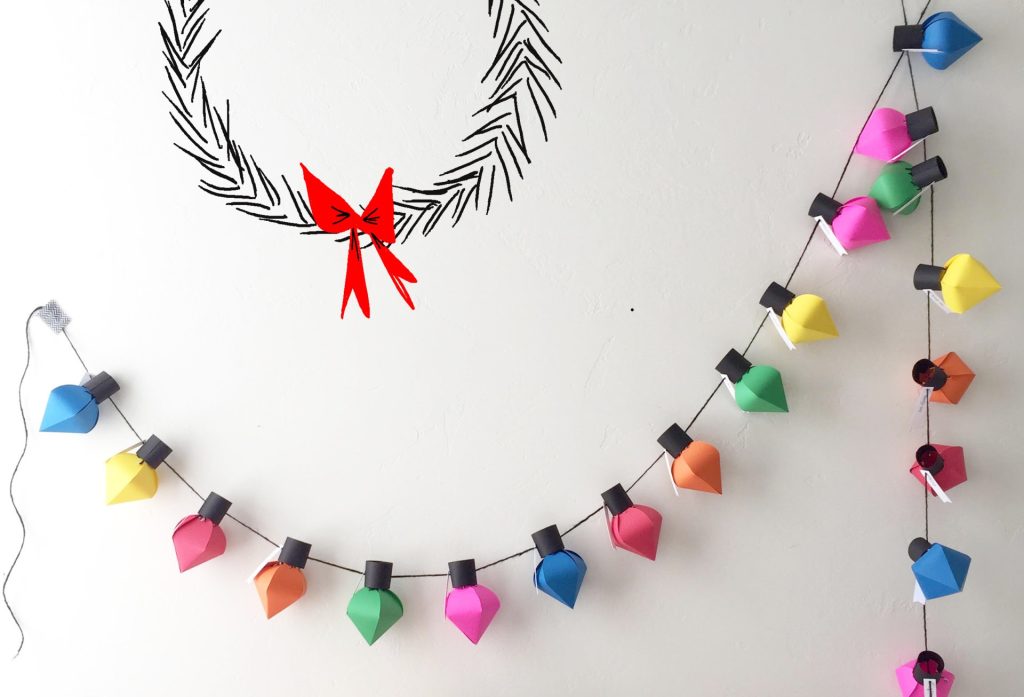
Once the paint is dry, create a hole at the top of each circle. Thread a piece of string through each hole, and tie a knot on the other side to keep them in place. Hang your calendar on the wall, and enjoy counting the days until Christmas!
29. Pegboard tree calendar
This craft takes a bit of patience, but it’s definitely worth it. You’ll need a pegboard, green paint, green yarn, paper, envelopes, and 24 small gifts or treats. You can freehand it or use a stencil for your tree. Then, thread a green yarn — ideally a matching color — through the board.
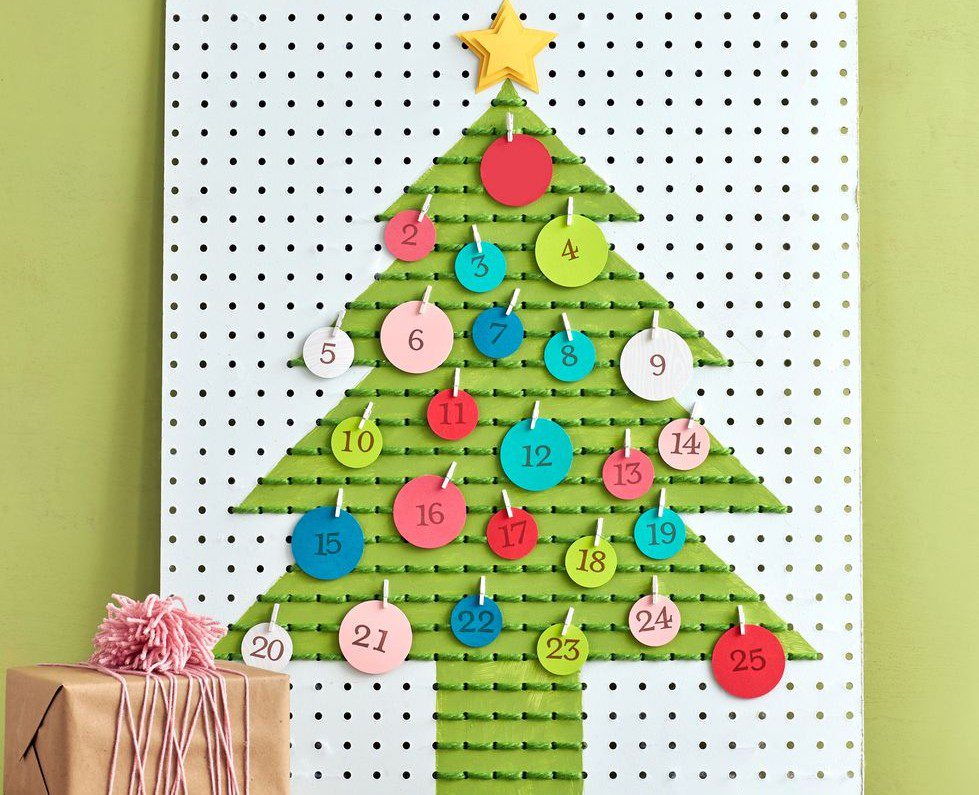
Starting at the top of the tree, count out 24 spaces and mark them with pegs. Attach a card and tie an envelope to the backside of the pegboard. On each day of Advent, cut the ribbon holding the numbered paper to the gift hidden behind the board. You can easily reuse this pegboard for multiple Christmas events.
30. Gumball machine creativity
Instead of using fillable ornaments, why not fill a few vending machine capsules with little presents or treats instead? That way, each day, you can open up a new capsule and enjoy something fun. Just make sure to wrap the capsules well, so they don’t spoil any surprises.
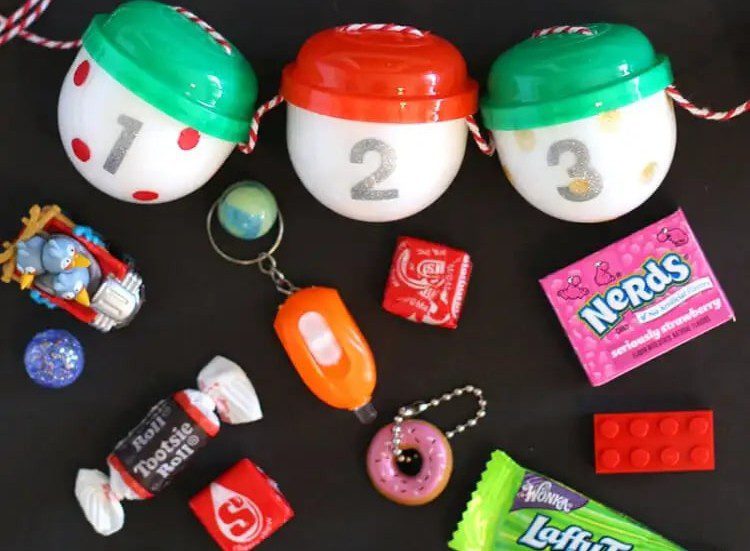
You can fill the gumball machine capsules with anything you like — candy, small toys, stickers, etc. And maybe put a limit on how many can be opened each day to help spread out happiness. Opening these will be a thrilling experience for all.
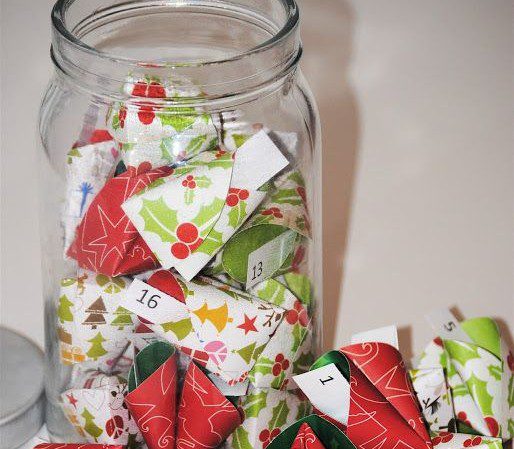
31. Blessing jar
If you don’t have a lot of space, you can use a jar of popsicle sticks as your Advent calendar. You’ll need popsicle sticks (if you don’t eat frozen treats, you can buy these at the store), a jar or vessel of some sort, permanent markers, and glitter (optional).

Write a different blessing or positive message on each stick. If desired, brush a light glue coating on each stick and then sprinkle with glitter. Let dry completely. Stick the sticks into the jar in any pattern you like. You can either do them randomly or create a specific design, like an Advent calendar.
32. Use an old shutter
Recycle an old shutter and use it as a Christmas Advent calendar. Or, if you have one as part of your household decor, you can use that! To do this, simply take 24 small envelopes to stick them in the shutter slats.
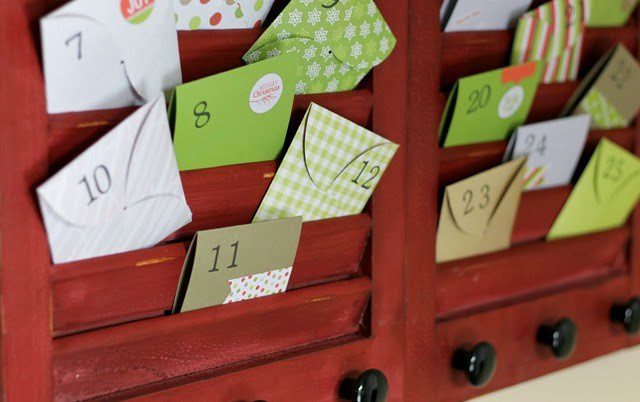
You can use a small piece of Scotch tape on the back of the envelopes to make the setup more sturdy. If you fill the envelopes with small gifts, make sure they’re not too full. Otherwise, the cards won’t stay in, and you’ll spoil the surprise.
33. Fortune cookies
What a unique Advent calendar! Each day, open a new fortune cookie to reveal a fun message or activity to do. This could be something as simple as watching a Christmas movie or making gingerbread houses or something more adventurous like going ice skating.
There are two ways you can make this Advent calendar. You can either make origami fortune cookies, or if you like to bake, you can make edible fortune cookies. If you choose the latter, make sure to follow the instructions and use the appropriate type of oven-safe paper.
34. Quick envelope calendar
If you’re on the hunt for a quick and easy way to create a festive calendar, why not try using envelopes? Simply take some plain white envelopes and number them from 1-24. Inside each envelope, place a card containing either an activity or a redeemable paper for a treat.
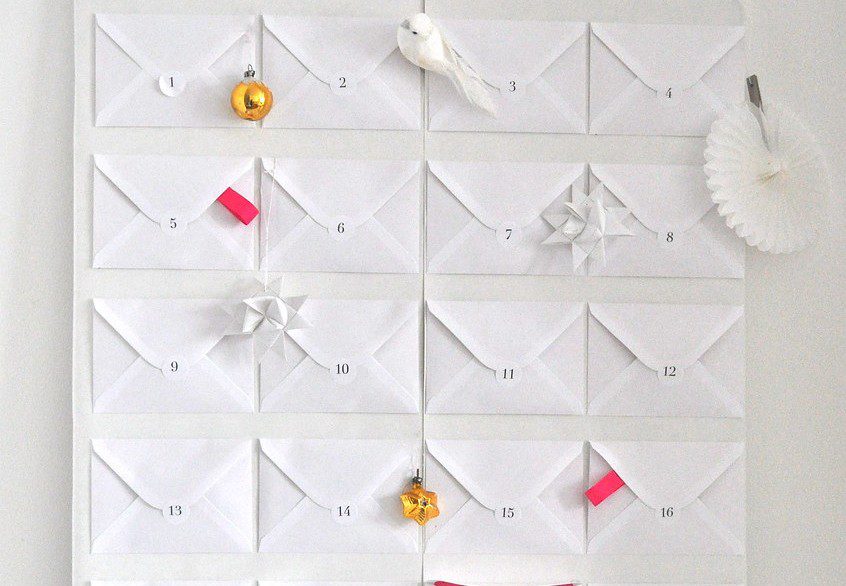
Once you have your envelopes lined up, you can let the kids go wild and put stickers all over the setup. To amp up the pre-Christmas excitement, match the number of treats to the envelope number. For example, 1 could be one Christmas movie to watch, 2 is two cookies, etc.
35. Mismatch boxes
It can be difficult to find the perfect Christmas Advent calendar; one that has a nice variety of treats and goodies for each day. But if you have some time, inspiration, and even a flicker of creativity, you can DIY one! For example, you could use a mismatched size box filled with goodies as a Christmas Advent calendar.
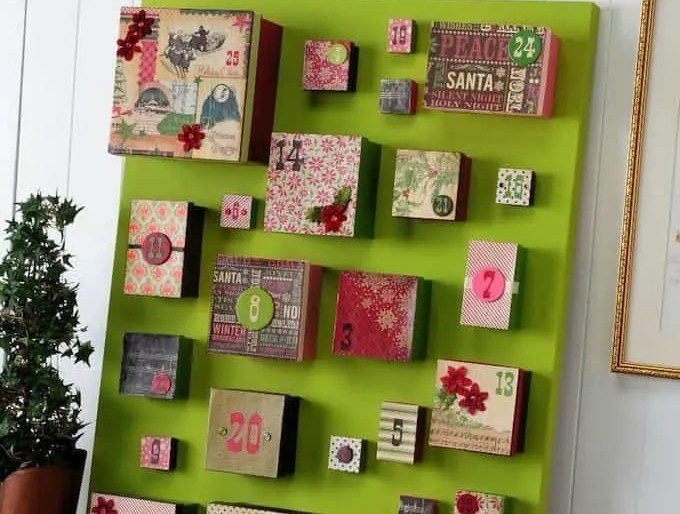
The best thing is that you can customize it to your own liking. So if you don’t like Christmas chocolate, you can fill the boxes with whatever treats you do like. Just open one each day from December 1st-24th to enjoy a little treat.
36. Hang some planters
You can use small hanging planters as your Christmas Advent calendar. Fill each planter with a different gift, such as a small toy, ornament, decoration, or even a festive plant. This is an excellent way to get into the holiday spirit and add some extra charm to your home décor.
The best part is that you can use this idea for every holiday — simply switch out the contents of the planters according to the season. So fill them up with Easter eggs, Halloween candy, or Christmas goodies! Enjoy the festive anticipation leading up to Christmas Day.
37. Starry garland Advent calendar
To make your own star garland Advent calendar, you’ll need 24 stars shaped boxes — you can find balsa wood boxes at a craft store, or make your own using cutouts from a poster board. Next, cut a length of string or ribbon that’s long enough to wrap around your tree several times over.
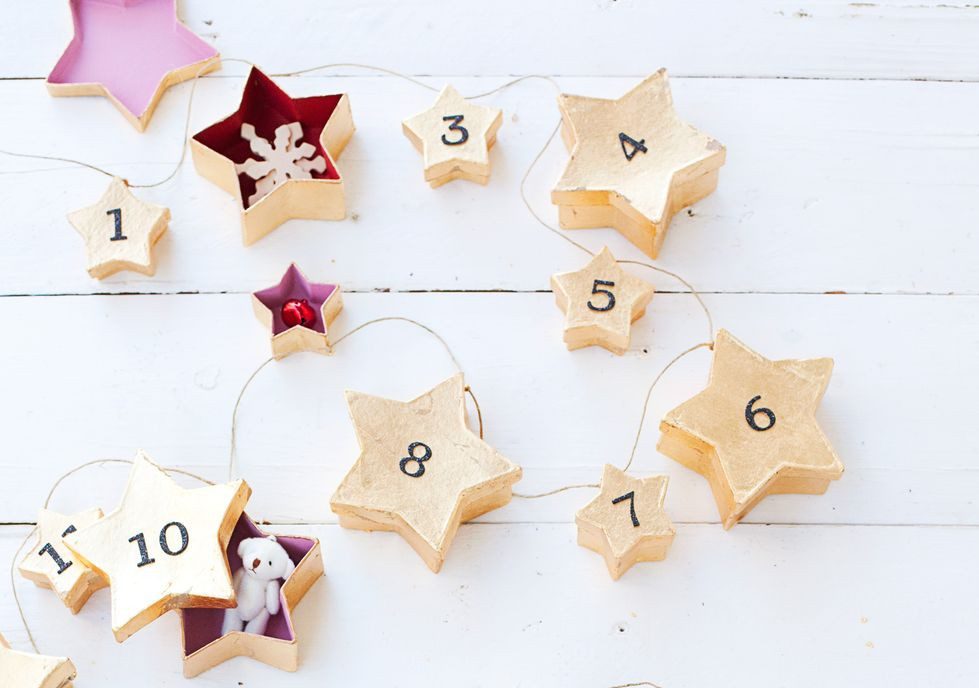
Connect the boxes to a string using tape or a stapler. Add a small surprise inside and use a small piece of tape to secure it shut. Number the lid of each box and wrap your masterpiece around your Christmas tree.
38. Holiday quiz printables
Kids are always eager to share new facts they’ve learned. Why not encourage their enthusiasm and support their learning by including holiday-themed quizzes in your Advent calendar? If you’re struggling to think of something, you can find plenty of printable questions online.

If you don’t have a lot of space in your home, you can fold the papers and put them in a jar. Alternatively, you can use these printables in any of the advent calendars detailed on this list! Who doesn’t love a versatile craft?
39. Toilet paper tube DIY
We’re back with another upcycled project. You’ll need some toilet paper tubes, crepe paper, stickers, ribbon, and candy. Cut 24 toilet paper tubes into 1-inch pieces. Cover each tube with construction paper and secure it with stickers. Use a ribbon or rubberband to hold the crepe paper in place.
Fill each tube with candy and/or small gifts. Stack the tubes labeled 1 through 21 so they form a triangle. Then, use the remaining three, stacked on top of each other, to make the “trunk” of the tree. Now you have a fun, tree-shaped calendar!
40. Punch box Advent adventure
Making a surprise punch box Advent adventure calendar for Christmas is a great way to add some excitement to the holiday season! Find a large cardboard box and cut 24 small squares from the top. Paint or decorate each square in a different color.
Cut 24 small rectangles out of colored paper and write an activity on each one to be completed in one day (examples: Make a gingerbread house, watch a Christmas movie, go shopping for presents, etc.). Roll up each rectangle and tape it closed. Punch a hole in the box to open up each square.